⚡ Key Facts
- Utility Backfeeding Risk: According to the Occupational Safety and Health Administration (OSHA), utility lineworkers face life-threatening electrical shock and electrocution from portable generators feeding unisolated power back into utility lines during repair operations.
- Grid Reliability Challenges: Data from the U.S. Energy Information Administration (EIA) reveals that American electrical utility customers averaged over five hours of power interruptions in recent years, driven heavily by severe weather events tracked by the National Oceanic and Atmospheric Administration (NOAA).
- Cost-Effective Alternative: A generator interlock kit serves as a budget-friendly manual transfer switch alternative, costing between $50 and $150 for hardware, compared to $500 to $1,500 or more for traditional multi-circuit transfer switch gear.
- Code Compliance Requirement: The National Electrical Code (NEC Article 702) strictly mandates a mechanical or automatic interlock device to prevent the simultaneous connection of utility power and an emergency standby generator.
- Carbon Monoxide Dangers: The Centers for Disease Control and Prevention (CDC) reports that over 400 Americans die annually from unintentional carbon monoxide (CO) poisonings, highlighting the critical rule that portable generators must operate at least 20 feet away from living spaces, regardless of how the panel is wired.
When an ice storm shears neighborhood preparedness network transmission lines or a summer heatwave collapses an overtaxed regional substation, the hum of an emergency portable generator brings immediate relief. Yet, connecting that portable power source directly to your home's complex electrical architecture demands respect, caution, and mechanical precision. Throwing an improvised patch together with dual-ended male "suicide cords" is an extraordinarily hazardous practice that risks catastrophic house fires, panel explosion, and fatal shocks to utility technicians working miles downstream. A generator interlock kit bridges the gap between rugged portable generation and clean, secure household distribution, transforming your existing service panel into a safe conduit for emergency backup power.
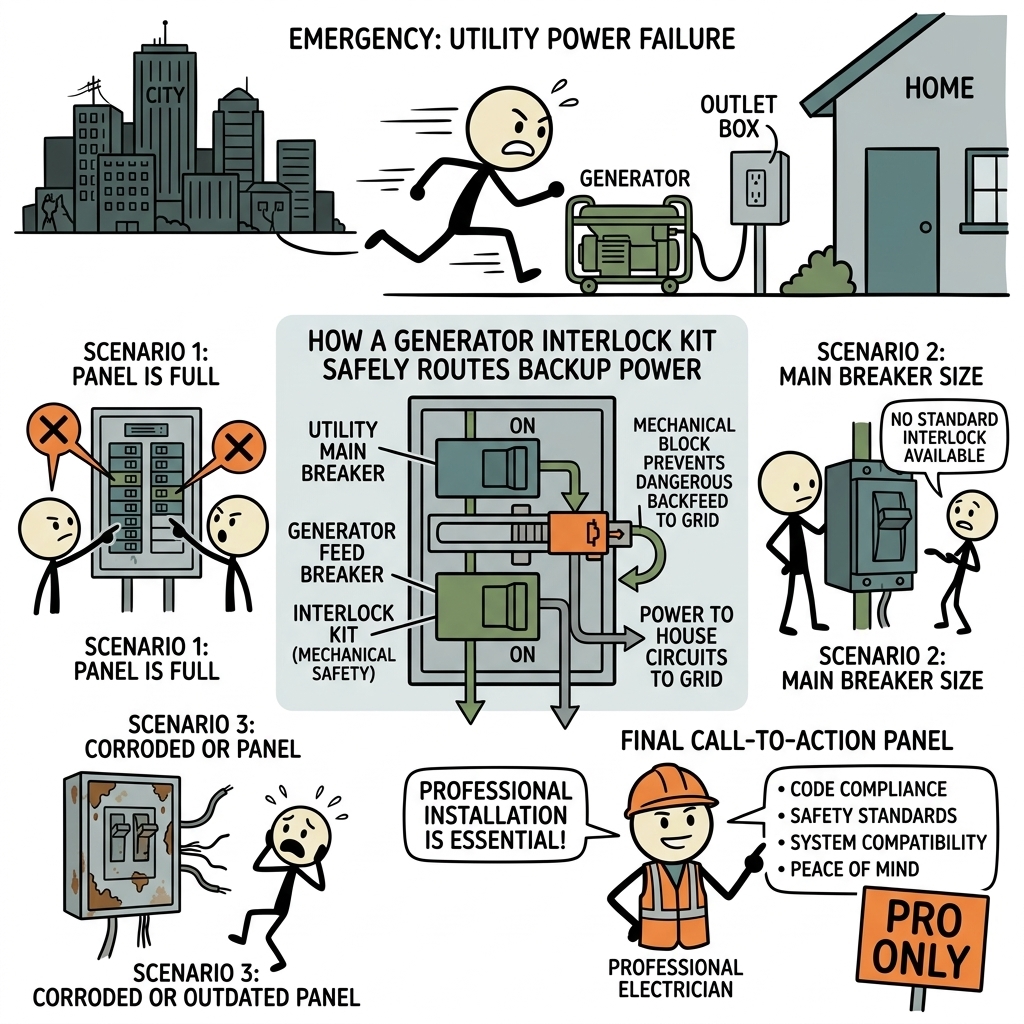
The Hidden Mechanics of Power Isolation: Why Interlocks Matter
Every home wired to the electrical grid receives alternating current through high-voltage utility lines, stepped down through a pole- or pad-mounted transformer to 120/240 volts before entering the main electrical panel. Inside that panel sits the primary service disconnect: a large double-pole circuit breaker that regulates every watt entering your household branch circuits. When grid power drops, introducing an alternate generator power source without severing that connection creates an immediate pathway for electrical current to flow backwards through your service drop. For the practical checklist side, use the community emergency preparedness guide.
This hazard, known technically as backfeeding, acts as an inverse transformer. A portable 240-volt generator feeding into a live utility line steps back up through neighborhood transformers to thousands of volts of lethal current. Utility lineworkers dispatched to repair downed lines operate under the reasonable assumption that isolated segments of the grid remain de-energized once local cutouts are opened. An unisolated home generator turns every downed conductor within its electrical footprint into an energized threat, violating federal safety regulations enforced by OSHA and the National Electrical Safety Code (NESC). For the practical checklist side, use the emergency communication plan.
Beyond external hazards, simultaneous dual-source connection invites explosive destruction inside your home. If utility power abruptly restores while your generator runs without mechanical isolation, the two independent AC waveforms will almost certainly be out of phase. The violent collision of opposing electrical currents can instantly vaporize circuit breakers, weld busbars, ignite structural wall framing, and grenade the generator's alternator assembly. A breaker panel interlock eliminates this possibility through pure mechanical constraint. For the practical checklist side, use the family emergency planning guide.
What Is a Generator Interlock Kit?
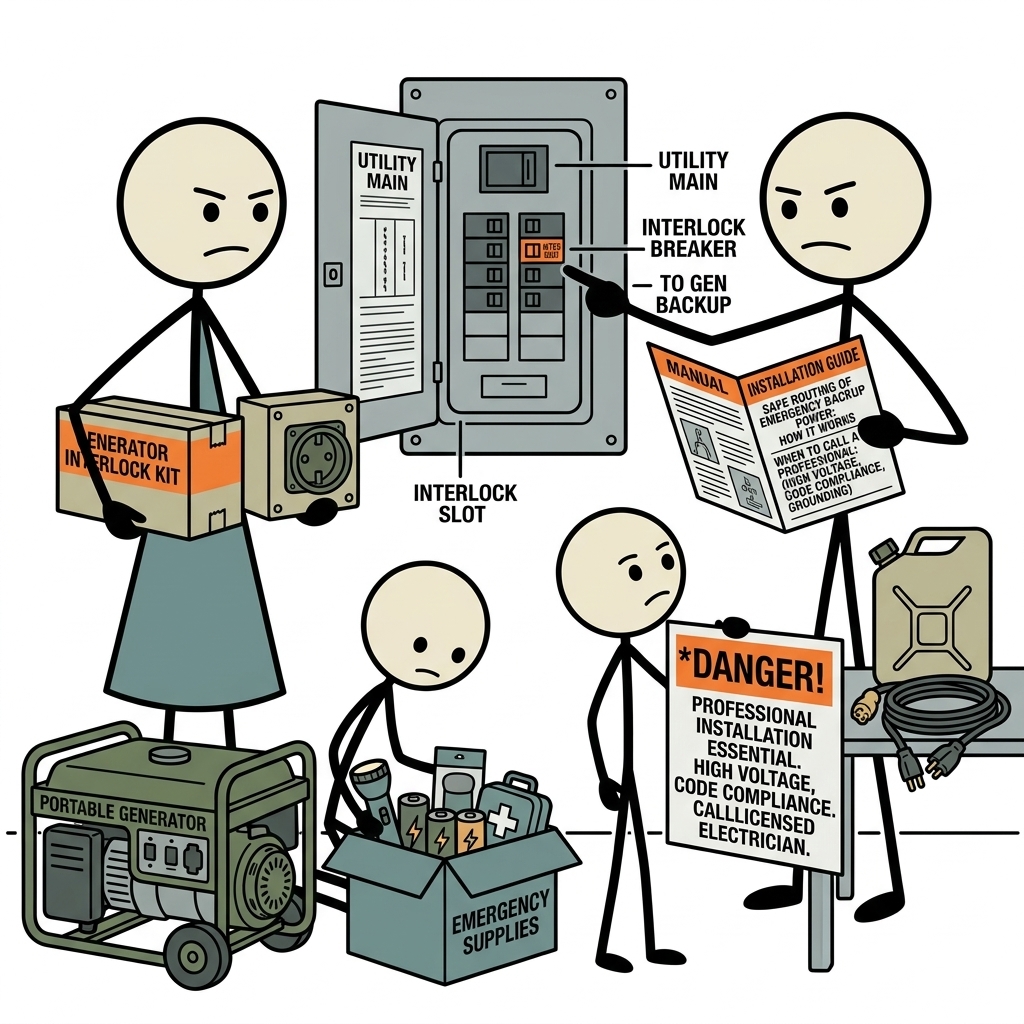
At its core, a generator interlock kit is an engineered mechanical safety plate fabricated from heavy-gauge anodized aluminum or stainless steel. It mounts directly over the front dead-front cover of your existing breaker panel, physically dictating the operating states of two critical switches: your home's main service breaker and a dedicated double-pole generator backfeed breaker. The device uses strict physical geometry rather than complex electronics to ensure that both power sources cannot remain closed simultaneously. For the practical checklist side, use the real-world emergency scenarios guide.
The operating logic behind an interlock plate is straightforward and failsafe:
- Utility Mode: The main utility disconnect is switched to the "ON" position. The physical body of the interlock plate is held in a position that blocks the generator breaker handle, making it mechanically impossible to toggle the generator breaker to "ON."
- Transition State: To supply power from your generator, you must first switch the main utility breaker to "OFF." With the main breaker disengaged, the interlock plate can freely slide, swing, or pivot upward into the vacant space left by the main breaker's handle.
- Generator Mode: Sliding the plate exposes the generator backfeed breaker handle, allowing it to move to the "ON" position. Crucially, the relocated plate now sits firmly against the main breaker handle, physically preventing it from being pushed back into the "ON" position while emergency power flows.
Because the mechanism is purely physical, there are no microprocessors to fail, no internal solenoids to seize, and no software routines to glitch during an atmospheric river or hurricane. It functions as an unyielding physical gatekeeper, maintaining strict air gaps between utility power and backup power at all times.
The Manual Transfer Switch Alternative: A Comparative Advantage
For decades, homeowners seeking legitimate electrical integration turned exclusively to multi-circuit manual transfer switches. These traditional units consist of a secondary metal enclosure installed adjacent to the main panel, populated with six to ten pre-selected circuit breakers and individual rocker toggles. While reliable, traditional transfer switches suffer from operational rigidity and high procurement costs.
A generator interlock kit serves as a superior manual transfer switch alternative for several distinct reasons:
- Full Panel Flexibility: A multi-circuit transfer switch locks you into powering only the circuits chosen during installation. If an unmapped circuit—such as a deep freezer in the garage, a nursery baseboard heater, or a septic aeration pump—requires power, traditional switches offer no practical path without rewiring. An interlock energizes the panel's entire copper busbar, allowing you to manually toggle any branch circuit on or off to match changing needs.
- Lower Equipment Footprint: Traditional transfer switches require substantial wall clearance beside the main distribution panel to mount a bulky secondary cabinet and route lengths of flexible conduit. An interlock mounts directly to the face of your current breaker panel, consuming zero additional square footage in tight utility closets or basements.
- Substantial Cost Efficiency: Dedicated transfer switch hardware frequently retails between $400 and $900 before factoring in complex junction-box labor. A precision-engineered, code-compliant breaker panel interlock bracket typically costs between $60 and $150, directing your preparedness budget toward fuel reserves or a higher-tier generator.
System Architecture: The Complete Circuit Topology
A generator interlock kit cannot function in isolation. The metal bracket represents just one component of an integrated electrical delivery pathway designed to safely route current from an exterior engine to interior household devices. Understanding how these elements connect ensures your emergency backup power system meets the standards set by the Federal Emergency Management Agency (FEMA) and the National Fire Protection Association (NFPA).
1. The Exterior Power Inlet Box
The pathway begins outside the dwelling with a weather-resistant, NEMA 3R or NEMA 4X rated power inlet box. Unlike a standard wall outlet that delivers power outward, an inlet box houses exposed male prongs recessed deeply inside an insulated sleeve. These heavy-duty male prongs safely accept the female end of an outdoor-rated generator power cord. Inlet boxes are typically rated for 30 amps (utilizing an industry-standard NEMA L14-30 connection) or 50 amps (utilizing a high-capacity CS6365 or NEMA 14-50 configuration), complete with spring-loaded, weather-sealed access covers to lock out driving rain, insects, and snow.
2. The Dedicated Feed Conductors
From the exterior inlet box, heavy-gauge copper conductors travel indoors toward the main breaker panel through rigid metal conduit, intermediate metal conduit (IMC), or non-metallic sheathed cable (Romex NM-B) sized appropriately for the load. For a 30-amp system, continuous runs require a minimum of 10 AWG copper wire; for a 50-amp system, code demands 6 AWG copper (or 4 AWG depending on distance, insulation thermal ratings, and conductor type). These conductors enter the service panel through an approved cable connector and terminate squarely at the dedicated generator backfeed breaker.
3. The Dedicated Generator Backfeed Breaker
Inside the breaker panel, a specialized double-pole circuit breaker acts as the direct docking point for the generator conductors. Unlike standard branch breakers that feed power outward to domestic circuits, this breaker acts in reverse, backfeeding incoming current directly onto the panel's hot busbars. Because this breaker is energized by an external source, NEC 408.36(D) strictly requires it to feature an approved hold-down retention kit—a mechanical screw, bracket, or fastener that anchors the breaker body firmly to the interior panel chassis, preventing accidental displacement when the panel cover is removed.
4. The Heavy-Duty Power Cord
The bridge between your portable generator and the inlet box is an industrial-grade rubber cord (typically rated SOOW or SJOOW for oil, ozone, and weather resistance). These cords utilize 4-conductor configurations: two ungrounded hot legs, one neutral conductor, and one equipment grounding conductor. Maintaining heavy-gauge cabling minimizes voltage drop across long runs, protecting sensitive household electronics like furnace control boards and refrigerator inverter compressors from brownout conditions.
Step-by-Step Blackout Protocol: Safe Operating Procedure
During an extended winter storm or sudden grid collapse, stress runs high. Navigating an electrical transition requires a systematic, repeatable operating procedure. Practicing this routine beforehand ensures safe execution even in cold, pitch-black emergency conditions.
Phase 1: Starting the Generator Outdoors
- Position the generator on a flat, dry, exterior surface at least 20 feet away from doors, windows, and fresh-air HVAC intakes, with the exhaust muffler directed downwind. Never run a generator in a garage, carport, covered porch, or breezeway.
- Inspect oil levels and fuel supply. Connect the heavy-duty four-prong power cord securely between the generator’s 120/240V twist-lock outlet and the exterior wall inlet box, twisting clockwise to lock the collar into place.
- Verify that the circuit breaker located on the control panel of the generator itself is in the "OFF" position.
- Start the generator engine and allow it to idle smoothly for three to five minutes until it reaches stable operating temperatures and steady output frequency (typically 60 Hz).
Phase 2: Transitioning the Breaker Panel
- Open your home's main electrical service panel door with a reliable flashlight in hand.
- Systematically shut down every individual standard branch breaker inside the panel, flipping handles to the "OFF" position. This deliberate step eliminates the risk of an aggressive inrush current stalling the generator when the panel is first energized.
- Firmly switch the large Main Utility Breaker to the "OFF" position. Your home is now fully severed from the municipal electrical grid.
- Slide the generator interlock kit plate upward (or downward, depending on your panel's model profile). The mechanism will glide into the empty pocket created by the open main disconnect, physically locking it down.
- Switch the dedicated generator backfeed breaker to the "ON" position. Your panel's main copper busbars are now energized by the external inlet lines.
- Return outside to the generator and flip the machine's primary output breaker to "ON."
Phase 3: Controlled Load Management
With the panel hot, reintroduce household electrical loads deliberately. Do not toggle every breaker on simultaneously. Prioritize critical survival circuits: your well pump, refrigerator, furnace fan, and medical equipment. Wait a few moments between toggling high-demand inductive loads to allow the generator's governor and automatic voltage regulator (AVR) to adjust to motor startup surges. High-draw luxury appliances—such as electric water heaters, clothes dryers, and central air conditioning compressors—should generally remain off unless you have calculated and confirmed your generator's starting and running wattage capacity.
When Professional Installation Is Essential
The mechanical simplicity of a generator interlock kit often tempts seasoned DIYers to take on the installation. While drilling a two-hole aluminum template through a detached panel cover falls well within basic workshop capabilities, installing the accompanying backfeed breaker, running heavy-gauge wiring, and managing service entrance safety present serious hazards. Even with the main breaker turned off, the thick service lugs feeding from the electrical meter remain energized with thousands of amps of available fault current. Contact with these exposed points can cause catastrophic arc-flash injuries or fatal electrocution.
Beyond baseline safety, specific panel configurations, physical clearances, and complex electrical conditions mandate installation by a licensed, insured electrician.
1. Crowded Panels Without Adjacent Breaker Spaces
For an interlock plate to physically block one breaker while freeing another, the generator backfeed breaker must sit in a precise, designated slot relative to the main disconnect. Most manufacturers design their kits around the top-right or top-left positions (slots 2 and 4, or slots 1 and 3) directly adjacent to or beneath the main service breaker.
If your panel is completely full of branch circuits, you cannot simply shove the generator breaker into any available slot at the bottom of the busbar. A licensed electrician must carefully audit the panel, determine whether the manufacturer permits tandem (space-saver) breakers, consolidate existing circuits, or relocate non-essential branch lines to a supplementary subpanel to create the needed space at the top of the busbar array.
2. Obsolete, Defective, or Split-Bus Electrical Panels
Millions of older homes across the United States still run on electrical infrastructure installed between the 1950s and 1980s. Certain vintage panels cannot safely accept a modern interlock kit:
- Federal Pacific Electric (FPE) Stab-Lok Panels: Extensive field research has demonstrated that FPE breakers frequently fail to trip under direct overcurrent conditions, creating severe fire hazards. Major interlock manufacturers do not support them, and installing an aftermarket kit on an FPE panel introduces severe liability and insurance coverage risks.
- Zinsco / Sylvania Panels: Known for their copper-plated aluminum busbars, Zinsco panels suffer from critical design flaws where breaker clips fuse to the busbar, leading to catastrophic panel fires. These panels should be upgraded to a modern platform rather than retrofitted with an interlock.
- Split-Bus Panels: Built prior to contemporary modern NEC updates, split-bus panels lack a single primary disconnect breaker. Instead, they rely on up to six individual main breakers (the "Rule of Six") to isolate the panel. Generator interlock kits require a single, centralized main breaker handle to secure mechanical lockout, making them incompatible with un-retrofitted split-bus systems.
3. Meter-Main Combos and Exterior Service Disconnects
In many regions—particularly across modern residential construction adhering to recent revisions of NEC 230.85—the home's primary electrical disconnect sits outside the house alongside the utility electric meter. If your main service disconnect is located on the exterior wall while your branch circuit distribution panel resides indoors in the basement, garage, or interior utility room, a standard indoor interlock plate cannot bridge both switches.
Navigating these meter-main assemblies requires deep code familiarity. An electrician must evaluate whether to mount an exterior-rated interlock at the meter enclosure itself, install an automated isolation relay, or configure a code-compliant transfer junction. Attempting a DIY workaround on an exterior service enclosure without utility company coordination is exceptionally dangerous, as these boxes cannot be completely de-energized without pulling the utility meter seal.
4. Neutral-Ground Bonding Conflicts
One of the most widely misunderstood aspects of residential emergency generation is system grounding and neutral bonding. Electrical code dictates that a home's neutral wiring and equipment grounding wiring must connect together at exactly one point: inside the primary service disconnect panel.
Portable generators generally ship in one of two configurations:
- Bonded Neutral: The generator's neutral wire connects directly to its metal frame at the factory.
- Floating Neutral: The generator's neutral circuit remains completely isolated from the machine's grounding frame.
If you connect a bonded-neutral portable generator to an electrical panel containing an interlock kit (which does not switch the neutral conductor), you create an illegal, hazardous condition known as a parallel neutral-to-ground path. This loop causes normal return currents to travel through equipment grounding wires, conduit, and chassis metal, potentially energizing appliance surfaces and generating nuisance trips on Arc-Fault (AFCI) and Ground-Fault (GFCI) breakers. A licensed electrician can test your specific generator, reconfigure it to a floating-neutral system where permitted by the manufacturer, and properly label the setup to preserve both equipment safety and code compliance.
5. Permitting, Inspection, and Homeowner's Insurance Realities
Electrical codes exist to protect human life and structural property. In almost every municipal jurisdiction across North America, altering a primary distribution panel, adding an exterior inlet receptacle, and integrating standby generation requires a formal electrical permit and subsequent inspection by the local Authority Having Jurisdiction (AHJ).
Unpermitted electrical work carried out by unlicensed individuals can invalidate your homeowner’s insurance policy. If a future electrical fire damages the property—even if the interlock kit was not the primary cause of ignition—insurance investigators who find unpermitted, non-code-compliant panel modifications may deny the claim outright. A professional electrical contractor secures permits, completes the installation within the bounds of local amendments to the NEC, and guarantees the safety of the work with a passing municipal inspection certificate.
Interlock Hardware: OEM vs. Third-Party Kits
When selecting the mechanical interlock plate for your panel, you will encounter two primary equipment pathways: Original Equipment Manufacturer (OEM) kits and specialized third-party fabricators.
Major electrical panel manufacturers—such as Square D (Schneider Electric), Siemens, Eaton (Cutler-Hammer), and Leviton—engineer proprietary interlock kits designed specifically for their distinct panel model lines. These OEM brackets undergo destructive laboratory testing to achieve Underwriters Laboratories (UL) or Intertek (ETL) listings. They mount cleanly into pre-drilled chassis holes on the panel face, ensuring reliable alignment with the main and backfeed breaker handles.
If your panel line is legacy or the original manufacturer has phased out specific accessories, third-party companies step in to fill the void. Reputable third-party fabricators use computer numerical control (CNC) laser cutting to mill heavy anodized aluminum plates matched to specific panel series and spacing dimensions. When sourcing a third-party kit, ensure the hardware comes backed by third-party testing documentation (such as UL 67 listing compliance). Avoid cheap, unbranded, stamped-metal kits sold across generic online marketplaces; imprecise drill tolerances or flimsy metal tabs can bend during emergency operation, defeating the lockout safeguard entirely.
Maintaining and Exercising Your Emergency Setup
Emergency hardware operates on the premise of infrequent, high-reliability deployment. An interlock plate that sits neglected for three years in a damp basement panel can gather dust, stick, or suffer from loose mounting hardware, leading to complications during an actual blackout. Establish a semi-annual maintenance routine to ensure operational readiness:
- Mechanical Inspection: Every six months, open the outer panel door. Confirm that the interlock plate slides smoothly between its utility and generator detents without binding or scraping excessively. Verify that the mounting hardware, whether threaded posts or high-tensile locking fasteners, remains tight and secure against the dead-front face.
- Breaker Exercising: Circuit breakers contain internal mechanical springs and silver-alloy contacts that can stiffen or corrode if left static for extended periods. During seasonal checks, turn off household loads and manually cycle both the main breaker and the generator backfeed breaker five to ten times to wipe the internal contact pads and verify positive snap-action mechanics.
- Inlet Box Cleanout: Walk outside to the power inlet box. Pop the spring-loaded dust cover, inspect the interior for wasp nests, cobwebs, or debris, and verify that the rubber gasket seal remains supple and uncracked. Apply a light application of dielectric grease to the male prongs if you live in high-humidity or coastal salt-air environments to prevent oxidization.
- Live Rehearsal: Every spring and fall, run a full live rehearsal. Wheel the generator out, hook up the heavy-duty cord, engage the interlock kit, and power the household for thirty minutes under real-world loads. This exercises the generator engine under an electrical demand, verifies that your family remembers the exact operational sequence, and confirms that all essential circuits respond properly before a major storm hits.
Resilience Rooted in Practical Safety
A resilient home relies on planning, reliable equipment, and rigorous attention to safety. A generator interlock kit provides a practical, code-compliant, and cost-effective approach to emergency backup power, eliminating the need to drape hazardous extension cords across living spaces or leave window seals compromised during severe weather. By establishing an unyielding mechanical barrier between municipal power lines and your emergency generator, an interlock protects your home's circuitry from conflicting phase strikes while shielding utility technicians working to bring the neighborhood grid back online.
Whether you have the electrical background to mount the system within safety guidelines or you partner with a licensed electrician to reconfigure an older, crowded panel, installing a breaker panel interlock is a smart upgrade for long-term self-reliance. When the next storm knocks out power across your county, you can stand confidently before your breaker panel, step through your protocol, and bring warmth, light, and safety back to your home.
Frequently Asked Questions
What is a generator interlock kit?
A generator interlock kit is a physical safety device installed on your main electrical panel that ensures the main utility breaker and the generator backfeed breaker cannot be switched on simultaneously.
Why is backfeeding power without an interlock kit illegal and dangerous?
Backfeeding without a mechanical interlock or transfer switch can send electricity back into the utility grid, which can fatally shock utility linemen working to restore power and destroy your generator when utility service resumes.
How does an interlock kit differ from a traditional transfer switch?
A manual transfer switch isolates a limited number of pre-selected circuits in a separate subpanel, while an interlock kit operates directly on your main panel, giving you the flexibility to toggle any individual breaker in the house within your generator's wattage capacity.
Can a homeowner install a generator interlock kit as a DIY project?
While the metal plate itself is mechanically simple, the installation requires adding a dedicated double-pole generator breaker, running heavy-gauge wiring to an exterior power inlet box, and working inside an energized panel, which typically requires electrical permits and professional installation.
When should you call a licensed electrician for an interlock kit installation?
You should call an electrician immediately if your panel has no empty breaker spaces, lacks a manufacturer-approved interlock kit, contains outdated wiring or main service equipment, or requires panel upgrades to meet National Electrical Code (NEC) standards.