⚡ Key Facts
- 95% Success Rate: According to the National Fire Protection Association (NFPA), portable fire extinguishers are highly effective, successfully extinguishing up to 95% of fires when used in their early stages by trained individuals. For the practical checklist side, use the community emergency preparedness guide.
- The Three-Minute Window: FEMA reports that a small residential fire can grow out of control and become fully engulfed in less than three minutes, making immediate access to an emergency fire extinguisher critical. For the practical checklist side, use the neighborhood preparedness network.
- Maintenance Deficits: Safety studies indicate that nearly 30% of fire extinguishers inspected in commercial and residential settings are either depressurized, blocked, or expired, highlighting a massive gap in emergency preparedness. For the practical checklist side, use the emergency communication plan.
- Kitchens as Ground Zero: The U.S. Fire Administration (USFA) notes that cooking is the leading cause of home fires and home injuries, accounting for 49% of all residential fires. For the practical checklist side, use the family emergency planning guide.
Imagine waking up at 2:00 AM to the shrill, piercing wail of a smoke detector. Within seconds, your brain registers the acrid smell of burning plastic coming from the home office down the hall. A power strip has overloaded, and small, blue-and-orange flames are beginning to climb up the curtains. In this high-stress moment, your survival depends on split-second decisions and the tools you have immediately at hand. This is where emergency fire extinguisher emergency preparedness transitions from a theoretical checklist to a life-saving reality. Having an emergency fire extinguisher nearby is only half the battle; knowing which type to use, where to find it, how to operate it, and—most importantly—when to abandon the fight and evacuate is what truly keeps you and your family alive. For the practical checklist side, use the real-world emergency scenarios guide.
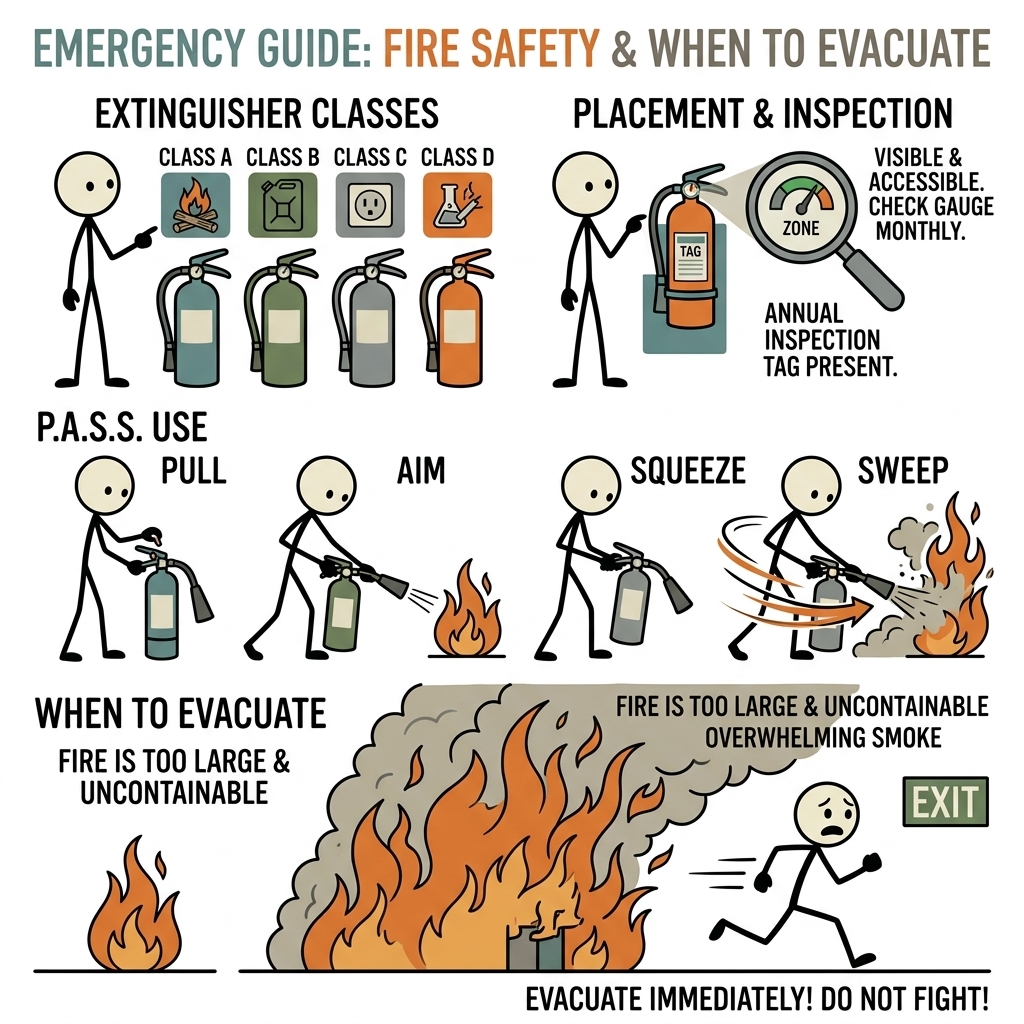
1. Decoding the Classes of Fire and Extinguishers
You cannot fight every fire with the same weapon. In fact, using the wrong type of extinguishing agent on a fire can have catastrophic results, such as causing an explosion, spreading the flames rapidly, or conducting high-voltage electricity directly back to you. To build a robust emergency preparedness plan, you must understand the five primary classes of fire defined by the NFPA.
Class A: Ordinary Combustibles
Class A fires involve everyday organic materials such as wood, paper, cloth, trash, and many plastics. These fires are typically extinguished by cooling the material below its ignition temperature or by smothering the oxygen supply. Water and multipurpose dry chemical agents are highly effective against Class A fires.
Class B: Flammable Liquids and Gases
Class B fires involve flammable liquids and gases, including gasoline, oil, grease, paint, solvents, propane, and butane. Never use water on a Class B fire. Water will sink to the bottom of the fuel, instantly vaporize into steam, and violently splash burning liquid across the room. Class B fires require smothering agents like carbon dioxide (CO2), dry chemicals, or clean agents that interrupt the fire's chemical chain reaction.
Class C: Electrical Equipment
Class C fires involve energized electrical equipment, such as appliances, computers, server racks, fuse boxes, and wiring. Because water conducts electricity, using a water-based extinguisher on a Class C fire presents a severe risk of electrocution. Once the electrical equipment is completely de-energized (unplugged or the breaker flipped), the fire technically becomes a Class A or B fire, but while it is active, non-conductive agents like CO2 or dry chemical are mandatory.
Class D: Combustible Metals
Class D fires involve combustible metals such as magnesium, titanium, zirconium, sodium, and potassium. These fires are highly specialized and typically occur in industrial environments, laboratories, or auto-repair shops handling specific components. Standard extinguishers will react violently with burning metals; instead, Class D fires require dry powder agents designed to crust over the metal and absorb the heat.
Class K: Cooking Media
Class K fires involve cooking oils, animal fats, and vegetable oils in commercial and residential kitchens. While similar to Class B fires, Class K fires involve extremely high temperatures and require specialized wet chemical extinguishers. These agents work through "saponification," converting the burning fat into a non-combustible soap-like foam that cools the oil and seals out oxygen.
Choosing the Right Extinguisher for Your Home
For residential use, the most versatile option is a multi-purpose ABC dry chemical extinguisher. These are charged with monoammonium phosphate, which coats Class A materials, smothers Class B liquids, and does not conduct electricity (Class C). However, they leave a highly corrosive, messy residue. For kitchens, keeping a dedicated Class K or a specialized kitchen-safe extinguisher is highly recommended by safety agencies like the American Red Cross.
---2. Strategic Placement: Where to Install Your Extinguishers
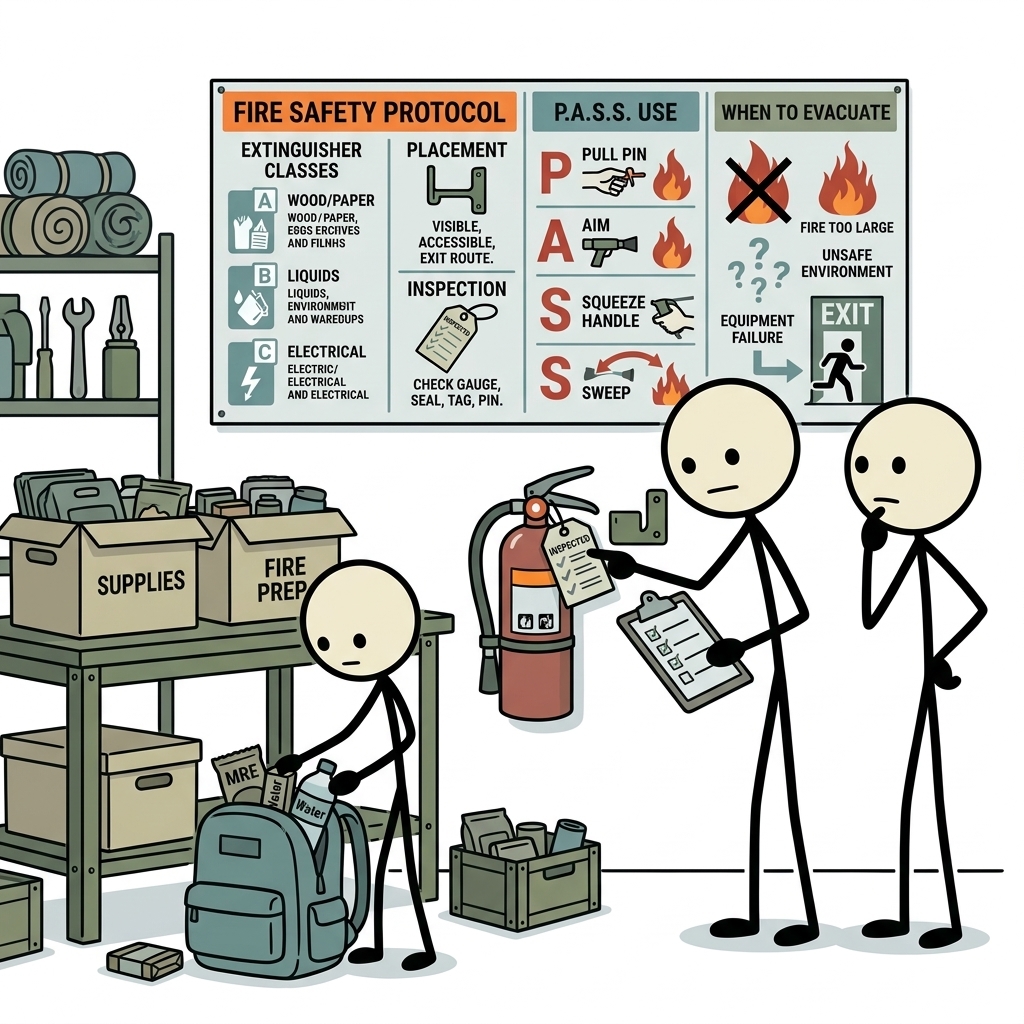
During an active fire, every second wasted searching for an extinguisher increases the risk of property loss and death. Strategic placement is not about hiding extinguishers out of sight; it is about keeping them visible, accessible, and positioned along natural escape routes.
The Golden Rule of Travel Distance
The NFPA 10 standard outlines specific guidelines for the placement of portable fire extinguishers. In residential settings, you should never have to travel more than 75 feet to reach a Class A extinguisher, and no more than 30 to 50 feet for Class B or Class K hazards. A good rule of thumb is to have at least one working extinguisher on every level of your home, including the basement and attic.
Key Locations for Installation
- The Kitchen: Since nearly half of all home fires start in the kitchen, this is your primary defense zone. Do not mount the extinguisher directly above or next to the stove, as a grease fire would prevent you from reaching it. Instead, mount it 10 to 15 feet away, near the kitchen exit.
- The Garage or Workshop: Garages are hotbeds for flammable liquids, power tools, and electrical systems. Place a heavy-duty ABC or BC extinguisher near the exit door of the garage so you can grab it as you retreat toward safety.
- The Utility Room / Furnace Area: Water heaters, HVAC units, and electrical panels are common sources of electrical and gas fires. Mount an extinguisher just outside the entrance to these utility spaces.
- Sleeping Quarters: If a fire breaks out overnight, you need to be able to fight your way out of your bedroom. Keep a small personal extinguisher mounted near the master bedroom door or under your bedside table.
Mounting Height and Visibility Guidelines
Extinguishers must never be left loose on the floor where they can be knocked over, damaged, or buried under clutter. They should always be mounted on wall brackets with their carrying handles clearly visible. According to OSHA and NFPA standards:
- Extinguishers weighing under 40 pounds should be mounted so the top of the canister is no more than 5 feet (1.5 meters) above the floor.
- Extinguishers weighing over 40 pounds must be mounted lower, with the top no higher than 3.5 feet (1 meter) above the floor.
- The bottom of the extinguisher must always clear the floor by at least 4 inches to prevent moisture accumulation and rust.
3. The Ultimate Emergency Fire Extinguisher Checklist
A fire extinguisher is a pressurized vessel that can degrade over time. Seals dry out, pressure leaks away, and chemical powders can clump together into a solid block. To ensure your equipment operates perfectly when you need it most, you must implement a structured emergency fire extinguisher checklist.
Monthly Visual Inspections (The 5-Point Check)
Set a recurring calendar reminder on the first of every month to perform this quick, five-point visual inspection of every unit in your home or facility:
- Accessibility: Ensure the extinguisher is highly visible, unobstructed by coats, boxes, or furniture, and that its location marker is clear.
- Physical Integrity: Examine the canister for signs of physical damage, rust, corrosion, dents, or leaks. Inspect the hose and nozzle to ensure they are free of cracks, dry rot, and blockages (such as spider webs or debris).
- The Pressure Gauge: Look closely at the dial. The needle must point directly within the green operating zone. If the needle has drifted into the red "recharge" or "overcharged" zones, the unit must be serviced or replaced immediately.
- The Tamper Seal: Verify that the safety pull-pin is securely in place and held by the plastic tamper seal. If the seal is broken or missing, the unit may have been partially discharged.
- The Powder Shake: For dry chemical extinguishers, invert the canister and shake it vigorously a few times. This prevents the chemical powder from settling and compacting at the bottom due to gravity and vibrations.
Professional Inspections and Maintenance Schedules
While monthly checks can be done by anyone, long-term maintenance requires professional intervention. The NFPA mandates specific timelines for deeper testing:
| Maintenance Type | Frequency | Description |
|---|---|---|
| Professional External Maintenance | Annually (Every 1 Year) | A certified technician inspects mechanical parts, checks the agent weight, and verifies internal pressure. |
| Internal Maintenance (6-Year Drawdown) | Every 6 Years | Stored-pressure extinguishers are completely emptied, inspected internally, refilled, and repressurized. |
| Hydrostatic Testing | Every 5 or 12 Years | The shell is pressure-tested using water to ensure there are no microscopic structural weaknesses in the metal. (5 years for CO2/Wet Chemical; 12 years for Dry Chemical). |
4. The PASS Method: How to Operate Under Pressure
When a fire occurs, your body undergoes an immediate physiological stress response: your heart rate spikes, your breathing shallowing, and your fine motor skills degrade. To overcome this panic, emergency responders rely on simple, repetitive training. The universally accepted standard for operating an emergency fire extinguisher is the PASS method.
Before you approach the fire, verify that you have a clear, unobstructed escape path at your back. Never let the fire get between you and your exit. Stand approximately 6 to 8 feet away from the flames, and execute these four steps:
P - Pull the Pin
Hold the extinguisher upright. Locate the metal ring pin near the handle. Pull the pin firmly to break the plastic tamper seal. This unlocks the squeeze lever and prepares the canister for discharge. Do not squeeze the handle while pulling the pin, as the pressure will lock the pin in place.
A - Aim Low
Point the nozzle or hose directly at the base of the fire, not at the flames themselves. A common mistake is aiming at the rising smoke and fire; this will do nothing to put out the source of the fuel. You must target the physical material that is actively burning to starve the chemical reaction.
S - Squeeze the Lever
Squeeze the heavy metal handle or lever slowly and evenly. This releases the pressurized gas inside the canister, forcing the extinguishing agent out through the nozzle. Most residential extinguishers will fully discharge their contents in 10 to 20 seconds, so make every second count.
S - Sweep Side to Side
Using a smooth, controlled motion, sweep the nozzle back and forth across the base of the fire. As the flames closest to you begin to die down, carefully step forward—maintaining your distance—and continue sweeping until the fire is completely extinguished. Keep a close eye on the area for several minutes afterward to ensure it does not spontaneously reignite.
---5. Fight or Flight: Knowing When to Evacuate
The most critical aspect of emergency fire extinguisher emergency preparedness is knowing when to put the extinguisher down and run. Property can be replaced; your life cannot. The American Red Cross and FEMA emphasize that portable extinguishers are meant solely for small, localized, early-stage fires. If you attempt to fight a fire that is too large, you risk carbon monoxide poisoning, severe burns, or getting trapped.
The Wastebasket Rule of Thumb
As a general safety guideline, if the fire is larger than a standard household wastepaper basket, do not attempt to fight it. A fire of this size generates more heat and toxic smoke than a standard portable extinguisher can safely handle. If the flames have reached the ceiling, are climbing the walls rapidly, or have spread across multiple pieces of furniture, evacuate immediately.
The Evacuation Checklist: When to Walk Away
Abandon your firefighting efforts and evacuate immediately if you encounter any of the following conditions:
- The Room is Filling with Smoke: Smoke inhalation is the leading cause of death in residential fires, not actual burns. Modern synthetic materials release highly toxic gases, including hydrogen cyanide and carbon monoxide. If you cannot see clearly or find yourself coughing, drop the extinguisher and get out.
- Your Escape Route is Threatened: Always fight a fire with an exit directly behind you. If the fire begins to spread around you, or if smoke threatens to block your only way out, retreat immediately.
- The Extinguisher Runs Out: A typical home extinguisher only has about 10 to 15 seconds of chemical spray. If the chemical agent is completely spent and the fire is still burning, do not look for a second extinguisher. Leave the building.
- You Feel Overwhelmed by Panic: If your hands are shaking so violently that you cannot pull the pin, or if you feel paralyzed by fear, do not force yourself to fight. Trust your survival instincts, alert others in the home, and evacuate.
6. Building Your Household Fire Safety Plan
Having the gear is only the first step; survival requires coordination. True emergency readiness means ensuring that every member of your household knows exactly what to do when the alarm sounds. Use these final steps to round out your safety protocol:
Establish a Two-Way Escape Plan
According to the National Fire Protection Association (NFPA), you should map out at least two ways out of every room in your home. This typically includes the main door and a window. If your bedrooms are on the second floor, equip them with emergency escape ladders that can be quickly hooked onto window sills.
Designate a Safe Meeting Spot
Choose a fixed, easily identifiable landmark a safe distance from your home—such as a specific neighbor’s mailbox, a light pole, or a prominent tree. Once you evacuate, everyone must head directly to this spot. This prevents family members or emergency personnel from entering a burning building to look for someone who is already safely outside.
Practice Makes Prepared
Conduct home fire drills at least twice a year. Practice escaping in the dark, crawling low under smoke, and physically touching your fire extinguishers to build muscle memory. Teach children what a smoke alarm sounds like and make sure they know never to hide under beds or in closets if a fire breaks out.
---Empowered and Prepared
True safety does not come from fear; it comes from active, structured preparation. By understanding the specific classes of fire, strategically mounting your equipment, maintaining a rigorous emergency fire extinguisher checklist, and mastering the PASS technique, you transform yourself from a potential victim into an active protector of your home. Take the time today to inspect your extinguishers, talk with your family about evacuation routes, and ensure that your home is fully equipped to face any emergency. Your proactive steps today are the shield that protects your tomorrow.
Frequently Asked Questions
What should a emergency fire extinguisher plan include?
Start with the immediate safety steps, the supplies and records your household needs, a communication plan, and a regular review schedule. Follow local official guidance during an active emergency.
How often should I review emergency fire extinguisher preparations?
Review them at least twice a year and whenever your household, medication, location, or local risks change. Replace expired supplies and practice key steps.
Where can I find reliable emergency guidance?
Use local emergency management alerts and established public-health or emergency-management agencies. A blog guide should support, not replace, official real-time instructions.