⚡ Key Facts
- Mold Acceleration: According to the Centers for Disease Control and Prevention (CDC), mold can begin growing on wet surfaces within 24 to 48 hours of exposure, making rapid, safe drying a top priority. For the practical checklist side, use the community emergency preparedness guide.
- Financial Vulnerability: Federal Emergency Management Agency (FEMA) data indicates that nearly 40% of small businesses and a significant portion of households fail to reopen or recover financially after a major disaster due to inadequate documentation. For the practical checklist side, use the neighborhood preparedness network.
- Post-Disaster Hazards: The National Fire Protection Association (NFPA) warns that electrical failures and gas leaks are the leading causes of secondary fires and explosions immediately following a natural disaster. For the practical checklist side, use the family emergency planning guide.
- Federal Aid Limitations: FEMA's Individual Assistance program is designed to jumpstart recovery, not replace comprehensive insurance; the average FEMA grant is often less than $10,000, underscoring the critical need for private policy management.
- Mental Health Impact: The Substance Abuse and Mental Health Services Administration (SAMHSA) reports that psychological distress peaks in the weeks following a disaster, highlighting the necessity of integrating mental health into physical recovery plans.
When the sirens fall silent and the immediate threat of a natural disaster passes, a new and often more complex challenge begins. Survival in the acute phase of a crisis relies on instinct, training, and emergency supplies; however, long-term survival and stabilization require a systematic, highly organized approach to rebuilding. The transition from crisis mode to recovery mode can feel overwhelming as you face damaged property, disrupted utilities, and bureaucratic red tape. To navigate this challenging landscape successfully, you must shift your focus from immediate threat mitigation to structured restoration using a comprehensive, step-by-step framework.
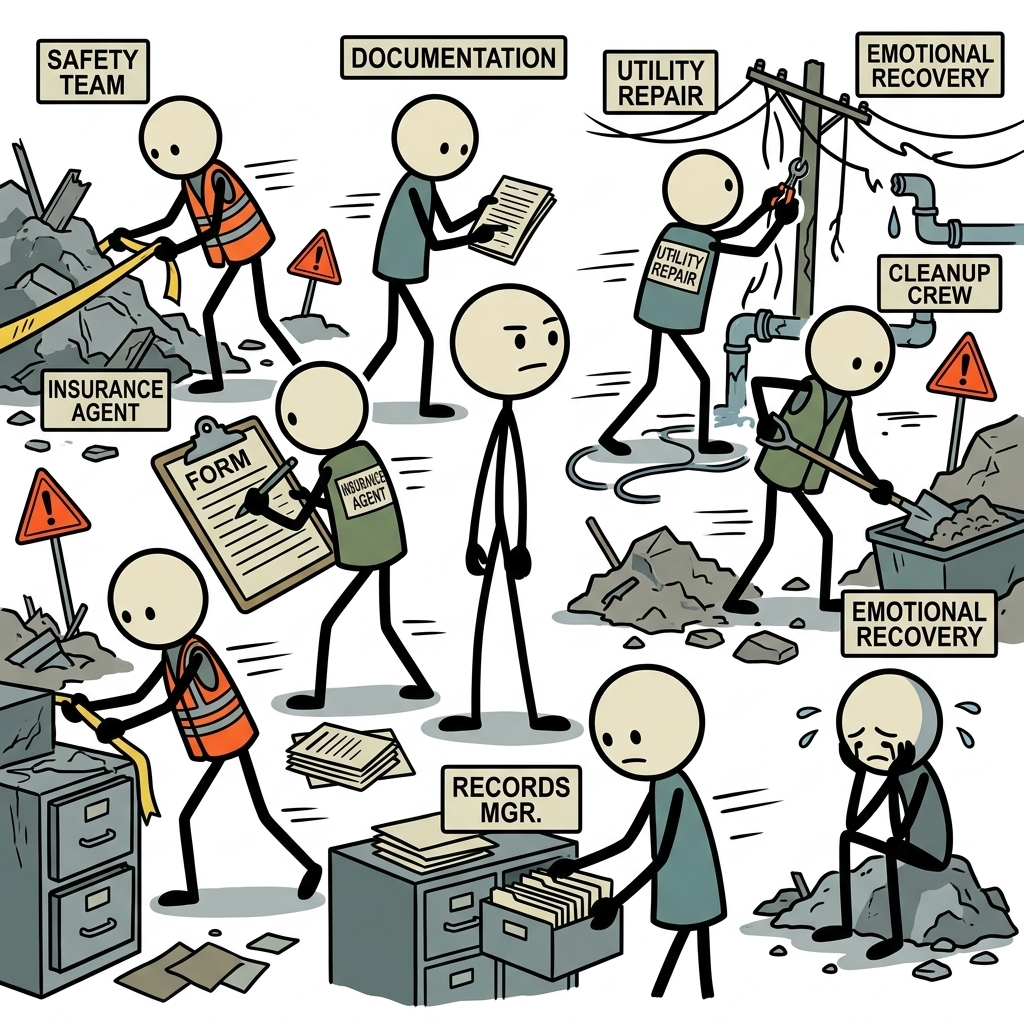
This guide serves as your definitive roadmap for post-event recovery, outlining the critical steps required to secure your physical environment, document damage, navigate insurance systems, and safeguard your family's emotional well-being. By establishing a clear, actionable disaster recovery checklist emergency preparedness protocol, you can transform a chaotic situation into a manageable, step-by-step process. Let’s examine the essential phases of post-disaster recovery to ensure your household transitions from survival to long-term resilience.
Phase 1: Immediate Post-Event Safety (The First 24 Hours)
The immediate aftermath of a disaster is often more hazardous than the event itself. Unseen structural damage, compromised utility lines, and environmental toxins pose severe threats to returning homeowners. Before you begin assessing property damage or salvage operations, you must ensure that the physical environment is safe to enter.
Assessing Structural Integrity First
Never enter a damaged structure without performing a thorough exterior inspection. According to the Federal Emergency Management Agency (FEMA), structural compromise is not always immediately obvious from the inside. Walk around the perimeter of your home and look for warning signs of instability before crossing the threshold.
- Foundation Cracks and Shifts: Look for new, wide cracks in concrete foundations, basement walls, or exterior brickwork. Any visible shifting or separation of the house from its foundation is a sign of severe compromise.
- Sagging Rooflines and Support Beams: Inspect the roofline from a distance. If you notice sagging, dipping, or bowing in the roof or structural support beams, do not enter the building.
- Dislodged Chimneys and Porches: Chimneys, porches, and carports are highly susceptible to separation during earthquakes, floods, or high-wind events. Check these attachment points carefully.
- Silted or Saturated Soils: In flood or landslide-prone areas, highly saturated soil around your foundation can cause sudden soil collapse or foundation shifting. Look for sinkholes or deep mud deposits pressing against walls.
Managing Utilities Safely
Damaged utility systems are a primary source of secondary disasters, such as fires, explosions, and electrocution. Managing these systems immediately upon your return is a critical component of any disaster recovery checklist.
Natural Gas Safety: If you smell gas, hear a hissing or blowing sound, or suspect a leak, do not enter the home. If you are already inside, leave immediately. Do not flip any electrical switches, light matches, or use your phone inside the building, as these actions can create a spark. Turn off the main gas valve at the meter using a wrench, rotating the valve a quarter-turn until it is perpendicular to the pipe. Once turned off, never attempt to turn the gas back on yourself; this must be done exclusively by a licensed utility professional.
Electrical System Management: If there is standing water in or near your electrical panel, do not approach it. If the area is dry, turn off the main breaker to prevent electrical surges when power is restored to the grid. If you see sparks, frayed wires, or smell burning insulation, contact a licensed electrician immediately. Never use wet electrical appliances; they must be professionally cleaned, dried, and inspected before being re-energized.
Water Infrastructure Inspection: Turn off the main water valve to your home to prevent contaminated water from entering your internal plumbing system. This also prevents water loss and water damage from internal pipes that may have cracked during the event. Monitor local authority announcements regarding boil-water advisories or system-wide contamination before consuming tap water.
Phase 2: Comprehensive Documentation (The Evidence Trail)
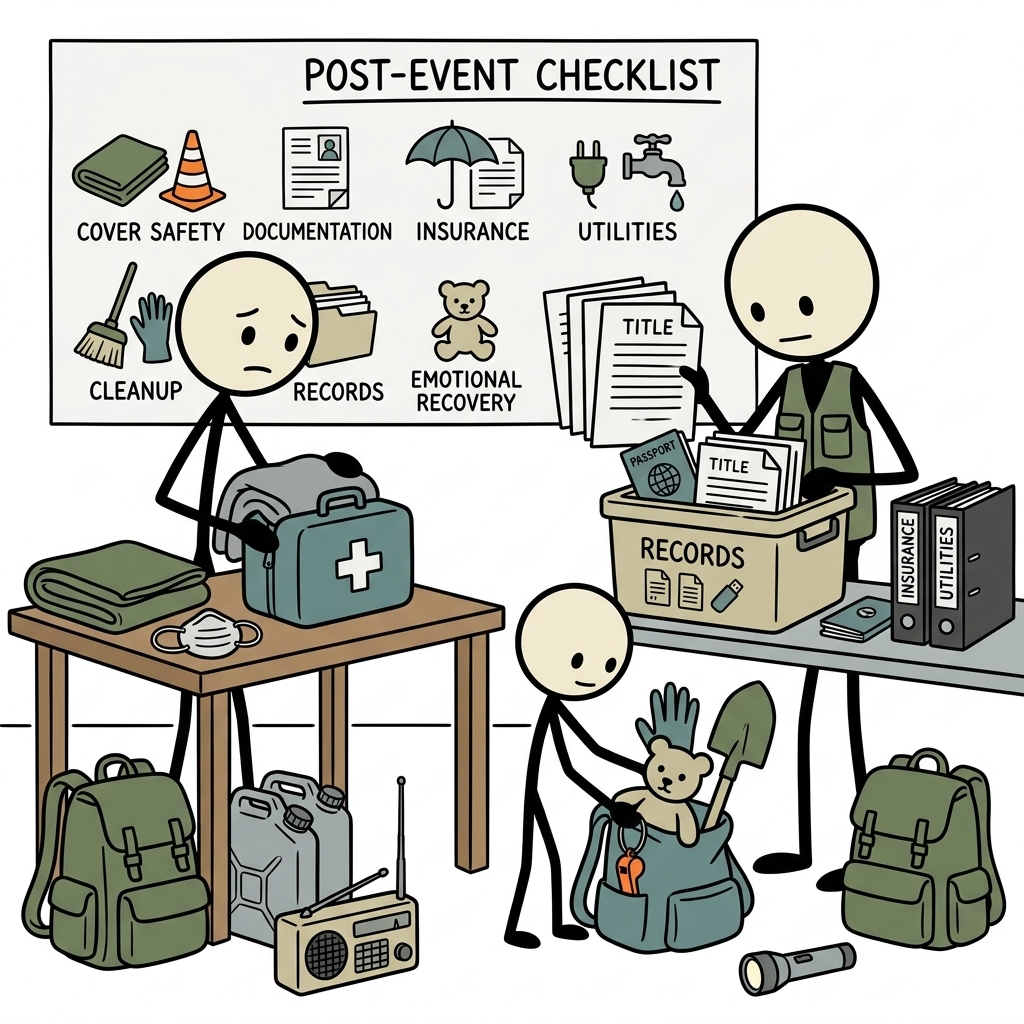
In the wake of a disaster, your memory is your least reliable asset. The stress of the event, coupled with the rapid pace of cleanup, can lead to forgotten details that could cost you thousands of dollars in insurance payouts or federal aid. Establishing a meticulous, undeniable paper trail is your most powerful tool for securing financial recovery.
The Golden Rule: Document Before You Clean
It is natural to want to begin cleaning and discarding ruined items immediately, but doing so without proper documentation can severely jeopardize your insurance claims. Insurance adjusters require concrete proof of the damage to validate your loss. Before you sweep a single floor, discard a ruined mattress, or pump out standing water, document every square inch of your property.
Take wide-angle photographs of every room to show the overall context of the damage, followed by close-up shots of specific damage points. For example, if floodwaters entered your home, photograph the waterlines against walls, doors, and furniture with a measuring tape or ruler in the frame to establish the exact height of the water. Capture images of structural cracks, broken windows, damaged roofing shingles, and ruined personal property from multiple angles. When in doubt, take more photos—you cannot over-document a disaster scene.
Creating a Digital and Physical Inventory
To streamline your claims process, compile a highly detailed inventory of every damaged or destroyed item. This list should be organized systematically, room by room, to ensure nothing is overlooked. For each item, record the following information:
- Description: The exact name, brand, model, and serial number of the item (e.g., "Samsung 55-inch QLED TV, Model QN55Q60A").
- Age and Purchase Date: Approximate date of purchase. If you have digital receipts stored in your email, locate and attach them to the entry.
- Estimated Value: The original purchase price and the current replacement cost.
- Condition: A brief description of the damage (e.g., "Fully submerged in 3 feet of saltwater, non-functional").
Store this inventory on a secure cloud-based platform, such as Google Drive, OneDrive, or Dropbox, so you can access it from any device, even if your physical computer or phone is lost or damaged during the recovery process.
Maintaining a Communication Log
As you navigate the recovery process, you will interact with dozens of individuals, including insurance agents, adjusters, contractors, utility representatives, and government officials. To keep track of these interactions, maintain a dedicated emergency communication plan log. Record the date, time, name, and organization of every person you speak with, along with a detailed summary of the conversation and any promised action items or deadlines. This log serves as valuable evidence if dispute resolution becomes necessary later in the claims process.
Phase 3: Navigating Insurance and Claims
Securing the financial resources to rebuild requires a strategic approach to filing insurance claims and applying for federal assistance. Understanding your policy limits, filing procedures, and available aid programs will help you maximize your recovery funds.
Filing the Initial Claim
Contact your insurance agent or company as soon as possible. Following a widespread disaster, insurance companies are flooded with claims, and processing is often handled on a first-come, first-served basis. When you call, have your policy number, current contact information, and your preliminary damage inventory ready.
Understand the difference between your standard homeowners policy and specialized coverages. Standard policies typically cover wind, hail, and fire damage, but explicitly exclude flood damage and earthquake damage. If your home was damaged by rising waters, you must file a separate claim through your flood insurance policy, which is typically managed through the National Flood Insurance Program (NFIP) or a private flood insurer. Ask your agent for a copy of your full policy document, including the "Declarations Page," which details your coverage limits, deductibles, and exclusions.
To ensure you do not miss a single detail during this stressful period, compile a disaster recovery checklist checklist that tracks every phone call, claim number, and adjuster name. This sub-checklist will keep you organized and prevent critical steps from falling through the cracks when managing multiple claims simultaneously.
Maximizing Claims and Understanding Adjusters
The insurance company will assign an adjuster to inspect your property and estimate the cost of repairs. It is important to remember that the staff adjuster works for the insurance company, not for you. While many are thorough and fair, their goal is to settle the claim within the company's guidelines.
When the adjuster visits your property, accompany them throughout the inspection. Point out all documented damage, including hidden issues like water stains in the attic or cracked structural elements under the porch. Provide them with a copy of your detailed photo inventory and communication log. If you feel the insurance company's settlement offer is insufficient to cover the actual cost of repairs, you have the right to hire an independent, public insurance adjuster. Public adjusters work on your behalf, typically charging a percentage of the final settlement, to ensure you receive the maximum payout allowed under your policy.
FEMA and Federal Assistance Programs
If your area is declared a federal disaster by the President, you may be eligible for assistance from FEMA and the Small Business Administration (SBA). FEMA assistance is designed to help meet basic needs and is not a substitute for insurance.
- FEMA Individual Assistance (IA): This program provides financial grants for temporary housing, home repairs, and other serious disaster-related needs, such as medical expenses, moving costs, or essential household items. You can apply online at DisasterAssistance.gov or by calling the FEMA helpline.
- SBA Disaster Loans: Despite the name, the SBA provides low-interest, long-term disaster loans to homeowners and renters, not just businesses. These loans can be used to repair or replace real estate, personal property, and machinery. Applying for an SBA loan is often a required step to qualify for certain other FEMA grants, so do not decline to apply if referred.
- Immediate Needs Funding: In severe crises, FEMA may offer immediate, one-time payments for critical needs, such as food, water, baby formula, and emergency medical supplies. Keep all receipts for these emergency purchases to submit for reimbursement.
Phase 4: Safe Utility Restoration & Structural Cleanup
Once you have secured your documentation and initiated your insurance claims, you can begin the physical cleanup of your property. This phase requires strict adherence to safety protocols to prevent injury, chemical exposure, and long-term health complications from environmental contaminants.
Personal Protective Equipment (PPE) Requirements
Disaster debris is frequently contaminated with sewage, industrial chemicals, asbestos, lead paint, and mold. According to the CDC, entering a damaged structure without proper personal protective equipment (PPE) exposes you to severe respiratory and biological hazards. Before starting any cleanup work, equip yourself with the following gear:
| PPE Item | Specification / Standard | Primary Protection Purpose |
|---|---|---|
| Respirator | NIOSH-approved N95 or half-face respirator with P100 filters | Filters out airborne mold spores, asbestos fibers, silica dust, and ash. |
| Gloves | Heavy-duty nitrile (inner) and cut-resistant leather (outer) | Protects against chemical exposure, biohazards, cuts from glass, and puncture wounds. |
| Eye Protection | Non-vented safety goggles | Prevents contaminated water splashes, dust, and mold spores from entering the eyes. |
| Footwear | Steel-toe, puncture-resistant boots with thick rubber soles | Guards against stepped-on nails, structural collapse debris, and standing water hazards. |
| Protective Clothing | Disposable Tyvek suits or long-sleeved shirts and heavy pants | Minimizes skin contact with contaminated floodwaters, hazardous chemicals, and mold. |
Mucking Out and Mold Mitigation
In the aftermath of water damage or flooding, your primary objective is to remove saturated materials as quickly as possible to prevent mold colonization. This process, often referred to as "mucking out," must be performed systematically.
Remove all standing water using submersible pumps and wet-dry vacuums. Once the water is gone, strip out all porous materials that have been submerged or in contact with water for more than 24 to 48 hours. This includes drywall, plaster, fiberglass and cellulose insulation, carpet, padding, and vinyl flooring. Cut away drywall at least 12 to 24 inches above the highest watermark to ensure you remove any moisture that has wicked upward through the wall cavity.
Clean all non-porous surfaces, such as concrete, brick, metal, and solid wood, with a heavy-duty disinfectant. The CDC recommends a solution of one cup of household liquid chlorine bleach per five Water Calculator for sanitizing hard surfaces. Ensure the area is well-ventilated during application. After cleaning, use high-capacity dehumidifiers and air movers to dry the structure completely. Do not install new drywall or flooring until the moisture content of the wood studs is below 15%, verified with a professional moisture meter.
Handling Hazardous Materials and Debris
Disaster cleanup generates massive quantities of debris, much of which cannot be disposed of in standard municipal trash collections. Separate your debris into distinct piles at the curb to facilitate municipal pickup and recycling:
- Vegetative Debris: Tree limbs, branches, brush, and plants.
- Construction and Demolition Debris: Drywall, lumber, carpet, shingles, and plumbing pipes.
- Hazardous Waste: Oil, batteries, paints, solvents, pesticides, and compressed gas cylinders.
- Large Appliances (White Goods): Refrigerators, freezers, washing machines, dryers, and stoves. Secure these doors with tape or locks to prevent children from climbing inside and becoming trapped.
- Electronics: Televisions, computers, monitors, and phones.
Phase 5: Document & Record Recovery (The Paper Trail)
Physical documents are the keys to your identity, financial assets, and legal rights. If your vital records were damaged, destroyed, or left behind during an evacuation, restoring this paper trail is a critical priority for your long-term recovery.
Replacing Vital Records
Without proper identification and legal documents, registering for long-term federal aid, selling property, or proving citizenship becomes extremely difficult. Prioritize the replacement of these vital records using the official channels outlined below:
- Birth, Death, and Marriage Certificates: Contact the vital statistics office in the state or territory where the event occurred. The National Center for Health Statistics (NCHS) provides a directory of state agencies to streamline this process.
- Social Security Cards: Apply for a replacement card online through the Social Security Administration (SSA) portal or by visiting a local SSA field office with proof of identity, such as a valid driver's license or passport.
- Driver's Licenses and Vehicle Registrations: Visit your state's Department of Motor Vehicles (DMV) website or local office. Many states waive replacement fees for individuals living in declared disaster areas.
- Property Deeds and Mortgages: Contact the county clerk's office or recorder of deeds in the county where your property is located. They can provide certified copies of your land deeds and property records.
- Passports: If your passport was lost or damaged, submit Form DS-64 (Statement Regarding a Lost or Stolen Passport) and Form DS-11 (Application for a U.S. Passport) at an authorized passport acceptance facility.
Protecting Digital Identity and Financial Records
Disasters create prime opportunities for identity thieves and scammers who exploit the chaos to access personal accounts. Protect your financial health by taking immediate protective measures:
Contact your banks, credit card issuers, and mortgage lenders to inform them of your situation. Many financial institutions offer disaster relief programs, including temporary payment deferrals, waived late fees, and restructured loan terms. Request replacement cards for any credit or debit cards that were lost during the event.
Place a temporary fraud alert on your credit reports by contacting one of the three major credit bureaus (Equifax, Experian, or TransUnion). Once you place an alert with one bureau, they are legally required to notify the other two. This alert warns potential creditors to verify your identity before opening new accounts in your name, protecting you from identity theft during your recovery.
Phase 6: Emotional Recovery and Mental First Aid
While restoring physical structures and securing financial aid are critical, true recovery is impossible without addressing the psychological impact of a disaster. The emotional toll of losing a home, possessions, or sense of security can be profound and long-lasting.
Recognizing Acute Stress and Trauma
Following a traumatic event, it is normal to experience a wide range of physical, emotional, and cognitive reactions. According to the Substance Abuse and Mental Health Services Administration (SAMHSA), common post-disaster stress symptoms include:
- Cognitive Symptoms: Difficulty concentrating, memory lapses, confusion, disorientation, and trouble making decisions.
- Physical Symptoms: Chronic fatigue, headaches, muscle tension, sleep disturbances, rapid heart rate, and gastrointestinal issues.
- Emotional Symptoms: Intense feelings of fear, anxiety, irritability, anger, grief, numbness, and overwhelming sadness.
- Behavioral Symptoms: Social withdrawal, increased consumption of alcohol or substances, changes in appetite, and hypervigilance.
Recognize that these are normal reactions to an abnormal situation. Give yourself and your family members grace as you navigate these complex emotions.
Implementing Psychological First Aid (PFA)
Psychological First Aid is an evidence-informed approach designed to reduce the initial distress caused by traumatic events and foster short- and long-term adaptive functioning. You can apply PFA principles within your own family and community:
Establish Safety and Comfort: Ensure that immediate physical needs—such as shelter, clean water, warm food, and dry clothing—are met. Physical comfort is the foundation of emotional stabilization.
Promote Connection: Keep your family unit together as much as possible. Maintain open communication, encourage expression of feelings without judgment, and stay connected with extended family, friends, and neighbors to combat isolation.
Restore Routines: Re-establish simple daily routines as quickly as possible. Having set times for meals, sleep, and family discussions provides a sense of predictability and control in an otherwise chaotic environment.
Limit Media Exposure: Constantly watching news coverage or scrolling through social media updates about the disaster can re-traumatize you and your children. Limit media consumption to essential emergency updates from trusted local authorities.
Supporting Children and Pets
Children and pets are highly sensitive to the stress levels of the adults around them. They often express trauma in different ways than adults, requiring specialized care and attention.
Children may exhibit regressive behaviors, such as bedwetting, thumb-sucking, or extreme clinginess. They may also experience intense fears of separation or recurring nightmares. Address these issues with patience and reassurance. Explain what happened using simple, age-appropriate language, and emphasize that they are safe now. Involve them in small, manageable recovery tasks—such as packing up salvageable toys—to give them a sense of agency.
Pets may become highly anxious, aggressive, or withdrawn following a disaster. Maintain their feeding and exercise routines as closely as possible. Provide them with a quiet, secure space to rest, and keep them on a leash or in a crate when outdoors, as familiar scents and landmarks may have changed, making it easy for them to become lost or disoriented.
Conclusion
The journey from the immediate aftermath of a disaster to full physical, financial, and emotional restoration is a marathon, not a sprint. By breaking this monumental task down into structured, manageable phases—focusing on immediate safety, meticulous documentation, strategic insurance navigation, safe cleanup, vital record recovery, and compassionate emotional care—you can systematically rebuild your life. Remember that you do not have to navigate this process alone. Leverage local, state, and federal resources, lean on your community, and prioritize your family's health and safety above all else. With a structured plan and a resilient mindset, you can transition from surviving a crisis to thriving in its aftermath.
Frequently Asked Questions
What should a disaster recovery checklist plan include?
Start with the immediate safety steps, the supplies and records your household needs, a communication plan, and a regular review schedule. Follow local official guidance during an active emergency.
How often should I review disaster recovery checklist preparations?
Review them at least twice a year and whenever your household, medication, location, or local risks change. Replace expired supplies and practice key steps.
Where can I find reliable emergency guidance?
Use local emergency management alerts and established public-health or emergency-management agencies. A blog guide should support, not replace, official real-time instructions.