⚡ Key Facts
- Significant Survival Advantage: According to the National Fire Protection Association (NFPA), working smoke alarms cut the risk of dying in a home fire by 55 percent. For the practical checklist side, use the community emergency preparedness guide.
- The 10-Year Rule: All smoke alarms—regardless of whether they are hardwired or battery-powered—must be completely replaced every 10 years from their manufacturing date. For the practical checklist side, use the neighborhood preparedness network.
- Rapid Burn Rates: Modern home fires burn significantly faster than they did 40 years ago due to synthetic materials in furnishings, reducing safe escape times from 17 minutes to under 3 minutes. For the practical checklist side, use the family emergency planning guide.
- Interconnection is Critical: NFPA data reveals that when smoke alarms are interconnected, they provide early warning in 89 percent of fires, compared to only 56 percent for standalone units.
- Hearing Accessibility Gap: Standard high-frequency (3,000 Hz) alarms fail to wake up to 50 percent of children and a significant portion of older adults; 520 Hz low-frequency alarms are proven to be far more effective.
When a residential fire breaks out, you do not have time to plan, negotiate, or hesitate. Modern synthetic materials, engineered lumber, and open-floor architectures mean that home fires now burn hotter and faster than ever before. According to the Federal Emergency Management Agency (FEMA), you may have less than three minutes to safely evacuate your home once a fire ignites. In this high-stakes environment, your emergency smoke alarm is not merely a utility device; it is a highly sophisticated, active life-safety system. Achieving true resilience requires an analytical approach to selection, placement, testing, and integration with your family's family emergency plans. This guide breaks down the science and mechanics of residential fire detection to ensure your household is prepared for any emergency.
1. Understanding Sensor Technologies: Ionization vs. Photoelectric
To build a resilient life-safety network, you must first understand the physics of detection. Smoke alarms are not all created equal. They utilize distinct technologies to sense airborne particles, and relying on the wrong type in the wrong location can lead to delayed detection or frustrating false alarms.
Ionization Smoke Alarms
Ionization alarms contain a tiny amount of americium-241, a radioactive source that ionizes the air within an internal sensing chamber. This ionization creates a small, continuous electrical current. When smoke particles enter the chamber, they disrupt this electrical current, triggering the alarm. Ionization sensors are exceptionally sensitive to small, invisible particles produced by fast-flaming fires—such as those fueled by paper, wood, or flammable liquids. However, they are highly prone to nuisance alarms caused by cooking vapors or bathroom steam, which often prompts frustrated homeowners to disable them.
Photoelectric Smoke Alarms
Photoelectric alarms operate on a light-scattering principle. Inside the chamber, a light source (usually an infrared LED) shoots a straight beam across the space, aiming away from a light sensor. When smoke particles enter the chamber, they scatter the light beam, redirecting some of light onto the sensor. Once a threshold of light hits the sensor, the alarm sounds. Photoelectric sensors are highly effective at detecting large, visible particles produced by slow, smoldering fires—such as those initiated by a cigarette on a couch or an electrical short behind a wall. These types of fires produce toxic, dense smoke long before bursting into open flames.
Dual-Sensor Alarms: The Gold Standard
For comprehensive emergency smoke alarm emergency preparedness, the United States Fire Administration (USFA) recommends installing dual-sensor smoke alarms. These devices combine both ionization and photoelectric sensors into a single unit, ensuring rapid detection regardless of whether a fire is a fast-burning blaze or a slow-smoldering hazard. If dual-sensor units are not feasible, you should strategically mix individual ionization and photoelectric units throughout your living space.
2. Strategic Placement: Mapping Your Home's Detection Grid
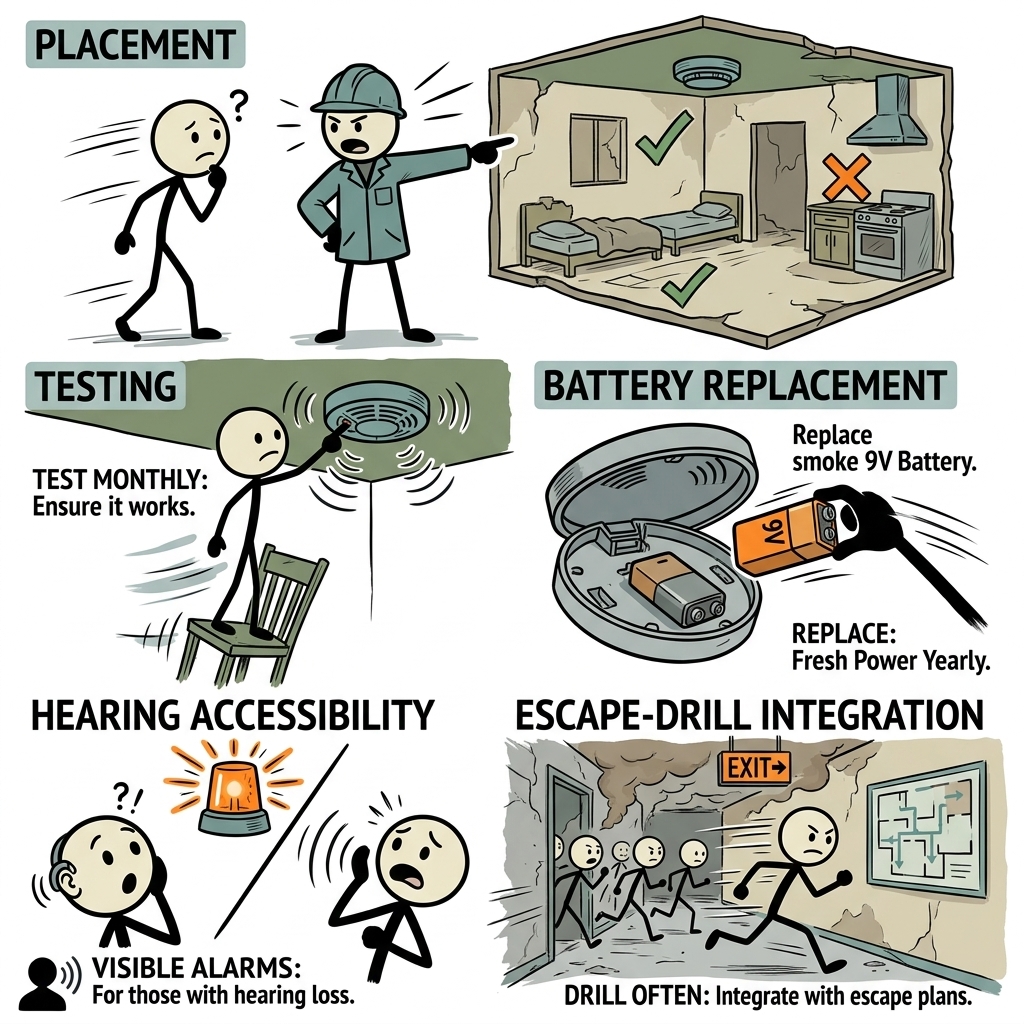
An alarm cannot protect you if it is positioned where smoke cannot reach it, or if it is too far away to wake you. Proper physical placement is governed by strict codes established by the National Fire Protection Association (NFPA 72, National Fire Alarm and Signaling Code). To maximize your safety, you must map out a precise detection grid across your entire property.
Where You Must Install Smoke Alarms
To meet modern safety standards and provide adequate early warning, smoke alarms must be installed in the following locations:
- Inside Every Sleeping Room: If a fire starts inside a bedroom (e.g., from a charging phone or space heater), an alarm must sound immediately within that room.
- Outside Every Sleeping Area: Alarms must be placed in the immediate vicinity of bedrooms, such as in hallways. This ensures that a fire originating in the living area is detected before it blocks bedroom escape routes.
- On Every Level of the Home: This includes basements and attics that are finished or contain mechanical equipment. If you have a multi-story home, you must have at least one alarm on every floor.
- Near Stairwells: Stairwells act as natural chimneys for heat and smoke. Alarms should be positioned at the top of basement stairs and at the ceiling of stairwells leading to upper floors.
The Geometry of Mounting
Because smoke and hot gases rise, smoke alarms must be mounted high on walls or ceilings. However, physical boundaries create "dead air" spaces where smoke may not circulate. Follow these precise measurements for installation:
- Ceiling Mounting: Position the alarm as close to the center of the room as possible. It must be mounted at least 4 inches (10 cm) away from any adjoining wall.
- Wall Mounting: If ceiling mounting is not possible, place the alarm on the wall between 4 and 12 inches (10 to 30 cm) down from the ceiling. Do not mount it lower than 12 inches, as this puts it below the rising smoke layer.
- Pitched Ceilings: For cathedral or peaked ceilings, mount the alarm within 3 feet (0.9 meters) of the peak, but not closer than 4 inches (10 cm) vertically from the peak.
Locations to Avoid (Preventing Nuisance Alarms)
To prevent false alarms—which lead to people disabling their safety devices—avoid placing alarms in the following zones:
- Within 10 Feet of Cooking Appliances: Kitchen alarms should be photoelectric or specialized heat detectors to minimize false alarms from cooking.
- Near Bathrooms with Showers: Keep alarms at least 3 feet (0.9 meters) away from bathroom doors to prevent moisture from triggering the sensor.
- Drafty Areas: Avoid placing alarms near ceiling fans, registers, air conditioners, or drafty windows, as moving air can blow smoke away from the alarm's sensor.
- Unfinished Garages, Crawlspaces, or Attics: Extreme temperatures, dust, and insects in these spaces can damage sensors or trigger false alarms. Use specialized heat alarms in these environments instead.
3. Testing Protocols and Maintenance Schedules
An untested smoke alarm is a liability. According to NFPA research, in fires where smoke alarms were present but failed to operate, nearly half (46%) had disconnected or missing batteries. Regular testing and proactive maintenance are non-negotiable components of your safety routine.
The Weekly, Monthly, and Annual Maintenance Schedule
Establish a strict maintenance routine to ensure your system remains fully operational throughout the year:
- Monthly Button Test: Press and hold the test button on every alarm. This tests the internal circuitry, horn, and battery connection. If the alarm does not sound, or if the sound is weak, troubleshoot the power source immediately.
- Semi-Annual Dusting: Twice a year, use a vacuum cleaner with a soft brush attachment or a can of compressed air to gently clear dust, spiderwebs, and debris from the outer vents of the alarm. Dust accumulation can insulate the sensor or cause false alarms.
- Annual Functional Smoke Test: Once a year, conduct a real-world test using an approved aerosol smoke detector tester (available at hardware stores). This confirms that the sensor chamber actually detects smoke particles, which a simple button test cannot verify.
How to Safely Clean Your Alarms
Never paint over a smoke alarm, and never spray cleaning chemicals directly onto or near the device. If you are painting or remodeling, temporarily cover the alarms with plastic caps or painter's tape to prevent dust and paint particles from settling inside the sensor chamber. Remember to remove these protective covers immediately after your project is complete.
4. Battery Management and Power Source Dynamics
Understanding how your alarms are powered is crucial to maintaining their reliability. Smoke alarms generally fall into three categories: hardwired with battery backup, 10-year sealed battery units, and traditional replaceable-battery units.
Hardwired vs. Battery-Operated Alarms
Hardwired alarms are connected directly to your home's 120-volt electrical system. They also feature a backup battery to ensure they remain functional during a power outage. Battery-operated alarms rely entirely on internal batteries. Hardwired systems offer a major advantage: they can be physically interconnected. When one hardwired alarm detects smoke, it sends a signal through a dedicated wire (or via wireless RF signals) to trigger every alarm in the house simultaneously. This provides critical early warning if a fire starts in a distant area of the home, such as the basement.
Battery Types and Replacement Rules
The type of battery your alarm uses dictates how you must maintain it:
- Traditional 9-Volt Alkaline Batteries: If your alarms use replaceable 9-volt batteries, replace them twice a year. A helpful rule of thumb is to change your batteries when you adjust your clocks for Daylight Saving Time in the spring and fall.
- 10-Year Sealed Lithium Batteries: Many modern alarms feature sealed lithium batteries designed to last for a full decade. These units do not require battery changes. However, the entire alarm must be replaced once the 10-year lifespan expires or if the unit begins to chirp indicating a low battery.
Decoding the "Chirp"
It is vital to distinguish between the full, continuous alarm sound and a single, intermittent chirp. A chirp every 30 to 60 seconds typically indicates a low battery, a sensor error, or that the unit has reached its end of life. Never ignore a chirping alarm; troubleshoot and resolve the issue immediately to keep your home protected.
5. Universal Design and Hearing Accessibility Solutions
Standard audible smoke alarms emit a high-frequency T3 pattern (three intermittent beeps). While effective for many, this sound is often inadequate for individuals who are deaf, hard of hearing, elderly, or deep sleepers. To build a truly inclusive safety system, you must incorporate universal design principles.
The Danger of High-Frequency Alarms for Sleepers
Clinical studies cited by the CDC and the NFPA show that standard high-frequency (approx. 3,000 Hz) alarms fail to wake up to 50 percent of children, even when the alarm is sounding right outside their door. Children spend more time in deep, slow-wave sleep than adults, making them less responsive to high-pitched sounds. Similarly, age-related hearing loss (presbycusis) often impairs an individual's ability to hear high-frequency tones, leaving older adults vulnerable during a fire emergency.
Low-Frequency (520 Hz) Sounders
The NFPA recommends 520 Hz low-frequency square-wave alarms for sleeping areas. Research shows that this lower pitch is significantly more effective at waking children, the elderly, and those with mild-to-moderate hearing loss. These devices produce a deeper, more resonant sound that penetrates deep sleep states far more effectively than traditional high-pitched alarms.
Visual and Tactile Alert Systems
For individuals who are profoundly deaf or severely hard of hearing, visual and tactile alert systems are essential additions to your home safety setup:
- High-Intensity Strobe Lights: These specialized strobes flash with high intensity (typically 177 candela) to wake individuals who cannot hear audible alarms. They are often interconnected with the standard alarm system to activate instantly when smoke is detected.
- Bed Shakers and Pillow Vibrators: These devices place a vibrating pad under a mattress or pillow. When the smoke alarm sounds, the pad vibrates vigorously to wake the sleeper. Many of these systems also feature a built-in low-frequency receiver that listens for the sound of a standard alarm and activates the vibration in response.
6. Integrating Detection with Your Emergency Escape Drill
Even the most advanced detection system is useless if your household does not know how to respond when it sounds. Your emergency smoke alarm must be fully integrated into a practiced, practical emergency escape plan.
The EDITH Framework: Exit Drills In The Home
Developed by the National Fire Protection Association, the EDITH framework is the gold standard for residential evacuation planning. It emphasizes that preparation, practice, and clear emergency communication plan are key to surviving a home fire. To implement EDITH in your home, follow these steps:
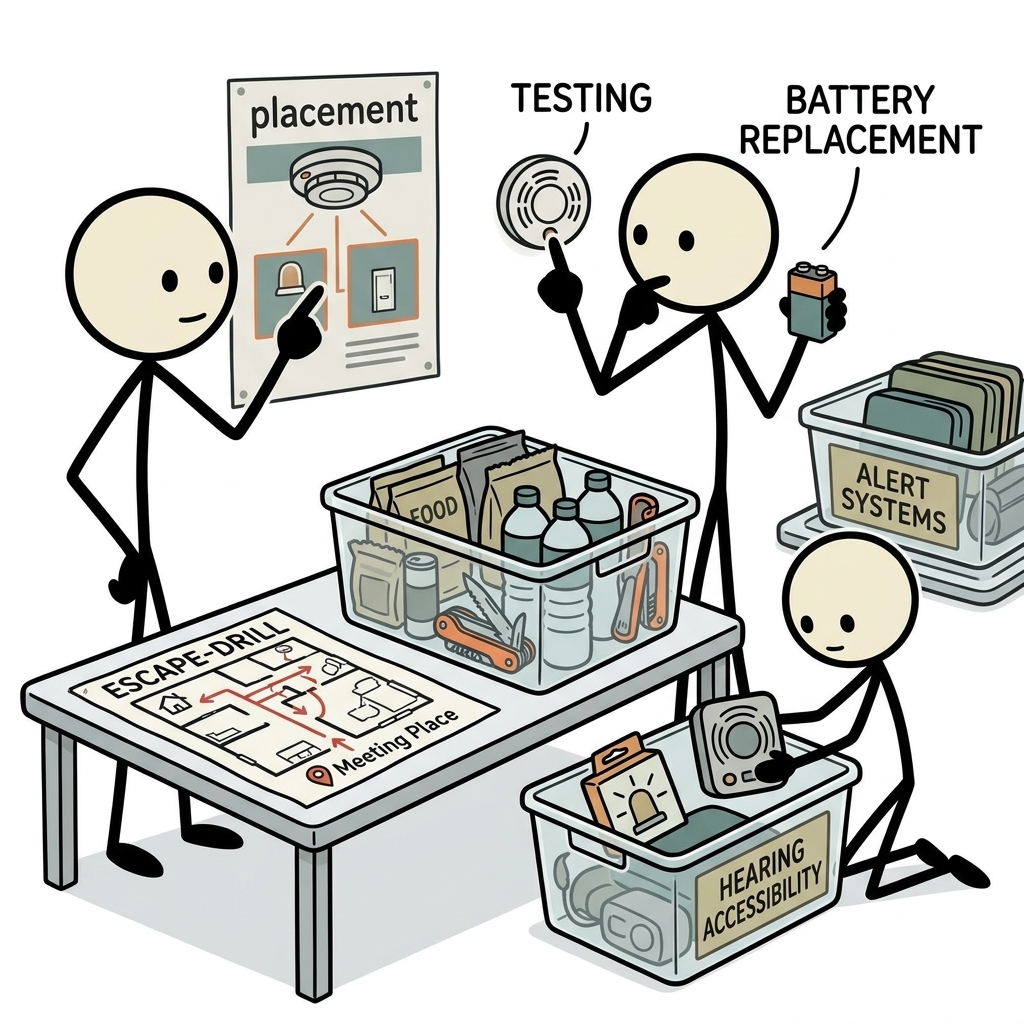
- Map Your Floor Plan: Draw a detailed floor plan of your home. Mark all doors, windows, and the location of every smoke alarm.
- Identify Two Ways Out: For every room in your home, identify two potential escape routes. The first route should be the main door or hallway. The second route is an emergency alternative, such as a window leading to a porch, fire escape, or ground level. If upper-story windows are part of your plan, ensure you have UL-listed escape ladders stored nearby and that everyone knows how to deploy them.
- Establish a Safe Meeting Spot: Choose a fixed, easily recognizable landmark outside your home where everyone will gather after escaping. This could be a specific tree, a mailbox, or a neighbor's driveway. This meeting spot must be located a safe distance from the house, well out of the way of arriving emergency vehicles.
- Practice Under Realistic Conditions: Conduct escape drills at least twice a year. To make these drills effective, practice under realistic conditions. Try running a drill in the dark, or have family members crawl low on their hands and knees to simulate navigating beneath a toxic smoke layer.
How to Run a Smoke Alarm Evacuation Drill
When conducting an evacuation drill, do not simply announce that it is time to practice. Follow this structured protocol to build muscle memory and ensure everyone knows exactly what to do:
| Step | Action | Key Safety Protocol |
|---|---|---|
| 1. The Trigger | Sound the actual smoke alarm using the test button. | Everyone must recognize the sound and immediately stop what they are doing. |
| 2. The Descent | Drop low to the floor and crawl on hands and knees. | Keep your head 12 to 24 inches above the floor to breathe cleaner air beneath rising smoke and toxic gases. |
| 3. The Check | Feel doors with the back of your hand before opening them. | If the door or doorknob is hot, do not open it. Use your second way out instead. |
| 4. The Evacuation | Exit the home quickly and calmly. Do not stop to gather belongings or pets. | Once you are out, stay out. Never re-enter a burning building for any reason. |
| 5. The Muster | Assemble at your designated meeting spot and account for everyone. | Have one designated person call 911 from a cell phone or a neighbor's house. |
7. The Ultimate Emergency Smoke Alarm Checklist
Use this comprehensive emergency smoke alarm checklist to audit your home's readiness, identify potential vulnerabilities, and keep your life-safety systems in peak operating condition.
- [ ] Inventory Check: Do you have smoke alarms installed on every level of your home, inside every bedroom, and outside every sleeping area?
- [ ] Sensor Verification: Are your alarms dual-sensor (ionization and photoelectric), or do you have a strategic mix of both types installed throughout your home?
- [ ] Interconnection Status: Are your alarms interconnected so that if one sounds, they all sound? (Hardwired or wireless RF interconnection are both acceptable).
- [ ] Age Verification: Have you checked the manufacturing date on the back of every alarm? Are all units less than 10 years old?
- [ ] Power Source Check: For 9-volt battery alarms, have the batteries been replaced within the last six months? For sealed lithium-battery units, are they still within their 10-year lifespan?
- [ ] Monthly Test: Has every alarm in your home been tested using the test button within the last 30 days?
- [ ] Annual Functional Test: Have all sensors been verified using an approved aerosol smoke tester within the last 12 months?
- [ ] Cleanliness Check: Have all alarms been vacuumed or cleared of dust and cobwebs within the last six months?
- [ ] Accessibility Audit: Do you have low-frequency (520 Hz) alarms, high-intensity strobes, or bed shakers installed for children, elderly family members, or anyone with hearing loss?
- [ ] Escape Drill Integration: Has your household practiced a full escape drill within the last six months, including using secondary escape routes and gathering at a designated meeting spot?
8. Conclusion: Commitment to Active Preparedness
Emergency preparedness is not a one-time project; it is an active, ongoing commitment to protecting your home and family. Your smoke alarms are the most critical components of your early warning system, but they require regular care, strategic placement, and consistent practice to do their jobs effectively. By understanding the science behind sensor technologies, mapping out a code-compliant placement grid, maintaining a strict testing schedule, and practicing realistic escape drills, you can dramatically improve your family's chances of surviving a residential fire. Do not wait for an emergency to find out if your system works. Take action today to audit your alarms, update your escape plan, and ensure your home is fully prepared for any crisis.
Frequently Asked Questions
What should a emergency smoke alarm plan include?
Start with the immediate safety steps, the supplies and records your household needs, a communication plan, and a regular review schedule. Follow local official guidance during an active emergency.
How often should I review emergency smoke alarm preparations?
Review them at least twice a year and whenever your household, medication, location, or local risks change. Replace expired supplies and practice key steps.
Where can I find reliable emergency guidance?
Use local emergency management alerts and established public-health or emergency-management agencies. A blog guide should support, not replace, official real-time instructions.