⚡ Key Facts
- The Critical Failure Factor: According to the National Fire Protection Association (NFPA), three out of five home fire deaths occur in properties without working smoke alarms, with dead, missing, or disconnected batteries causing 41% of alarm failures.
- Shrinking Escape Windows: Federal Emergency Management Agency (FEMA) and UL fire research shows that modern synthetic furnishings burn eight times faster than natural materials from forty years ago, reducing average escape time from 17 minutes to less than 3 minutes.
- The 10-Year Hard Limit: Regardless of battery status or appearance, NFPA 72 standards mandate replacing the entire smoke alarm unit 10 years from its manufacturing date due to sensor degradation.
- The 3:00 AM Physics: Low-battery chirps disproportionately sound during the coldest hours of the morning because dropping ambient temperatures decrease a battery's internal chemical reaction rate, pushing marginally charged cells below the alarm's voltage threshold.
- Push-Button Limitations: Pressing a smoke alarm's "Test" button only confirms that the battery, horn, and electrical continuity are intact—it does not evaluate the optical or ionization sensing chamber's ability to detect actual particulate smoke.
At 2:30 AM, an ear-splitting, intermittent chirp pierces the silence of your hallway. It sounds once every 45 seconds—just far enough apart to let your adrenaline settle before striking again. While most homeowners view this nocturnal annoyance as an untimely inconvenience, that sound represents an urgent breakdown in your family's primary survival network. Modern residential fires double in size every 30 seconds, producing lethal levels of hydrogen cyanide and carbon monoxide long before flames reach structural timbers. Maintaining reliable smoke detector batteries, executing rigorous sensor tests, and eliminating the root causes of system errors are not mundane domestic chores; they are foundational protocols that determine whether your household survives a structural fire. For the practical checklist side, use the community emergency preparedness guide.
The Hidden Mechanics of Residential Smoke Detectors
To keep an early-warning network functional, you must understand how these small sentinels perceive threats. Residential smoke alarms operate using one of two primary sensor mechanisms: ionization or photoelectric detection. Each technology reacts differently to environmental conditions, battery voltages, and airborne particles. For the practical checklist side, use the neighborhood preparedness network.
Ionization alarms house a microscopic, shielded trace of Americium-241 within an ionization chamber. This radioactive isotope charges the air molecules between two metal plates, establishing a small, steady electric current. When combustion particulates enter the chamber, they attach to the ions and disrupt this current, which trips the horn. Ionization units respond aggressively to fast-flaming fires fueled by flammable liquids, paper, or dry wood. However, they are vulnerable to false alarms from kitchen steam, aerosol sprays, and localized humidity spikes. For the practical checklist side, use the emergency communication plan.
Photoelectric alarms use light-scattering principles. Inside the chamber, an infrared light-emitting diode (LED) aims straight ahead while a light-sensitive photodiode sits off to the side in darkness. When dense smoke particles enter, they reflect and scatter the light beam toward the photodiode, completing an optical circuit that sounds the alarm. Photoelectric systems excel at identifying slow, smoldering fires—such as those sparked by faulty wiring or cigarettes dropped on synthetic upholstery—hours before flames erupt. The American Red Cross and FEMA urge homeowners to deploy dual-sensor units combining both technologies, or to install dedicated photoelectric units throughout hallways and bedrooms to guard against smoldering hazards. For the practical checklist side, use the family emergency planning guide.
Hardwired vs. Battery-Only Topologies
Modern homes use one of two wiring architectures: standalone battery-operated units or interconnected hardwired systems (120V AC with DC battery backup). In hardwired configurations, standard residential line voltage powers the unit during normal operation, while an onboard battery sits on standby to preserve life-saving readiness during localized power outages. For the practical checklist side, use the real-world emergency scenarios guide.
Crucially, interconnected hardwired units communicate through an extra traveler wire or a dedicated wireless radio frequency. When one detector identifies smoke in an isolated basement or utility room, every alarm throughout the residence activates simultaneously. This interconnectivity provides a vital buffer of time, but it also complicates routine home fire safety maintenance. A depleted battery or clogged sensor in an upstairs attic unit can propagate phantom alerts down through primary living spaces.
How to Test Smoke Detector Units Correctly
Most homeowners assume that tapping the plastic center button with a broom handle proves their smoke detection network is ready for an emergency. This assumption creates a dangerous illusion of safety. Understanding how to test smoke detector systems properly requires verifying both the mechanical horn circuit and the physical particle chamber.
1. The Monthly Electrical Circuit Verification
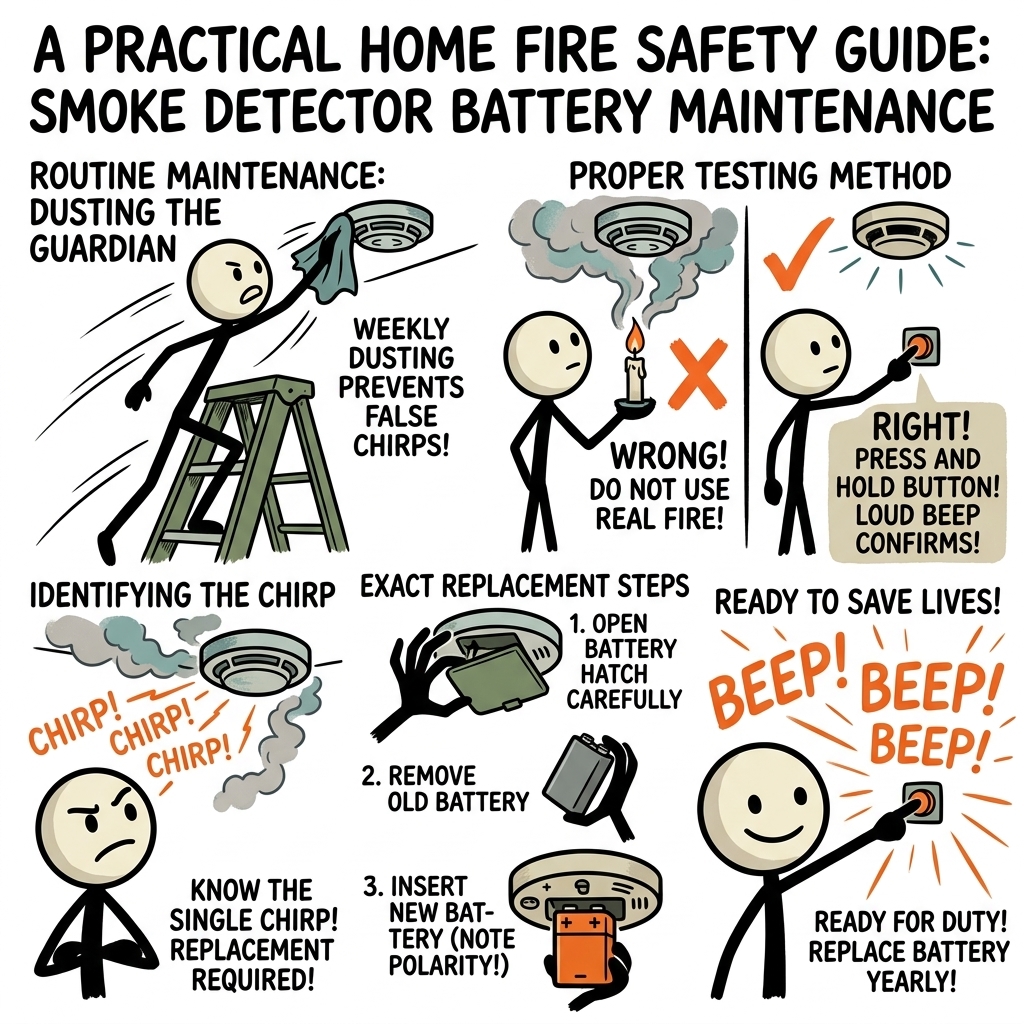
The push-button test should occur on the first day of every month. This test completes a circuit loop that validates internal continuity, measures battery output under load, and confirms that the piezo-electric horn sounds at or above the NFPA-mandated 85 decibels at a 10-foot distance.
- Notify Household Members: Warn everyone in the home prior to testing to avoid triggering panic or startling children and pets.
- Inspect the Exterior Shell: Check the casing for insect webs, visible grime, or settling drywall dust before touching the unit.
- Engage the Button: Firmly press and hold the test button for 3 to 5 continuous seconds. A quick tap often fails to activate the diagnostic cycle.
- Evaluate the Output: The unit should emit three piercing, rhythmic beeps (Temporal 3 pattern). If the tone is muffled, weak, or raspy, change smoke alarm battery cells immediately.
- Verify Interconnection: If your home features interconnected alarms, maintain pressure on the test button until you confirm that alarms on other floors and in adjacent bedrooms have triggered in response.
2. The Semi-Annual Functional Aerosol Chamber Test
A successful push-button test does not prove that your detector can register actual smoke. Dust, dead spiders, or damaged photodiodes can leave an alarm blind to hazardous particles even while its test button functions smoothly. Twice a year, conduct a true functional test using an approved aerosol smoke detector tester spray (synthetic smoke).
Purchase a can of UL-listed aerosol smoke tester, which mimics the particle size profile of real combustion without leaving oily residues. Hold the can approximately two to three feet away from the unit and spray a short, one-second burst directly toward the detection vents. The alarm should sound within five to fifteen seconds. Once it activates, clear the lingering particulate away using a portable fan, a piece of cardboard, or the cool-shot setting on a handheld blow dryer. If the alarm fails to react to aerosol particles despite a passing push-button test, the optical or ionization chamber is either contaminated beyond repair or broken; replace the unit immediately.
The Midnight Chirping Smoke Detector Fix
Nothing frays nerves faster than an erratic, high-pitched chirp echoing through a quiet house. While many react with frustration, understanding the underlying electronics helps you fix the issue quickly and methodically.
Why Smoke Alarms Chirp in the Cold
Detectors rarely start chirping at noon. Instead, they almost always begin between 2:00 AM and 5:00 AM. This timing comes down to basic battery chemistry. As ambient indoor temperatures dip overnight, the internal chemical reactions within alkaline smoke detector batteries slow down. This drop in temperature increases internal resistance and drops the battery's terminal voltage output.
If an aging battery is already hovering near its minimum threshold (typically around 7.2 to 7.5 volts for a standard 9-volt cell), that early-morning temperature dip drops its output below the cutoff line. The processor registers a low-voltage condition and fires an alert pulse. When daytime heating warms the room back up, the voltage may edge back above the warning line, silencing the alarm until the next night. Do not wait for the chirping to resume; address the voltage drop the moment you hear it.
Decoding Alarm Sound Sequences
Not every audible signal indicates a flat battery. Modern alarms communicate their status through distinct audio patterns:
- Single chirp every 30 to 60 seconds: Low battery voltage. The cell must be replaced.
- Rapid double chirp every minute: Sensor chamber contamination or internal fault. The unit requires deep cleaning or has experienced a processor error.
- Single chirp every 30 seconds accompanied by a red LED flash: End-of-Life (EOL) warning. The internal timer has reached 10 years; the entire fixture must be decommissioned and replaced.
- Continuous, unbroken ear-splitting siren: Active emergency detection. Evacuate immediately according to your emergency escape plan.
Step-by-Step Troubleshooting for Lingering False Chirps
A common point of frustration occurs when an alarm continues to chirp even after you install a brand-new battery. This lingering alert is almost always caused by residual capacitive charge in the circuit board, which prevents the microchip from clearing its low-voltage memory state.
- Isolate Electrical Sources: If dealing with a hardwired unit, switch off the responsible breaker on your main electrical panel.
- Dismount the Fixture: Rotate the alarm counter-clockwise off its mounting bracket and disconnect the three-pin quick-connector harness from the ceiling.
- Extract the Battery: Open the battery door and remove the existing cell.
- Drain Residual Energy: Press and hold the test button down continuously for 15 to 20 seconds while the unit is completely unpowered. This drains all residual charge from the internal capacitors, resetting the microchip's diagnostic memory to factory zero.
- Wipe the Contacts: Inspect the metallic battery terminal snaps or prongs. If tarnished or bent, clean them with an isopropyl alcohol swab and gently bend loose prongs inward for a tighter friction fit.
- Insert New Chemistry: Install a fresh, premium battery, matching polarity markings (+ and -) precisely.
- Reassemble and Reconnect: Reattach the wiring harness, mount the unit back onto its ceiling plate, restore line power at the breaker panel, and run a standard push-button test.
How to Change Smoke Alarm Battery: The Complete Procedure
Changing smoke alarm battery cells appears straightforward, but small mistakes—such as choosing cheap off-brand batteries or mishandling terminal leads—can cause early failures or leave the unit dead when you need it most. Follow this field-tested procedure for both standalone and hardwired configurations.
Step 1: Procure the Proper Power Cells
Never power life-safety systems with bargain-bin zinc-carbon batteries or generic rechargeable NiMH cells. Standard zinc-carbon batteries exhibit sharp, unpredictable voltage drops that cause premature chirping and shortened service lives. Rechargeable cells, meanwhile, suffer from high self-discharge rates and lower nominal operating voltages (1.2V per cell instead of 1.5V), which can trigger permanent low-battery signals.
Select name-brand premium alkaline batteries (such as Energizer Max or Duracell Coppertop) or dedicated 9V / AA lithium chemistries designed for life-safety equipment. Lithium replacements offer substantial cold-weather resistance, shelf lives exceeding 10 years, and flat discharge curves that maintain optimal operating voltage for years at a time.
Step 2: Access and Clean the Unit Safely
Set up a stable step stool or stepladder directly beneath the alarm base. Never overreach from an angle or balance on unstable chairs. Carefully grasp the outer rim of the alarm and rotate it roughly 15 degrees counter-clockwise until it unlocks from the ceiling bracket tabs.
Before opening the battery drawer, inspect the perimeter slots. Take this opportunity to gently brush or vacuum away the dust, dead insects, and particulate matter that accumulate around the sensor housing over months of convective airflow.
Step 3: Replace the Cell and Check Terminal Polarity
Open the battery compartment door (located either on the rear baseplate or along the front edge of modern designs). Remove the exhausted cell and responsibly set it aside for hazardous-waste or battery recycling.
Take note of the mechanical polarity markings inside the compartment. Many modern 9V compartments feature a mechanical lockout arm—a small plastic lever that stays depressed while a battery is seated. If you try to close the door without a battery installed, or insert the cell backward, this lockout blocks the door, keeping you from mounting an unpowered alarm back to the ceiling.
Step 4: Re-Engage and Run System Checks
Snap the new battery firmly into place. Ensure the locking latch fully clicks shut. If the alarm is hardwired, align the keyed electrical harness and push it firmly into the back of the alarm until its locking clip snaps into place.
Seat the unit flush against the mounting bracket and twist clockwise until you feel it click into its locked detent. Press and hold the primary test button to run a full diagnostic cycle, confirming that both local horns and interconnected partner alarms sound clearly.
Beyond the Battery: The 10-Year Replacement Mandate and Maintenance
Homeowners often believe that a smoke alarm with fresh batteries will protect them indefinitely. That is a dangerous misconception. The sensitive components within smoke detectors age, degrade, and gather dust until they can no longer be relied on.
Why Smoke Detectors Expire
Every smoke detector carries an uncompromising 10-year lifespan under NFPA 72 regulations. After a decade of continuous service, the sensor hardware suffers unavoidable physical breakdown:
- Photodiode and LED Fading: In photoelectric units, the light-emitting diode runs 24 hours a day, 365 days a year. Over 10 years (amounting to roughly 87,600 operating hours), the LED's output dims, while the photodiode loses light sensitivity. This drift causes phantom alerts or leaves the sensor blind to real smoke.
- Corrosion and Environmental Coating: Airborne cooking oils, aerosolized cleaners, pet dander, and humidity steadily coat the inner walls of the sensing chamber. This build-up acts like an acoustic and optical sponge, dampening particle scatter and trapping moisture.
- Americium Chamber Drift: In ionization models, americium particles break down and their surrounding electrical contacts oxidize, altering the chamber's baseline resistance and reducing detection speed.
How to Read Date Codes
The date stamped on the back of your alarm is the date of manufacture—not an expiration date, and not the date of retail purchase. To verify the service life of your units:
- Dismount the unit from the ceiling.
- Flip the housing over to view the rear specification label.
- Locate the 4-digit or text date code (e.g., "2016 AUG 12" or "160812").
- Add precisely 10 years to that stamped date. If that threshold has passed, replace the entire fixture immediately, regardless of whether it passes a push-button test.
If the label has faded, is covered in paint, or lists no legible date, the alarm is almost certainly obsolete and should be replaced right away.
The Semi-Annual Vacuum Protocol
Dust is the leading culprit behind sudden false alarms and degraded sensor performance. As air circulates through living spaces, your smoke detectors act as static traps, pulling in microscopic dust, drywall powder, and pet dander. Make cleaning your units part of your seasonal routine:
- Vacuum the Vents: Using an upholstery brush attachment or a crevice nozzle, gently vacuum along the outer perimeter and intake vents of every detector. This clears out built-up debris without harming the sensitive electronics inside.
- Blow Out the Chamber: Use a can of clean, moisture-free compressed air to clear debris out through the opposite side vents. Apply short, controlled puffs rather than sustained blasts to avoid spinning internal parts or spraying liquid propellant into the sensing path.
- Wipe Down the Cover: Clean the exterior plastic cover using a lightly dampened microfiber cloth. Never spray household cleaners, ammonia, bleach, or disinfectants directly onto or near the detector housing. The chemical vapors can damage the sensors and dissolve plastic parts.
Strategic Placement and Home Fire Safety Maintenance
Even a well-maintained smoke detector will fail to protect your family if it is mounted in the wrong location. To give everyone time to evacuate safely, alarms must be positioned where they can catch rising smoke layers quickly without being blinded by dead air spaces or tripped by routine household steam.
| Room / Area | Recommended Detector Type | Placement Rules |
|---|---|---|
| Bedrooms | Photoelectric or Dual-Sensor | Mount inside every sleeping room on the ceiling, ideally near the center of the room. |
| Hallways | Dual-Sensor (Ionization + Photoelectric) | Place in corridors outside sleeping quarters; one detector for every 30 feet of hallway. |
| Kitchens | Photoelectric with Hush Feature | Keep at least 10 feet (ideally 20 feet) away from cooking appliances to prevent cooking-steam false alarms. |
| Basements & Multi-level Landings | Hardwired / Interconnected Ionization | Mount on the ceiling at the bottom of the basement stairwell; install on every level of the home. |
The Geometry of Dead Air Spaces
Smoke rises toward the ceiling and spreads out horizontally like a mushroom cap until it reaches surrounding walls. However, the exact corners where ceilings meet walls form stagnant pockets called "dead air spaces." Air currents bypass these pockets entirely, which can significantly delay smoke from reaching an alarm mounted there.
To avoid dead air zones, mount ceiling alarms at least 4 inches away from any adjacent wall. If you must mount a unit on a wall due to structural constraints, place it between 4 and 12 inches down from the ceiling plane. Never mount a detector within 36 inches of ceiling fan blades, heating and cooling supply vents, or window drafts; incoming air currents will blow smoke away from the sensors, delaying early detection when every second counts.
The Annual Home Fire Safety Master Schedule
Maintain consistent life-safety readiness by integrating home fire safety maintenance into a simple, disciplined calendar:
- First of Every Month: Conduct push-button horn and electrical continuity checks on all units across the house.
- Daylight Saving Transitions (Spring & Fall): Swap out alkaline smoke detector batteries for fresh pairs, blow clear internal sensor chambers using compressed air, and inspect the manufacturing date codes stamped on the backing plates.
- Every Six Months: Run a functional aerosol spray test to confirm that sensing chambers react promptly to physical particles.
- Every Ten Years: Remove and replace every smoke and combination carbon monoxide detector across your home, updating mounting brackets and electrical quick-connect harnesses as needed.
Take Command of Your Home Fire Preparedness
A residential fire is a fast-moving, high-heat emergency that offers no time for second guesses or improvised plans. The ear-piercing sound of an alarm should never signal a forgotten battery or an unaddressed circuit fault; it must serve as an immediate, trustworthy call to action. By managing your smoke detector batteries proactively, carrying out regular functional aerosol tests, and replacing aging fixtures on time, you transform an annoying midnight chore into a life-saving layer of home defense. Take control of your safety network today: inspect your manufacturing dates, clear out accumulated dust, install fresh power cells, and rest easy knowing your home and family are protected by a reliable, battle-tested system.
Frequently Asked Questions
How often should smoke detector batteries be tested?
Test smoke detector batteries once a month by pressing and holding the test button until the loud siren sounds.
How often should standard smoke detector batteries be replaced?
Replace standard 9-volt or AA batteries at least once a year, or immediately when the unit emits a periodic low-battery chirp.
Do 10-year sealed smoke alarms require battery replacement?
No. Sealed 10-year lithium smoke alarms do not require battery swaps, but the entire detector must be replaced once the 10-year lifespan expires.
Why does a smoke detector chirp after putting in a new battery?
Post-replacement chirping is typically caused by improper battery orientation, dust inside the sensor chamber, residual charge needing a reset, or the alarm reaching its 10-year replacement date.
When does the entire smoke detector unit need to be replaced?
Smoke alarms should be replaced every 10 years from the manufacture date stamped on the back of the device, regardless of battery type.