⚡ Key Facts
- Hypothermia is a Rapid Killer: According to the Centers for Disease Control and Prevention (CDC), hypothermia can set in at temperatures well above freezing (even between 40°F and 50°F) if a person is wet, wind-exposed, or exhausted. For the practical checklist side, use the community emergency preparedness guide.
- The Critical 3-Hour Window: In extreme outdoor conditions, exposure can become life-threatening in as little as three hours without adequate thermal protection, making emergency shelter construction your immediate priority over food or water. For the practical checklist side, use the neighborhood preparedness network.
- Search and Rescue Realities: Data from the National Park Service (NPS) indicates that over 85% of search and rescue operations are resolved within 24 hours, meaning emergency shelter types should focus on short-term, high-insulation designs. For the practical checklist side, use the emergency communication plan.
- The Ground is the Enemy: Conduction—the transfer of body heat directly to the cold ground—saps body heat up to 25 times faster than air of the same temperature, highlighting the absolute necessity of a thick insulation bed. For the practical checklist side, use the family emergency planning guide.
Imagine the scenario: the sun is dipping below the ridgeline, the temperature is plummeting, and an unexpected storm has rolled in, rendering your map useless and your path back to camp invisible. In a survival situation, panic is your greatest enemy, but preparation is your ultimate shield. When you are stranded in the backcountry, understanding the fundamentals of wilderness shelter building is the dividing line between a cold, life-threatening night and surviving to see the sunrise. By mastering a few fundamental designs, you can utilize the raw materials provided by nature to create a microclimate that preserves your core body temperature and keeps you safe until rescue arrives.
The Science of Survival: Why Shelter Comes First
In the hierarchy of survival, the "Rule of Threes" dictates that you can survive three minutes without air, three days without water, three weeks without food, but only three hours without shelter in harsh, exposure-prone environments. Your body maintains a delicate internal core temperature of approximately 98.6°F (37°C). When exposed to cold, wind, and rain, your body loses heat through four primary mechanisms: radiation, conduction, convection, and evaporation. Understanding these physical processes is crucial when learning how to build a survival shelter.
Conduction occurs when you sit or lie directly on the cold earth, allowing your body heat to drain into the ground. Convection happens as moving air currents sweep away the thin layer of warm air clinging to your skin. Radiation is the natural emission of infrared heat from your body into the surrounding atmosphere, while evaporation strips heat as sweat or rain dries from your clothing. To counteract these forces, outdoor survival shelters must be designed to trap a pocket of dead air around your body, shield you from wind and precipitation, and insulate you from the cold ground below. By choosing the right shelter design, you create an engineered pocket of warmth that works with, rather than against, thermodynamic laws.
Site Selection: The "5 Ws" of Wilderness Shelter Building
Before you snap a single branch or gather a handful of leaves, you must select the optimal location. Erecting the most structurally sound primitive shelter DIY project in a hazardous zone is a recipe for disaster. Professional search and rescue teams, alongside agencies like the Federal Emergency Management Agency (FEMA), emphasize the importance of situational awareness. Always evaluate your potential camp using the "5 Ws" framework:
- Wind: Analyze the prevailing wind direction. Your shelter’s entrance must face away from the wind (typically downwind or leeward) to prevent cold drafts and rain from blowing directly into your sleeping area.
- Water: Ensure you are close enough to a water source for hydration, but far enough away to avoid hazards. Never build in dry riverbeds, canyons, or low-lying drainage basins where flash floods can occur overnight. Stay at least 200 feet away from water bodies to avoid damp microclimates and insect breeding grounds.
- Widowmakers: Look up before you look down. Avoid pitching your shelter beneath dead, standing trees, hanging branches, or loose rocky cliffs. High winds can easily dislodge these heavy hazards, resulting in fatal impacts.
- Wild Things: Inspect the immediate area for signs of wildlife. Avoid game trails, active animal burrows, insect hives, and areas with high concentrations of rotting logs, which host scorpions, snakes, and spiders.
- Wood: Ensure there is an abundant supply of dead, dry wood and insulating materials (such as dry leaves, pine needles, or ferns) nearby. Carrying heavy logs over long distances rapidly depletes your caloric reserves and increases the risk of physical injury.
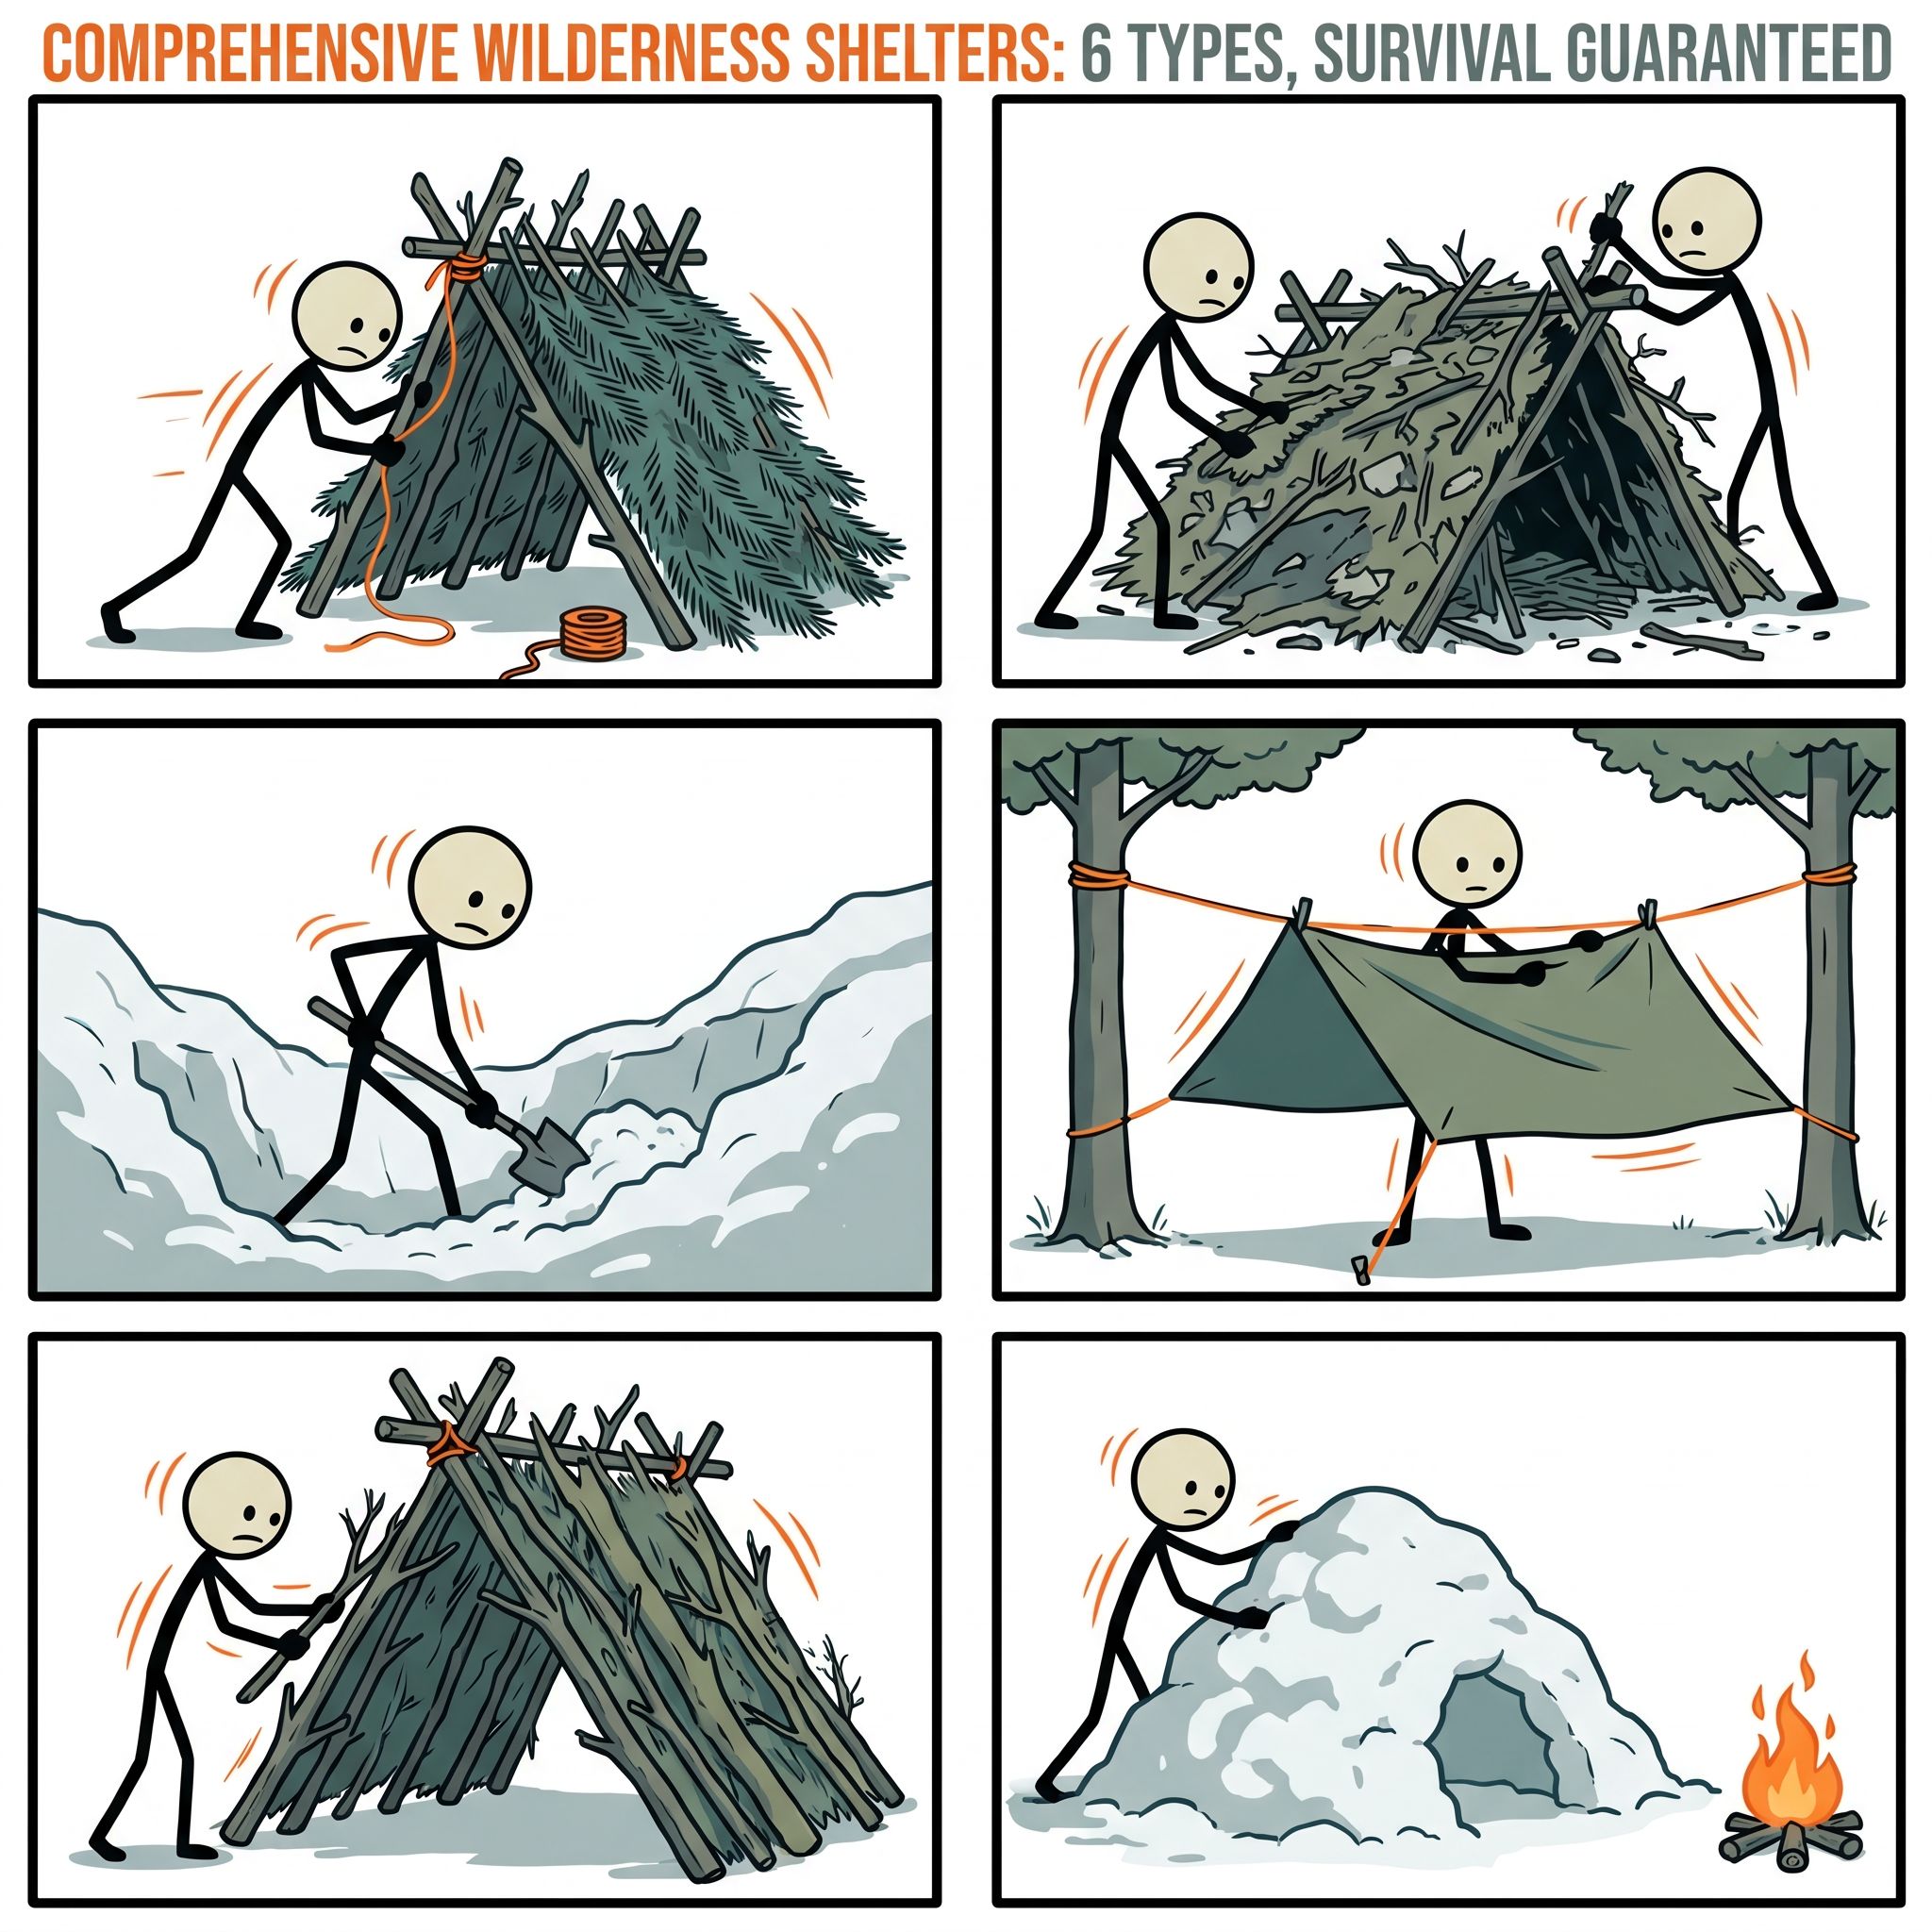
6 Highly Effective, Beginner-Friendly Emergency Shelter Types
When selecting from various emergency shelter types, you must match your design to the available natural resources, the weather conditions, and your physical state. Below are six highly effective, time-tested wilderness shelters that require no synthetic tools to construct.
1. The Classic Debris Hut
The Debris Hut is the undisputed gold standard of primitive shelter DIY. It requires absolutely no cordage, tarps, or specialized tools, relying entirely on gravity, friction, and the insulating properties of forest debris. This shelter operates like a natural sleeping bag, trapping your body heat within a very small, heavily insulated chamber.
How to Build It Step-by-Step:
- Locate a Ridgepole: Find a sturdy, straight branch that is approximately 1.5 times your height. It must be strong enough to support your weight without bowing or snapping.
- Secure the Ridgepole: Prop one end of the ridgepole onto a sturdy base, such as a low tree fork, a large rock, or a secure two-legged bipod made of interlocking branches. The high end should be roughly waist-high, while the opposite end rests directly on the ground.
- Place the Ribbing: Lean thick, sturdy branches along both sides of the ridgepole at a 45-degree angle. This creates an A-frame rib cage. Ensure the ribbing is spaced closely together so that debris does not fall through the gaps.
- Create a Lattice Layer: Weave smaller twigs, brush, and leafy branches horizontally across the ribbing. This creates a fine mesh or lattice that will hold your loose insulating material in place.
- Apply the Debris Pile: Heap loose, dry organic material—such as leaves, pine needles, ferns, and moss—over the entire structure. This insulating layer must be at least two to three feet thick. The thicker the debris, the more dead air space is trapped, and the warmer you will remain.
- Secure the Debris: Place light branches over the top of the debris pile to prevent wind from blowing your insulation away.
- Insulate the Interior: Crawl inside and pack the floor with at least 12 inches of dry debris to prevent conductive heat loss to the ground. Leave just enough room for your body to squeeze inside.
Best Used In: Cold, dry, or damp forested environments with abundant leaf litter or pine needles.
Pros: Exceptional thermal efficiency; requires no tools or cordage.
Cons: Time-consuming to construct; cramped interior space; can harbor insects.
2. The Fire-Reflective Lean-To
The Lean-To is one of the simplest and quickest outdoor survival shelters to construct. It utilizes a single sloped wall that acts as a windbreak and a heat-catching barrier. Because one side remains completely open, this shelter is designed to be paired with a long campfire and a heat reflector wall to bounce warmth back onto your body.
How to Build It Step-by-Step:
- Establish a Horizontal Support: Lash a strong horizontal pole (the ridgepole) between two living trees at chest height. If you do not have cordage, look for two trees with natural forks at the correct height, or prop the horizontal pole up using two sturdy bipods.
- Lean the Rafters: Lean several long, straight poles against the horizontal support on the windward side (the side facing the wind). These poles should angle down to the ground at roughly a 45-to-60-degree angle.
- Weave the Ribbing and Thatch: Lay horizontal branches across the rafters to create a grid. Beginning at the bottom and working your way up (like shingles on a roof), layer evergreen boughs, leafy branches, or bark sheets over the grid. Layering from bottom to top ensures that rainwater sheds off the structure rather than leaking through.
- Build a Fire Reflector: Directly in front of the open side of the lean-to, construct a wall of green logs or stacked stones. Build your campfire between the lean-to and this reflector wall. The wall will block external drafts and bounce radiant heat directly into your shelter.
Best Used In: Moderate climates with predictable wind directions; ideal when you have a reliable fire-starting method.
Pros: Fast and easy to build; spacious; allows for a heating fire.
Cons: Offers poor protection if the wind shifts; requires a continuous fire to stay warm in freezing temperatures.
3. The Natural A-Frame Shelter
The Natural A-Frame is a modification of the lean-to, offering dual-sided protection against shifting winds and heavy rains. By enclosing both sides of your sleeping area, this shelter sheds water exceptionally well and minimizes convective heat loss from sudden drafts.
How to Build It Step-by-Step:
- Set up the Ridgepole: Suspend a long ridgepole horizontally between two trees or support structures at roughly waist-to-chest height, depending on how much headroom you require.
- Add Symmetrical Ribs: Lean straight poles along both sides of the ridgepole, creating an identical slope on each side. The poles should meet at the top, forming a series of "A" shapes along the length of the ridgepole.
- Thatch the Sides: Just like the lean-to, apply a horizontal lattice of smaller branches, and then thatch both sides with pine boughs, palm fronds, or thick bark slabs, working from the ground up.
- Block the Back Entrance: Close off one of the triangular openings of the A-frame with stacked logs or woven brush, leaving the opposite end open as your main entrance.
Best Used In: Wet, windy environments where rain may fall from multiple directions.
Pros: Excellent wind shedding and water runoff; structurally very stable.
Cons: Less interior space than a lean-to; requires more building materials and time.
4. The Tree Well Shelter
If you find yourself stranded in a deep snowpack environment, such as a high-altitude coniferous forest, the Tree Well Shelter is a life-saving option. Coniferous trees, like spruce, fir, and pine, have thick, heavy branches that catch falling snow, leaving a natural hollow or "well" of clear ground around the base of the trunk.
How to Build It Step-by-Step:
- Select the Right Tree: Locate a large, mature evergreen tree with thick, low-hanging branches that extend all the way to the snowpack.
- Excavate the Well: Carefully dig out the loose snow around the trunk of the tree. Dig down until you reach the ground or a highly compacted layer of snow. Be careful not to disturb the overhead branches, which are holding back a heavy snow load.
- Reinforce the Canopy: Use the excavated snow to build a perimeter wall around the edge of the tree well to block the wind. If the overhead branches are sparse, weave additional pine boughs into the ceiling to create a thick, insulated, water-resistant roof.
- Insulate the Floor: The frozen ground or snow underfoot will quickly drain your body heat. Lay down a thick mattress of dry pine boughs, bark, or dry wood to insulate your sleeping area.
Best Used In: Deep snow conditions and alpine environments where evergreen trees are abundant.
Pros: Utilizes existing natural architecture; fast to construct; naturally insulated by the surrounding snowpack.
Cons: Risk of snow collapse if the branches are disturbed; limited ventilation requires caution if using any form of open flame.
5. The Fallen Trunk / Log Shelter
Nature often does the heavy lifting for you. A fallen tree that is propped up by its root ball, branches, or an adjacent boulder provides an instant, structurally sound ridgepole. This minimizes the physical exertion of lifting heavy logs, allowing you to focus your energy on insulation and weatherproofing.
How to Build It Step-by-Step:
- Inspect the Trunk: Ensure the fallen tree is completely stable and will not shift, roll, or sink further under the weight of your building materials.
- Clear the Underside: Clear away any dead twigs, rocks, or damp debris from beneath the high side of the log to create a clean sleeping platform.
- Lean Ribbing Against the Trunk: Lean sturdy branches along the windward side of the trunk, using the log itself as your support beam. If the log is high enough off the ground, you can build a lean-to style wall; if it is low, you can create a low-profile bivy-style shelter.
- Thatch and Insulate: Cover the ribbed wall with a thick layer of pine needles, leaves, or sod. Pack the interior with dry bedding to complete your windproof sleeping pocket.
Best Used In: Old-growth forests or areas with high windthrow, where fallen trees are common.
Pros: Extremely sturdy; saves time and physical energy; low profile makes it highly wind-resistant.
Cons: Can be damp if the log is rotting; height is limited by the natural position of the fallen tree.
6. The Wickiup (Debris Teepee)
The Wickiup is a circular, conical shelter resembling a traditional Native American teepee. It is highly versatile, spacious, and structurally strong. Because of its height and conical shape, it is one of the few primitive shelter DIY designs that can safely accommodate a very small, well-ventilated warming fire in the center of the structure.
How to Build It Step-by-Step:
- Construct the Tripod: Find three or four long, thick, fork-topped poles. Interlock the forks at the top and spread the bases out to form a stable, wide tripod frame.
- Add Ribbing Poles: Lean dozens of additional poles around the tripod frame in a circle, leaving a small gap on the downwind side to serve as your doorway. The frame should now resemble a cone.
- Apply the Thatch: Cover the conical frame with layers of brush, leaves, bark, or pine boughs. If you plan to build a small fire inside, leave a 12-to-18-inch opening at the very peak of the cone to allow smoke to escape.
- Dig a Fire Pit (Optional): If the wickiup is large enough and properly vented, dig a small, shallow pit in the center of the floor. Keep your fire small to prevent sparks from catching the dry walls of your shelter.
Best Used In: Semi-arid or forested environments where long, straight poles are abundant; ideal for multi-day Survival Scenarioss or small groups.
Pros: Spacious; excellent shedding of wind and rain from all directions; can support an internal fire.
Cons: Requires a large volume of long, straight poles; takes significant time and energy to construct correctly.
The Critical Role of Ground Insulation: The "Under-Bedding" Rule
A common and potentially fatal mistake made by beginners practicing wilderness shelter building is focusing entirely on the roof while ignoring the floor. You can build a flawless, waterproof, and windproof canopy, but if you lie directly on the cold earth, you will succumb to hypothermia. The ground acts as a massive heat sink, drawing warmth out of your body via conduction.
To prevent this, you must apply the "Under-Bedding" Rule: always build a sleeping platform that is at least 8 to 12 inches thick when compressed by your body weight.
To construct an effective survival mattress, begin with a base layer of thick, springy branches (such as pine or fir boughs) laid down in an interlocking pattern. This creates a spring-like frame that keeps you elevated off the cold ground. Next, pack this frame with a thick layer of dry, soft insulation, such as dry leaves, pine needles, dried ferns, or moss. When you lie down, the bedding should compress into a comfortable, thick barrier that traps a layer of warm air beneath you, isolating your body from the cold earth.
Advanced Shelter Tips: Waterproofing and Ventilation
Building a shelter is only half the battle; ensuring it remains dry and breathable is what guarantees your long-term survival. Use these advanced tactics to optimize your shelter's performance:
| Feature | Survival Purpose | How to Implement |
|---|---|---|
| Drip Lines & Trenches | Prevents ground runoff from flooding your shelter floor during heavy rains. | Dig a shallow, 3-inch trench around the high side and lateral edges of your shelter, sloping it downhill to divert water away. |
| Shingling Method | Ensures rainwater flows down the outside of the shelter instead of dripping inside. | Always apply your outer boughs or bark slabs from the bottom up, overlapping each layer like shingles on a house. |
| Ventilation Ports | Prevents hazardous carbon monoxide buildup and reduces condensation from your breath. | Leave a small, fist-sized opening near the top of your shelter's door or peak to maintain fresh air circulation. |
Common Mistakes to Avoid in Survival Shelter Construction
When survival is on the line, minor errors can yield catastrophic results. Avoid these common pitfalls during your build:
- Building Too Big: A spacious shelter requires more time and physical effort to build, and more importantly, it is incredibly difficult to warm. Your body heat is the only furnace available; keep the interior chamber as small as possible to maximize thermal efficiency.
- Starting Too Late: Gathering materials and constructing a high-quality shelter takes hours. Do not wait until dusk to begin. FEMA recommends halting your travel and starting shelter construction at least two to three hours before sunset.
- Using Rotten Wood: Rotten logs are weak, hold moisture, and are prone to collapsing under the weight of your debris pile. Only use dry, dead, structurally sound wood for your load-bearing poles.
- Ignoring the Door: A wide-open doorway allows wind and rain to sweep inside, instantly destroying your microclimate. Always build a "door plug" using a bundle of pine boughs or a pile of debris held together by branches, and pull it into the opening behind you once you crawl inside.
Empower Yourself Through Practice
The wilderness is a dynamic, unpredictable environment, but your response to an emergency does not have to be. Knowing how to build a survival shelter is not merely a theoretical exercise—it is an active, empowering discipline that connects you to the ancient survival skills of our ancestors. By understanding the thermodynamic principles of heat loss, assessing your surroundings with the "5 Ws," and mastering the construction of these six emergency shelter types, you transform the forest from a place of potential danger into a resourceful ally. The next time you step onto the trail, carry this knowledge with you, and remember that with the right skills, you are never truly homeless in the wild.
Frequently Asked Questions
What is the most important factor when choosing a wilderness shelter site?
The most important factor is location: select dry, level ground free of hazards like dead overhanging branches (widowmakers), rising water, and animal trails.
What are the six basic types of emergency wilderness shelters?
The six basic types are the lean-to, A-frame, debris hut, tarp shelter, snow cave, and trench shelter.
How does a debris hut keep you warm without a fire?
A debris hut traps body heat by using a thick outer layer of insulating natural materials, such as dry leaves, pine needles, and brush, over a small, confined frame.
What is the survival 'Rule of Threes' regarding shelter?
The Rule of Threes dictates that you can survive 3 minutes without air, 3 hours without shelter in extreme exposure, 3 days without water, and 3 weeks without food.
Can I build an emergency shelter using only natural materials?
Yes, shelters like the debris hut and natural lean-to can be constructed entirely from fallen branches, bark, and leaves without any tools or cordage.