⚡ Key Facts
- The Baseline Rule: FEMA and the Red Cross mandate a minimum of 1 gallon of water per person, per day-half for drinking, half for basic hygiene and food preparation.
- The 14-Day Standard: While a 3-day supply is the absolute minimum, the CDC and modern preparedness experts strongly recommend building a 2-week emergency water supply for your household.
- Water Doesn't Expire: Pure H2O does not go bad, but the plastic containers holding it will degrade over time. Standard bottled water should be rotated every 1 to 2 years.
- Concrete Warning: Never store plastic water containers directly on concrete floors; temperature fluctuations and chemical leaching can compromise your water supply. Always use a wooden pallet or shelving.
- Chemical Purification: According to the EPA, you can safely disinfect questionable water using standard, unscented household bleach (5.25%-8.25% sodium hypochlorite) at a ratio of just 6 to 8 drops per gallon.
Keep Your Plan Usable
A written checklist is only useful if it stays current. The Protocol Survival preparedness app helps households track supplies, turn gaps into next actions, and keep the plan ready to use when normal services are disrupted.
Start With Three Days
For most households, 72 hours is 3 days of essentials before outside help or normal services may return. Use the 72-hour emergency preparedness guide to turn this checklist into a realistic water, food, light, communications, and family-plan baseline.
First 72 Hours: Fast Action Path
The query behind this page is simple: 72 hours is 3 days. In preparedness terms, those three days are the bridge between a normal household and delayed outside help. Start with the 72-hour rule guide, then build skills through the free Catastrophe Survival 101 course.
For the practical kit, use the 72-hour kit guide, calculate supplies with the supply calculator, and set water targets with the water calculator.
How Much Water to Store: Running the Numbers
The most common question beginners ask is simply how much water to store. The official recommendation from the Federal Emergency Management Agency (FEMA) and the American Red Cross is one gallon per person, per day. However, treating this as a rigid maximum rather than a bare minimum is a dangerous mistake. That single gallon is strictly budgeted: two quarts for drinking and two quarts for food preparation and minimal sanitation. It leaves virtually zero margin for error. In reality, your water needs will fluctuate wildly based on your environment, physical exertion, and the specific members of your household.Accounting for the Variables
When calculating your emergency water supply, you must factor in the unique dynamics of your family. Pregnant or nursing mothers require significantly more hydration to maintain health and milk production. Children, the elderly, and individuals with underlying medical conditions are highly susceptible to dehydration and require a larger daily allowance. Climate is another massive factor. If you live in a hot, arid climate or experience a summer power outage without air conditioning, your body will demand double the normal water intake just to regulate its core temperature. You also need to account for your pets. A medium-sized dog will require about half a gallon of water per day, while cats require about a quart.The 3-Day Minimum vs. The 2-Week Ideal
For decades, the standard advice was to keep a 72-hour (3-day) supply of water. This equates to 3 gallons per person. However, modern disaster data shows that power grids and water treatment plants often take much longer to come back online. The Centers for Disease Control and Prevention (CDC) now advises aiming for a 2-week supply. Let's break down the math for a family of four aiming for a two-week supply:- 4 people × 1 gallon/day = 4 gallons per day.
- 4 gallons × 14 days = 56 gallons.
- Add 14 gallons for a large dog = 70 gallons total.
Choosing the Right Water Storage Containers
Commercially Bottled Water
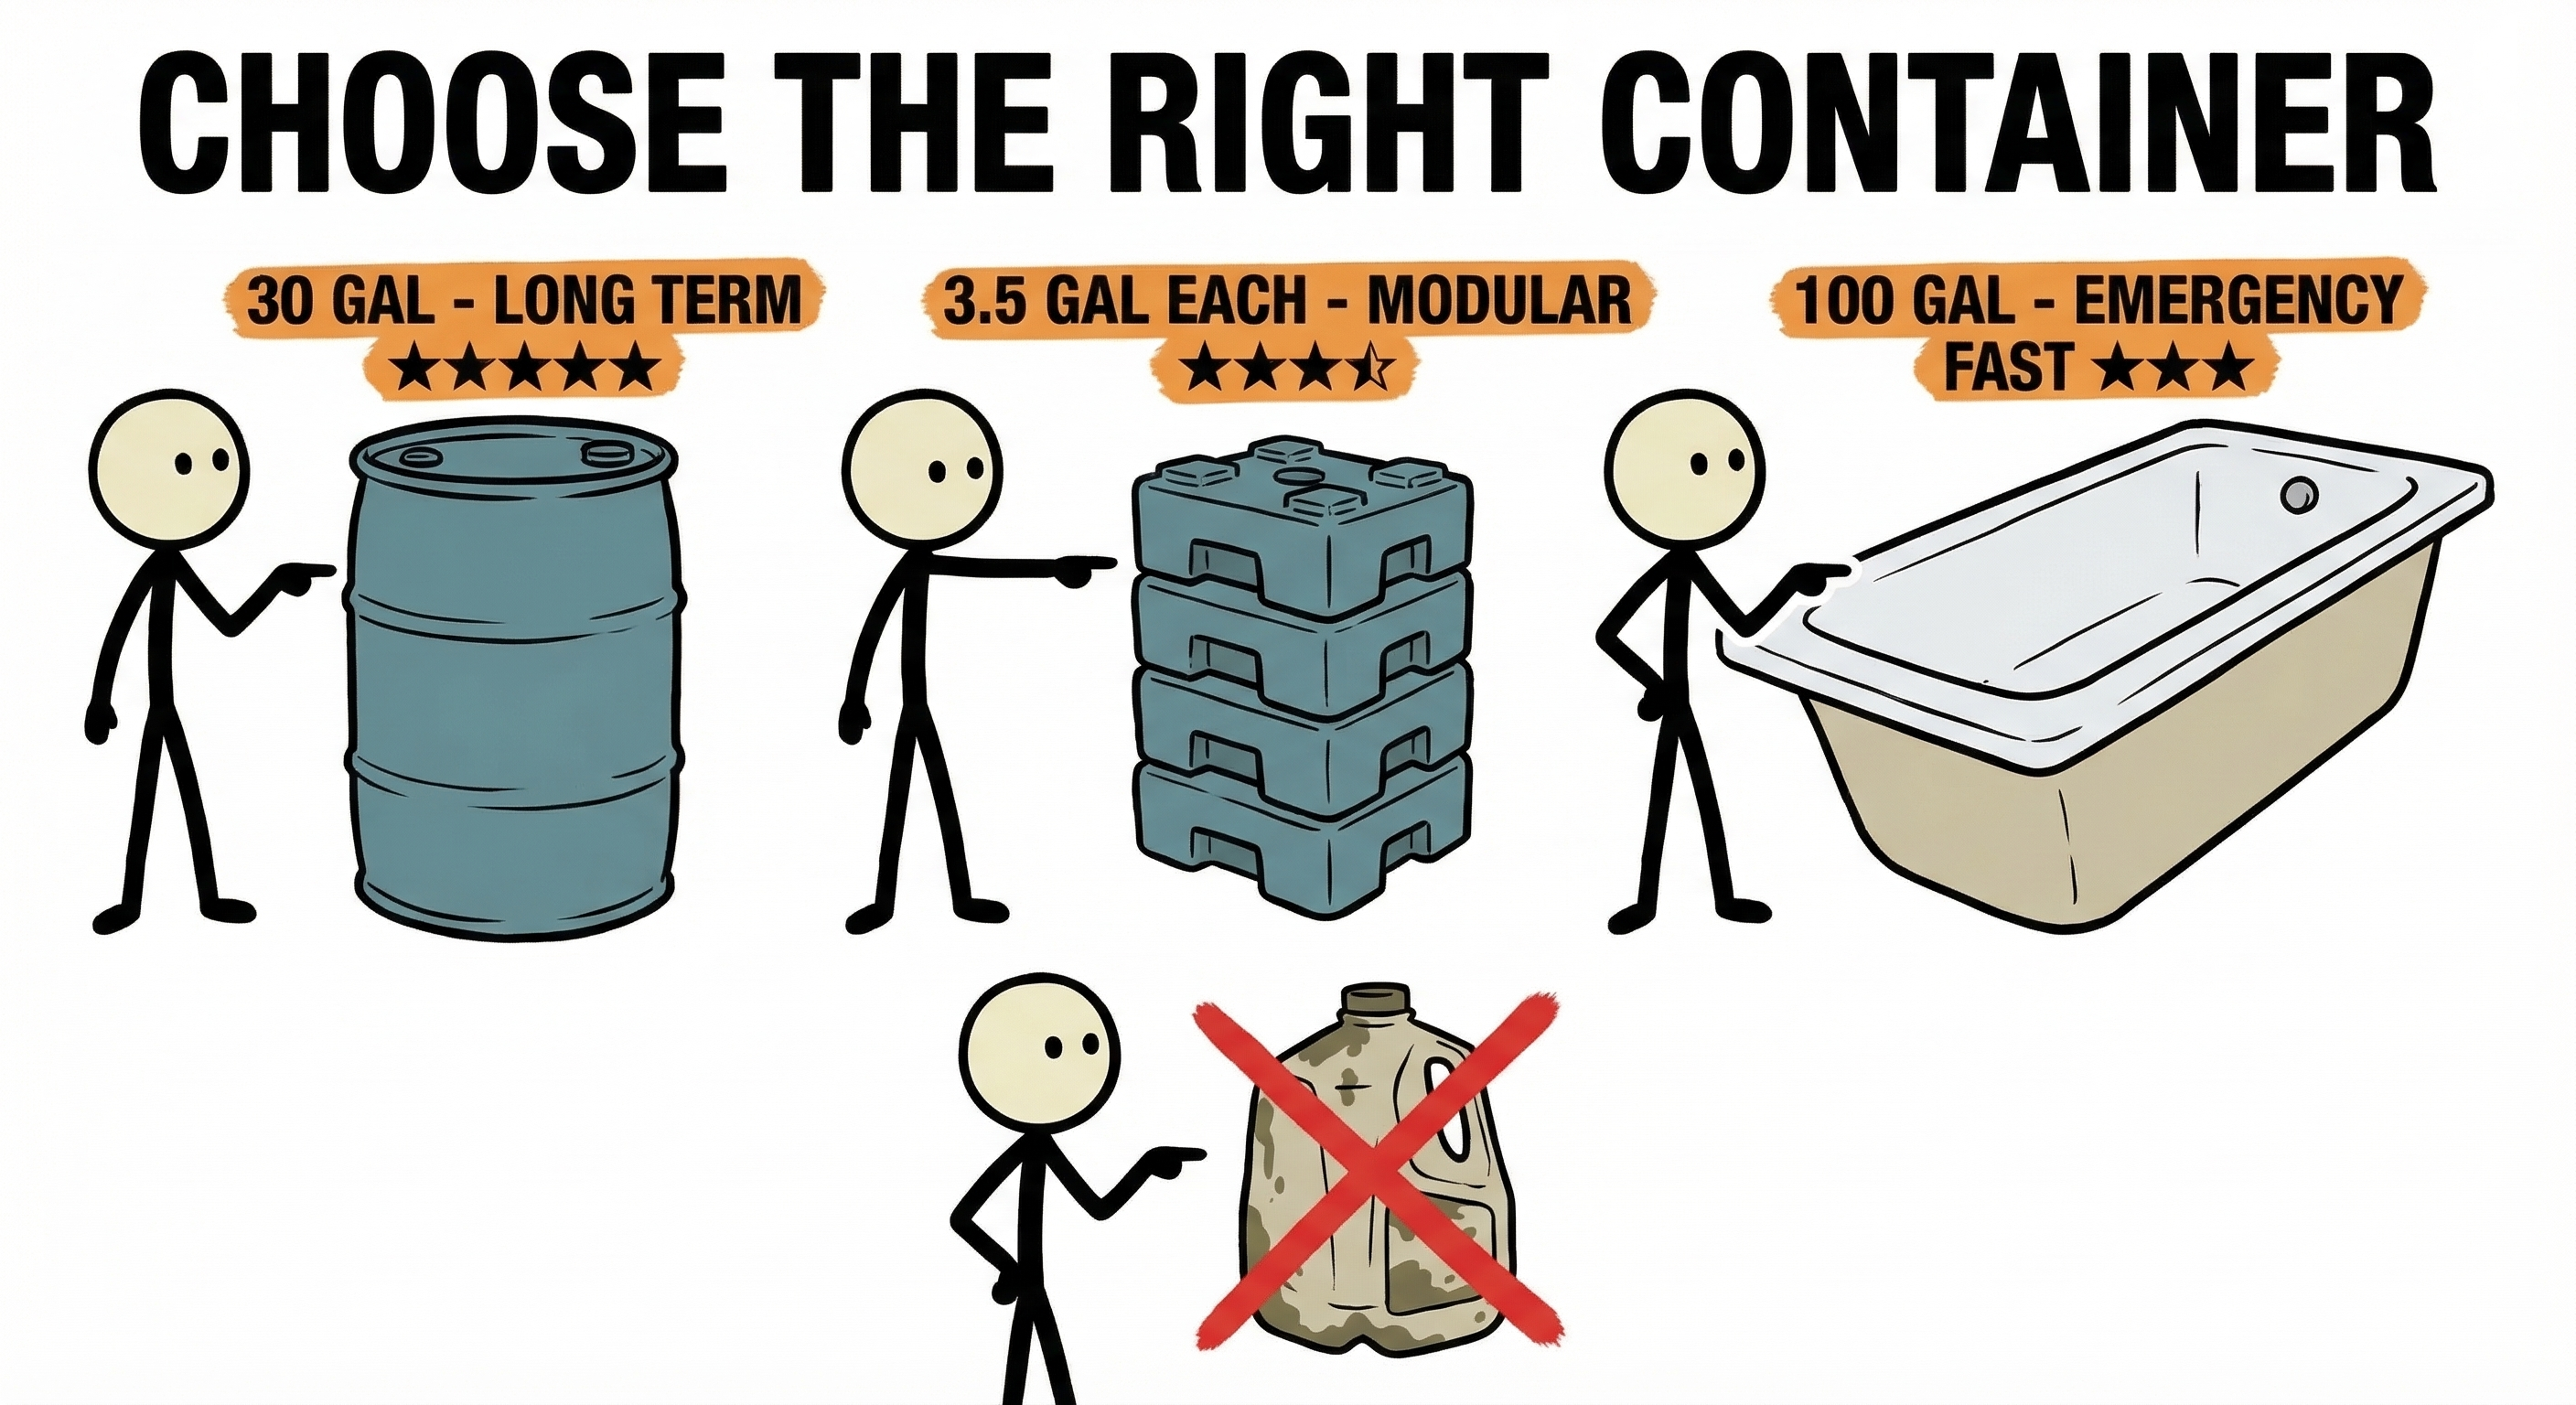
For sheer convenience, commercially packaged bottled water is hard to beat. Cases of water bottles or gallon jugs are inexpensive, pre-sanitized, and easy to distribute. You can slide them under beds, stack them in closets, or throw them into a vehicle if you need to evacuate. However, the plastic used in disposable water bottles (PETE #1) is very thin. Over time, and especially if exposed to heat, this plastic will degrade, become brittle, and eventually leak. They are excellent for a short-term, grab-and-go supply, but they require strict rotation and should not be the only method you rely on.Stackable Containers (WaterBricks and Aqua-Tainers)
If you want to maximize space in a closet or pantry, specialized stackable containers are an incredible investment.- WaterBricks: These hold 3.5 gallons each and are shaped like giant Lego blocks. They interlock, allowing you to stack them safely up to four feet high. Because they only weigh about 30 pounds when full, they are manageable for most adults to lift and carry.
- Aqua-Tainers: These are 7-gallon square jugs made of thick HDPE plastic. They feature a reversible spigot, making them perfect for dispensing water into cups or pots. Be aware that a full Aqua-Tainer weighs nearly 60 pounds, making them difficult to move once filled.
Large Capacity: 55-Gallon Drums
For homeowners with a garage or basement, a 55-gallon food-grade water drum is the most cost-effective way to secure a massive emergency water supply. A single drum nearly fulfills the two-week requirement for a family of four. If you choose to use drums, you must also purchase a bung wrench (to open and close the tight seals) and a manual siphon pump to extract the water. Remember that a full 55-gallon drum weighs over 450 pounds. You must fill it exactly where you intend to store it, as you will not be able to move it afterward.Last-Minute Storage: Bathtub Bladders
If you receive advanced warning of an impending emergency-such as a hurricane or a severe winter storm-a bathtub bladder is a lifesaver. Products like the WaterBOB or AquaPod are heavy-duty, food-grade plastic liners that fit into a standard bathtub. You simply lay the bladder in the tub, attach it to the faucet, and fill it up. In about 20 minutes, you can safely store 65 to 100 gallons of clean tap water. Because the water is sealed inside the bladder, it remains protected from soap scum, dust, and debris that would otherwise contaminate an open bathtub.Containers to Avoid
Never try to save money by repurposing the wrong containers. You should absolutely avoid:- Milk jugs: Milk proteins embed themselves into the plastic and cannot be fully washed out. Your water will grow bacteria and spoil quickly. The plastic is also biodegradable and will split open in a few months.
- Cardboard cartons: Fruit juice or milk cartons cannot be sanitized properly.
- Used chemical containers: Never use buckets or jugs that previously held bleach, pesticides, or industrial chemicals, no matter how thoroughly you wash them.
How to Store Water for Emergency: Best Practices
Having the right containers is only half the battle; how and where you store them determines how long the water will remain safe. Location is critical. Water should be stored in a cool, dark place. Heat accelerates the breakdown of plastics, and direct sunlight encourages algae and bacterial growth. Basements, interior closets, and insulated garages are ideal. Avoid storing water in an attic, where summer temperatures can easily exceed 120 degrees Fahrenheit, or in an uninsulated shed where winter freezes can cause the containers to expand and rupture. Keep it off the floor. If you are storing water in a basement or garage, never place plastic containers directly on a bare concrete floor. Concrete fluctuates in temperature and can leach chemicals into the plastic over time, compromising the structural integrity of the container and the taste of the water. Always place a wooden pallet, a piece of thick cardboard, or wooden planks between the concrete and your containers. Keep it away from chemicals. Plastic is slightly porous. If you store your water containers next to gasoline, paint thinner, or harsh cleaning chemicals, the vapors can permeate the plastic and taint your drinking water. Keep your emergency water supply completely isolated from your household chemicals.Water Purification and Treatment
1. Boiling: The Gold Standard
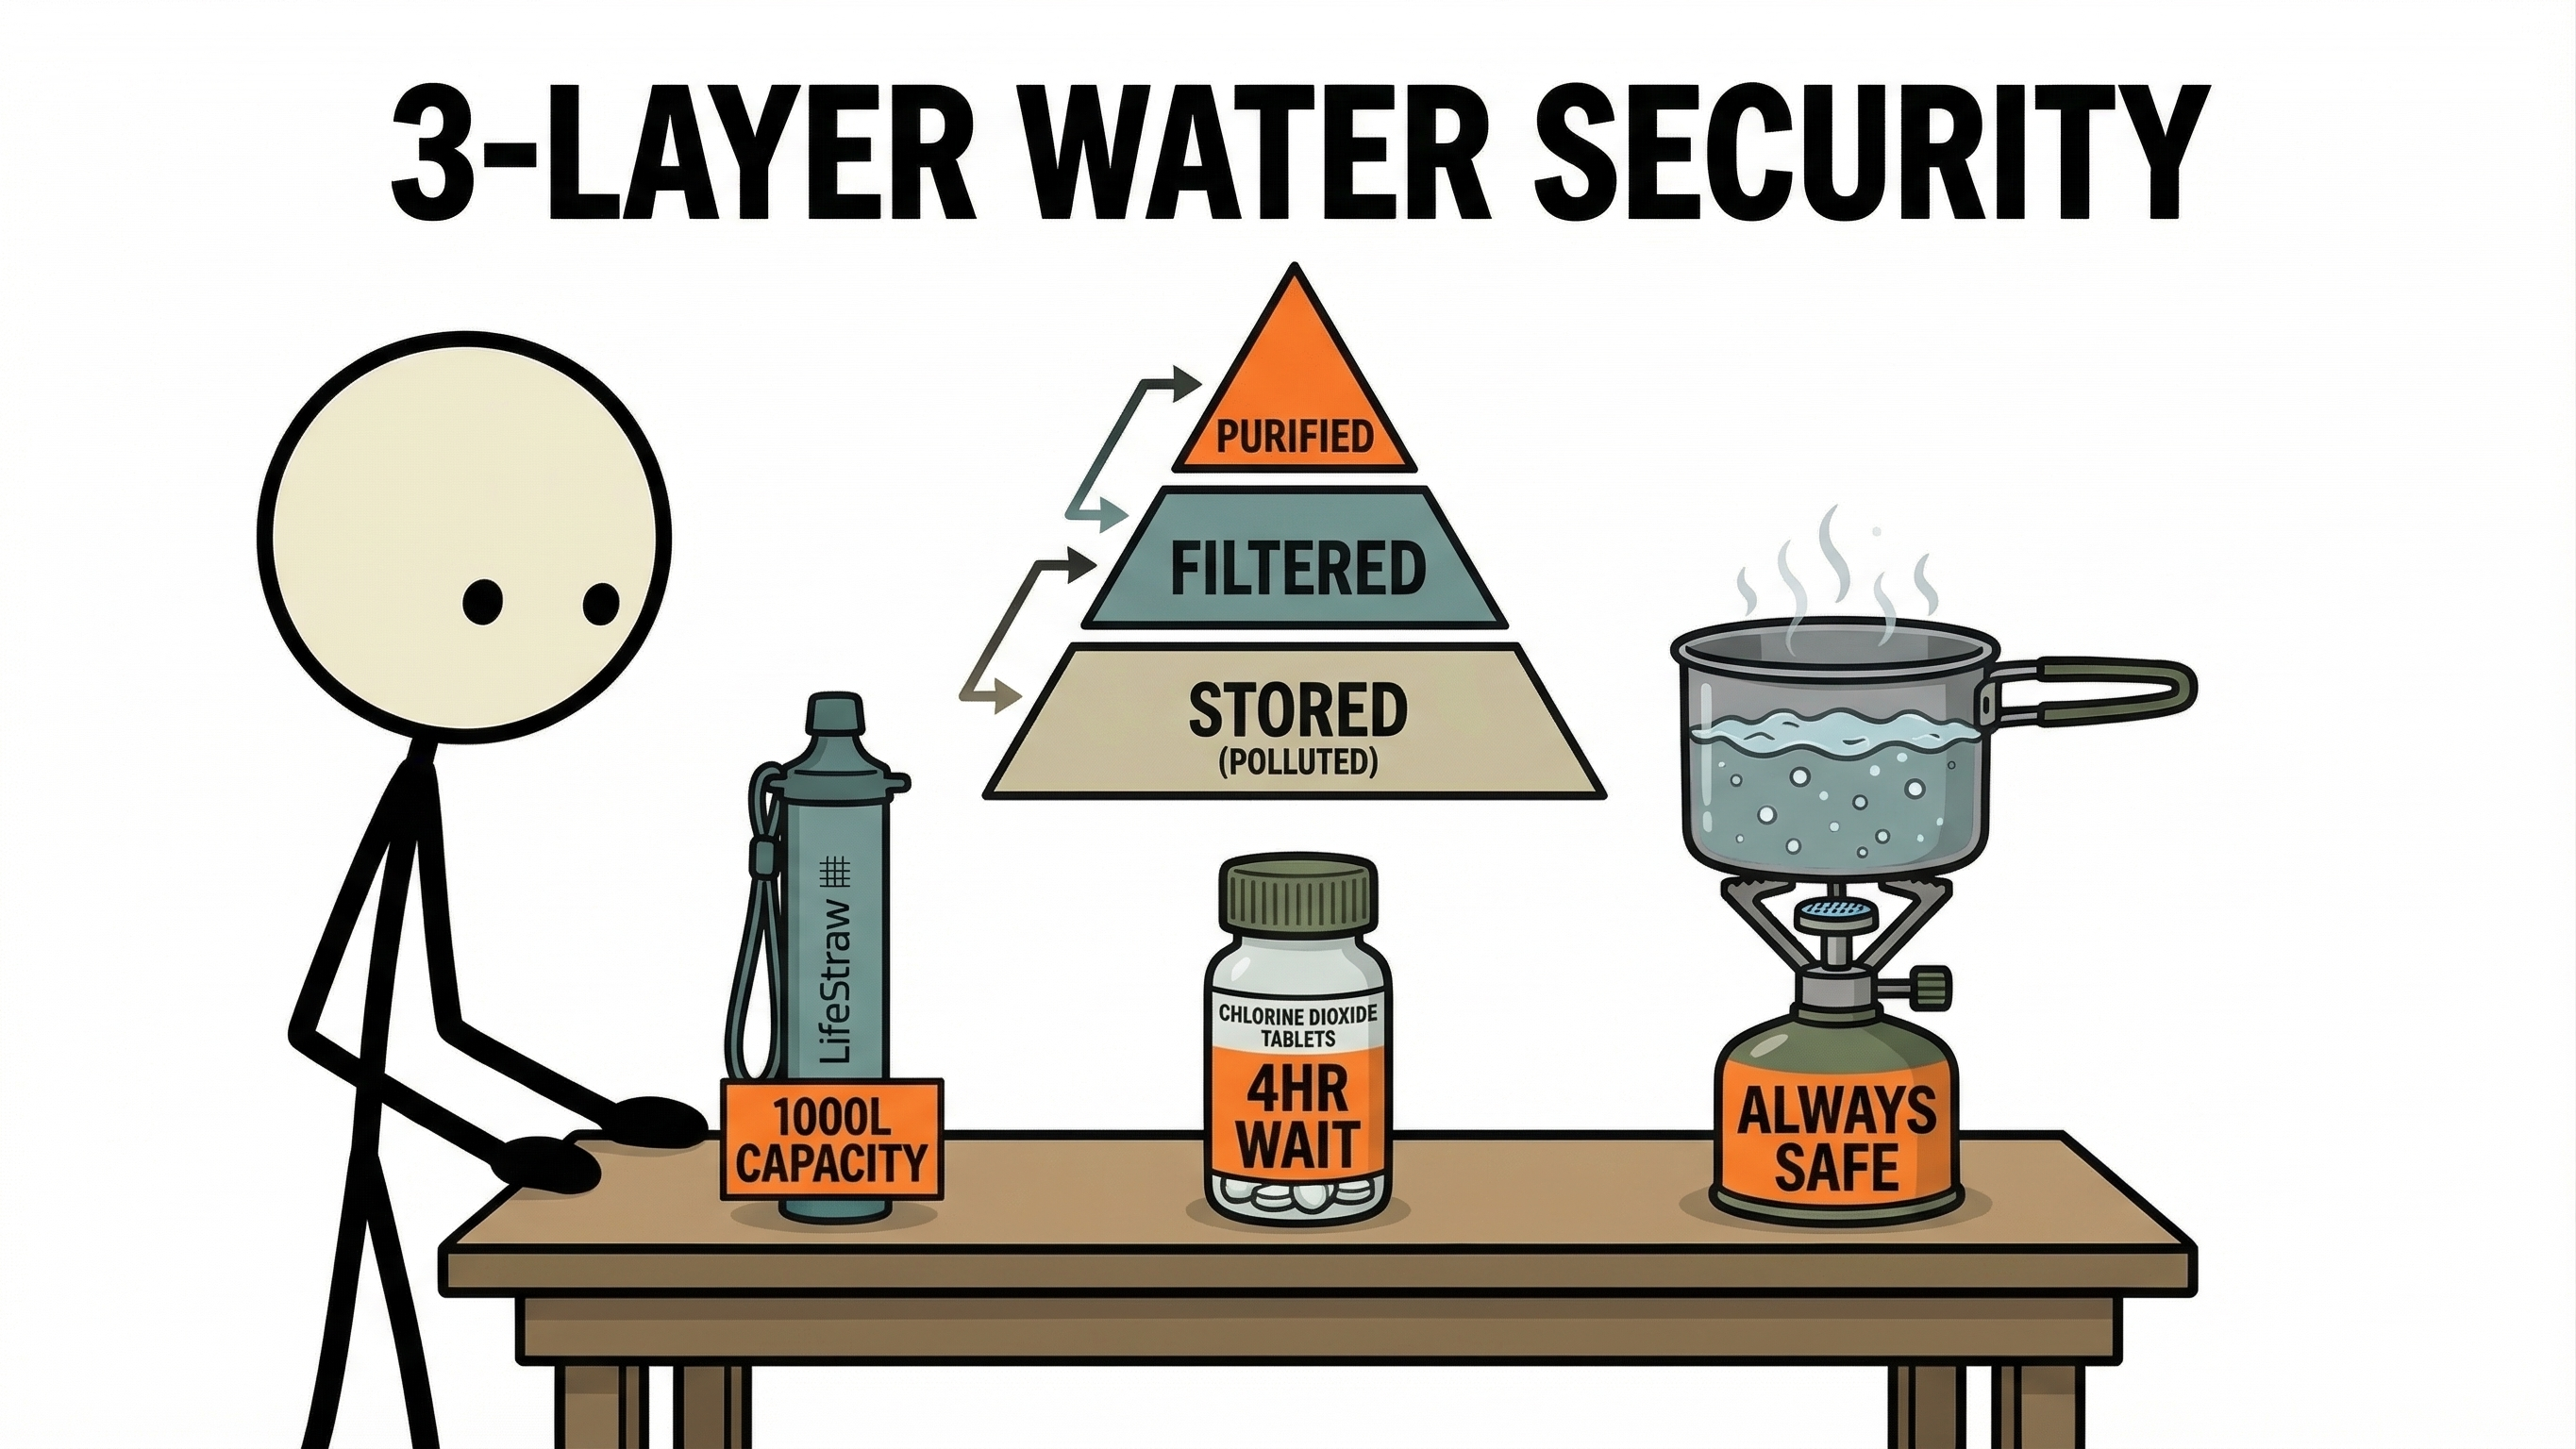
Boiling is the safest, most effective way to purify water. It requires no special chemicals or advanced filters-just a heat source. According to the CDC, bringing water to a rolling boil for 1 full minute will kill all pathogenic bacteria, viruses, and protozoa. If you live at an altitude above 6,500 feet, water boils at a lower temperature, so you must maintain the rolling boil for 3 full minutes. If the water is cloudy, filter it through a clean cloth, paper towel, or coffee filter before boiling to remove sediment.2. Chemical Disinfection: Bleach and Tablets
If you lack the fuel to boil water, chemical disinfection is your next best option. Standard household bleach is an incredibly effective water purifier, provided you use the correct type and ratio. You must use unscented liquid household bleach containing 5.25% to 8.25% sodium hypochlorite. Do not use color-safe, splashless, or scented bleaches, as these contain toxic additives. To purify water with bleach:- Filter out any large debris or sediment.
- Add 8 drops (about 1/8 teaspoon) of 5%-6% bleach per gallon of water. (If using 8.25% bleach, use 6 drops).
- Stir well and let the water sit for 30 minutes.
- The water should have a very faint chlorine odor. If it doesn't, repeat the dose and wait another 15 minutes.
3. Filtration Systems
While boiling and chemicals kill pathogens, they don't remove heavy metals, chemical runoff, or physical sediment. This is where filtration comes in. For personal use, portable filters like the Sawyer Squeeze or LifeStraw are excellent. They use microscopic pores (usually 0.1 microns) to physically trap bacteria and protozoa. For household use, gravity-fed drip filters like a Berkey or a LifeStraw Family system can process gallons of water per day without requiring electricity or water pressure. Note: Most standard camping filters do not remove viruses, as viruses are small enough to pass through the pores. If you are pulling water from a stagnant urban source, you should filter the water first to remove sediment and bacteria, and then treat it with chemicals or boil it to kill any viruses.Water Rotation and Maintenance
The Rotation Schedule
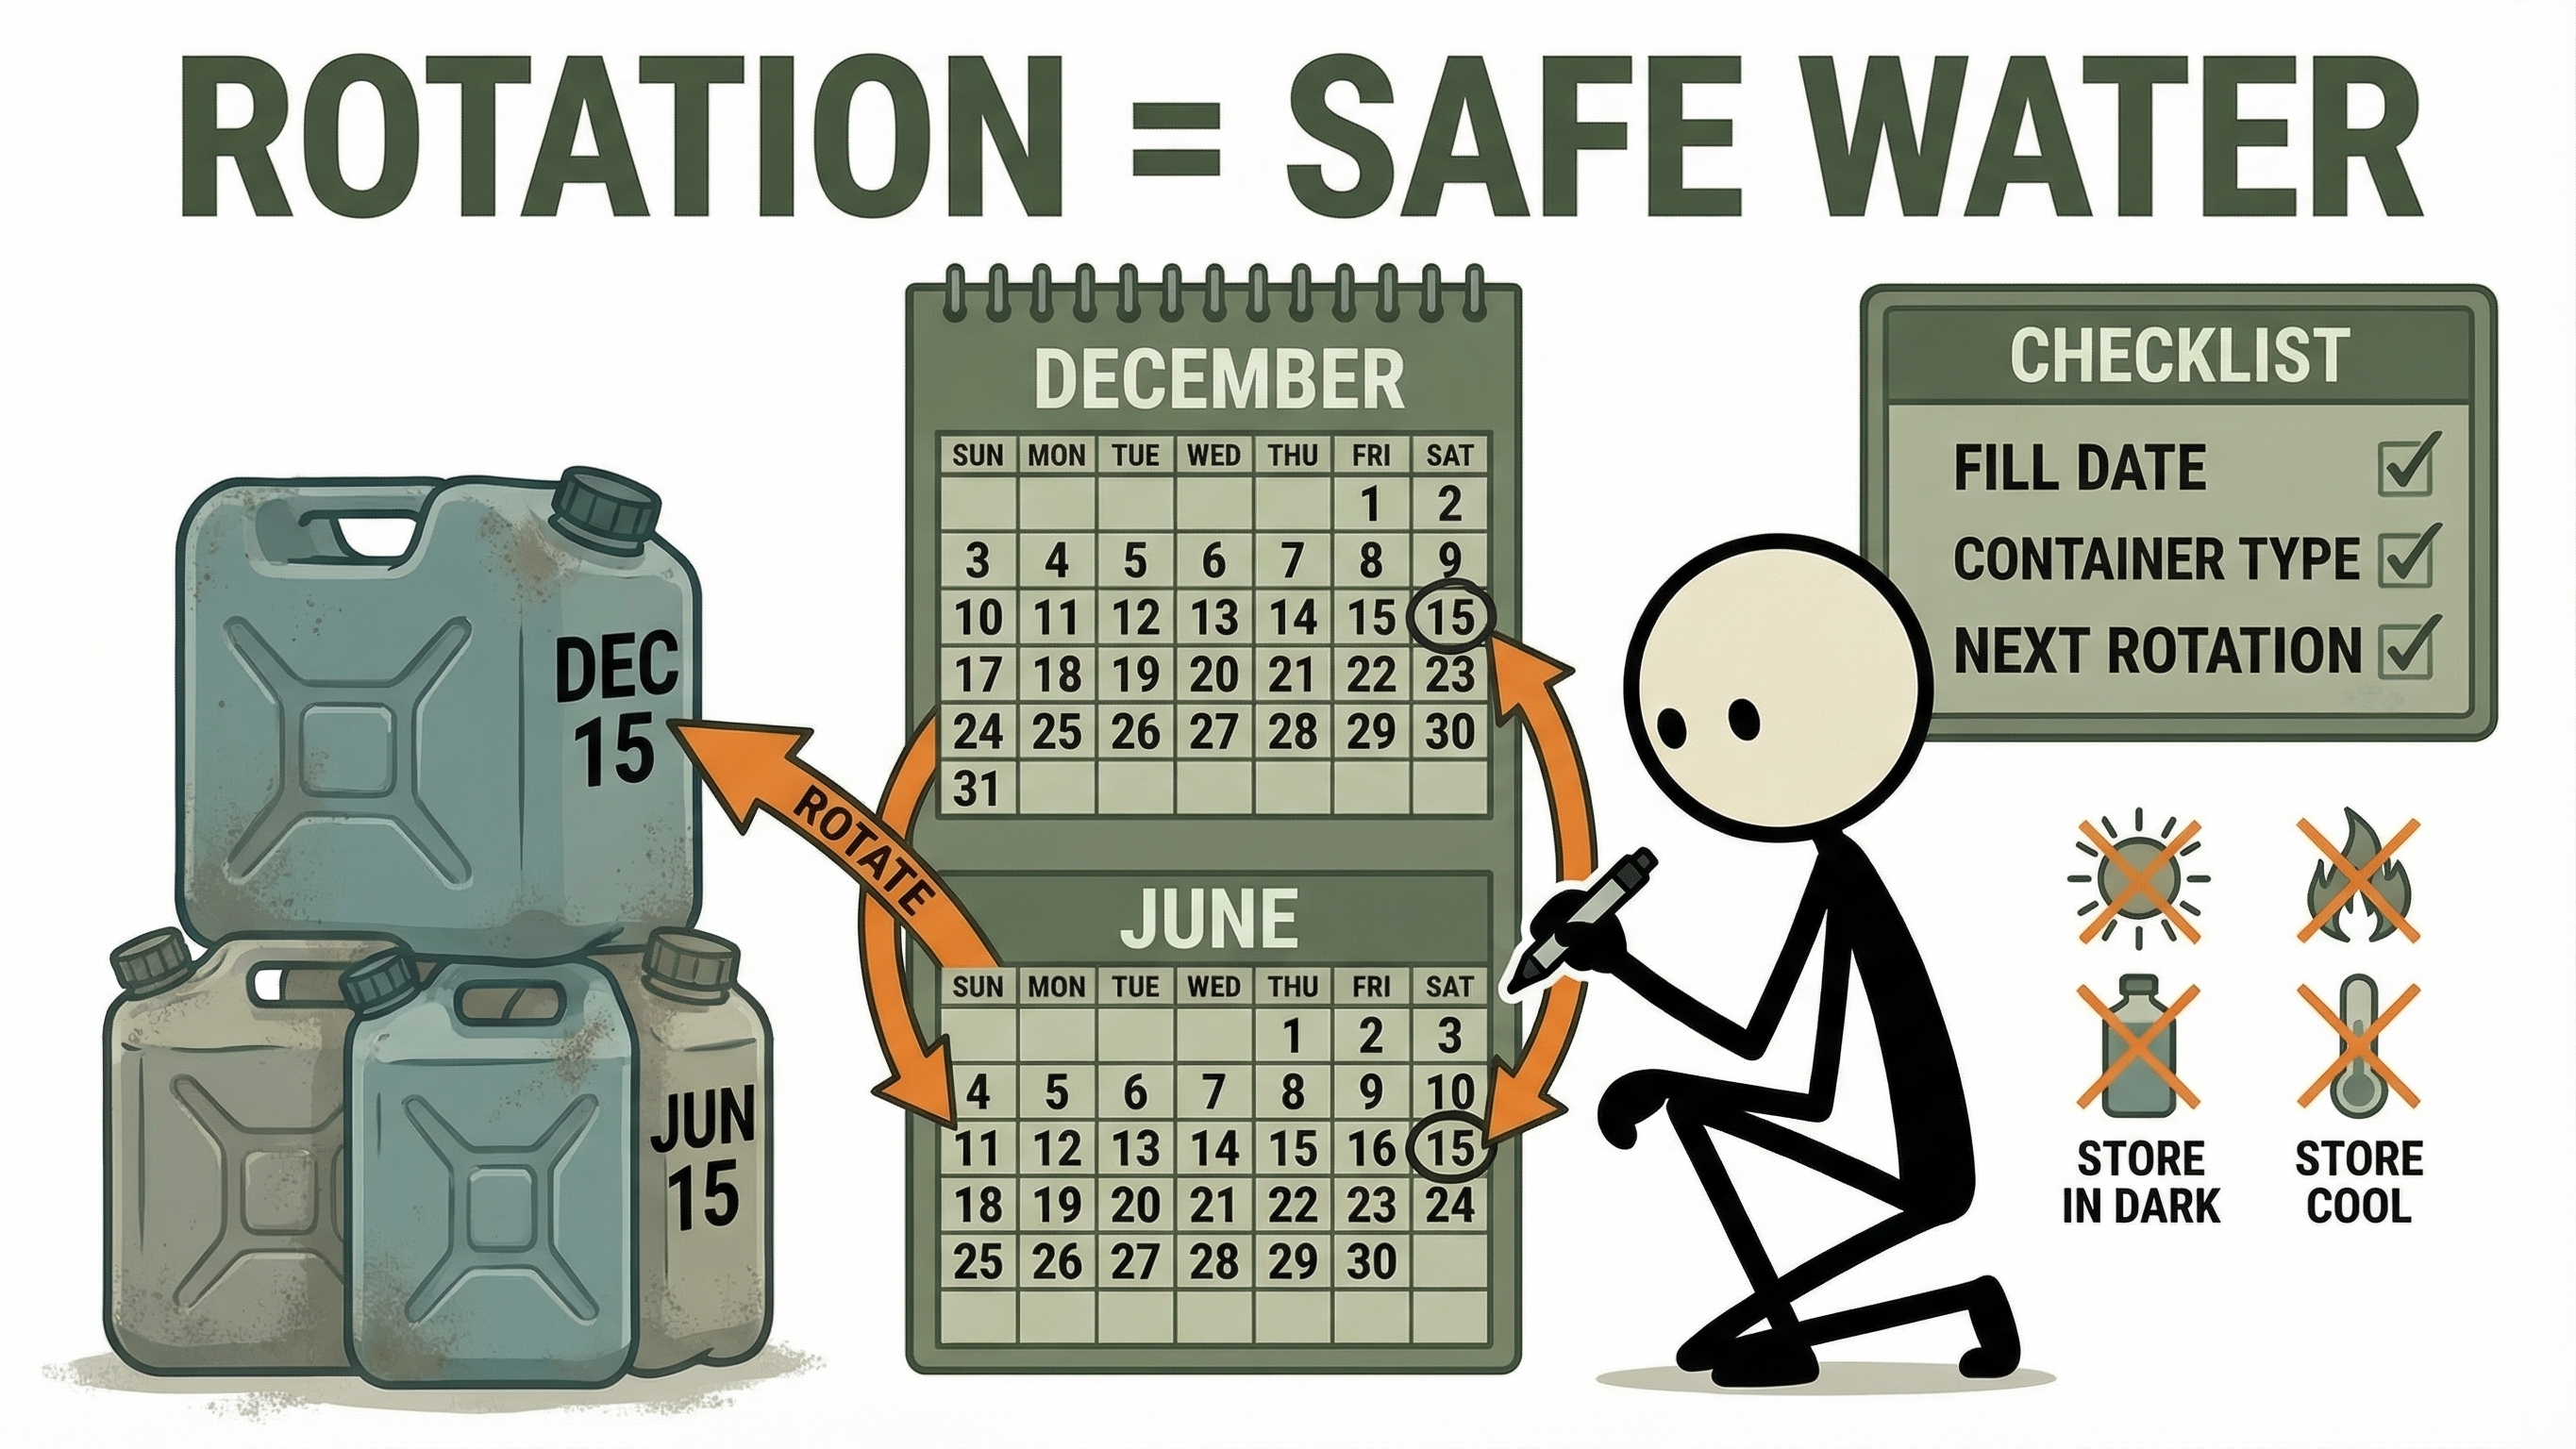
If you are filling your own containers with municipal tap water, the CDC recommends emptying, cleaning, and refilling them every 6 months. To make this process painless, do not dump the water down the drain. Use your expiring emergency water to water your garden, wash your car, or do household cleaning. Once empty, wash the container with dish soap and warm water, rinse it thoroughly, and sanitize it by swishing a mixture of 1 teaspoon of unscented liquid bleach and 1 quart of water inside. Rinse it completely before refilling. Always use a piece of masking tape and a permanent marker to write the date you filled the container. Treat your water supply like a pantry: use the "First In, First Out" (FIFO) method.Extending Shelf Life with Water Preservers
If emptying and refilling 55-gallon drums every six months sounds exhausting, you can use a commercial water preserver. Products like Water Preserver Concentrate use a proprietary blend of sodium hypochlorite and other stabilizing agents that, when added to fresh tap water, guarantee the water will remain safe to drink for up to 5 years. Copper-silver ion drops are another popular, long-term preservation method. These drops prevent the growth of bacteria, algae, and fungi, significantly extending the rotation timeline of your bulk storage.Fixing "Flat" Water
If you open a container of stored water and find that it tastes incredibly stale or "flat," don't panic. This doesn't mean the water is contaminated. As water sits in a sealed container, it loses its dissolved oxygen. To restore the taste, you simply need to aerate it. Pour the water back and forth between two clean pitchers or cups several times. This reintroduces oxygen into the water, instantly improving its taste and making it much more palatable to drink.Hidden Emergency Water Sources in Your Home
Even if you haven't perfectly calculated how much water to store, your house actually contains a secret reservoir of emergency water-if you know where to look.The Water Heater
Your home's hot water heater is essentially a massive, pre-filled emergency water tank holding anywhere from 40 to 80 gallons of potable water. In a severe crisis, this water is perfectly safe to drink, but you must extract it correctly.- Step 1: Turn off the power to the water heater. Shut off the gas valve or flip the electrical breaker. (If the power comes back on while the tank is empty, the heating elements will burn out and destroy the unit).
- Step 2: Turn off the cold-water intake valve at the top of the tank to prevent contaminated municipal water from entering.
- Step 3: Open a hot water faucet somewhere in your house (like a kitchen sink). This allows air into the system, breaking the vacuum and allowing the water to flow.
- Step 4: Attach a clean hose to the drain valve at the bottom of the heater, open the valve, and drain the water into your buckets or pots. Be extremely careful-the initial water may be scalding hot.
The Toilet Tank (Not the Bowl)
The water inside the upper tank of your toilet (the part with the flushing mechanism) is clean tap water. It typically holds 2 to 3 gallons. As long as you do not use chemical bowl-cleaning tablets in the tank, this water is safe to use for hygiene, washing, or even drinking if boiled or purified first. Never use water from the toilet bowl.Pipes and Ice Cubes
If the municipal water shuts off, your home's plumbing pipes are still full of water. You can harvest this by opening the highest faucet in your house to let air in, and then catching the water that drains out of the lowest faucet in your house (usually an exterior garden hose bib or a basement sink). Additionally, don't forget the ice cubes in your freezer. Melt them down for a quick, clean source of drinking water.Empowering Your Preparedness Journey
Securing an emergency water supply is the most impactful step you can take toward true self-reliance. It removes the immediate panic that strikes when the faucets run dry and ensures your family's most critical biological need is met. You do not need to buy a massive 55-gallon drum today. Start small. Buy a few extra cases of bottled water on your next grocery run. Invest in a couple of stackable WaterBricks next month. Learn the bleach ratios, establish a simple rotation schedule on your calendar, and familiarize yourself with your home's water heater. By taking these methodical, actionable steps documented in our preparedness courses, you transform an unpredictable crisis into a manageable situation, giving you the clarity and peace of mind to navigate whatever emergency comes your way.Related preparedness term: water purification.
Related preparedness term: water storage.
Frequently Asked Questions
How much emergency water should I store per person?
FEMA and the Red Cross recommend a minimum of one gallon (about 3.8 liters) per person per day - covering drinking and basic sanitation. For a 72-hour emergency that's 3 gallons per person. In hot climates, for pregnant women, or for people doing physical labor, double that amount. Don't forget pets - a medium-sized dog needs roughly half a gallon per day.
How long can I store tap water safely?
Commercially bottled water has a shelf life of 1-2 years. If you fill your own containers from the tap, use food-grade BPA-free containers, fill them completely to minimize air, and store in a cool dark place. Change tap-filled water every 6-12 months. Always label containers with the fill date so you know when to rotate.
What are the best containers for emergency water storage?
The best options are: heavy-duty BPA-free water bricks or aquatainers for modular storage, large 30-55 gallon food-grade barrels for long-term home storage, and WaterBOBs (bathtub bladders that hold up to 100 gallons) for rapid fill-up when a storm is incoming. Avoid recycled milk jugs - the plastic degrades and will eventually leak.
How do I purify water if my stored supply runs out?
Use a three-layer approach: a portable filter like a LifeStraw or Sawyer Squeeze removes bacteria and parasites instantly; chlorine dioxide tablets (Micropur) kill viruses and bacteria but require a 4-hour wait; boiling water for 1 minute is the most reliable method if you have a heat source. Keep all three options in your emergency kit.
Can I use tap water that smells or looks cloudy in an emergency?
Cloudy water usually indicates suspended particles - run it through a cloth filter first, then purify it. Smelling of chlorine is generally fine (that's the treatment). However, if water smells of sulfur, fuel, or chemicals, do not drink it even after boiling or filtering - chemical contamination requires professional treatment. When in doubt, use your stored supply or a sealed commercial bottle.
Sources & Further Reading
If a term is unfamiliar, check the preparedness glossary for quick definitions while you build your plan.
Related resource: Water Calculator.
Related resource: Family Emergency Planning Guide.