⚡ Key Facts
- Vulnerable Infrastructure: The Federal Emergency Management Agency (FEMA) explicitly warns that cellular and internet communications are highly susceptible to failure during severe weather events and grid disruptions.
- Massive Storage Efficiency: A comprehensive offline knowledge base—including the entirety of Wikipedia, Khan Academy, medical databases, and advanced AI models—can now fit comfortably on a single 1TB Solid State Drive (SSD).
- Low-Power Efficiency: An M1 Mac Mini running advanced AI models draws just 10 to 15 watts of power at idle, making it exceptionally compatible with portable solar generators for off-grid operations.
- Cost-Effective Resilience: Building a highly capable, custom budget AI hardware rig costs between $230 and $370, saving you hundreds of dollars compared to underpowered, overpriced commercial prepper devices.
Imagine a scenario where a Category 4 hurricane or a severe winter storm has knocked out the regional power grid. Cell towers have exhausted their backup battery supplies, and your internet service provider is offline. In the midst of this blackout, a family member sustains an injury, or you need to troubleshoot a malfunctioning portable generator. In our modern era, the instinct is to pull out a smartphone and search the web. But when the cloud evaporates, what remains? For the modern survivalist, relying on internet-dependent knowledge is a critical single point of failure. This is where the concept of an offline ai prepper system becomes not just a novelty, but a lifesaving necessity.
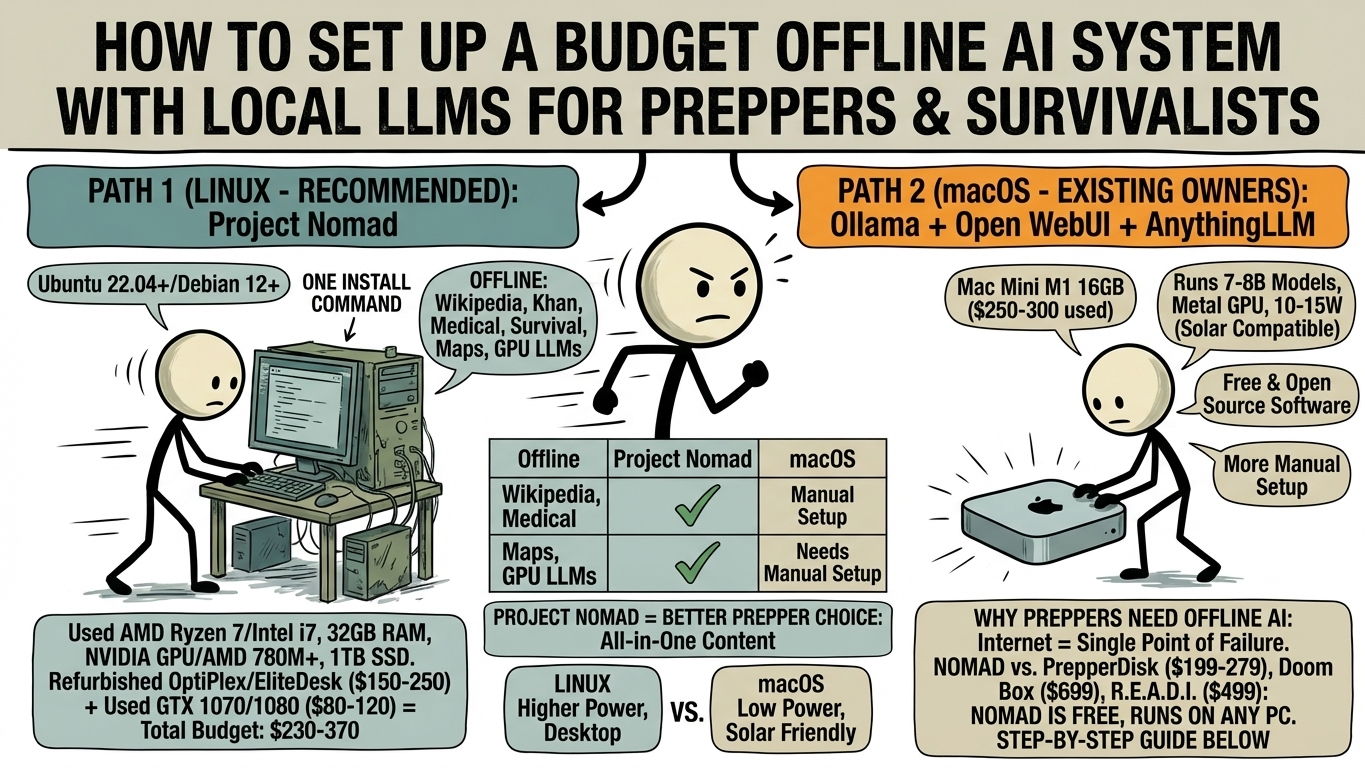 survival guides, OpenStreetMap, AND GPU-accelerated local LLMs. Requires Ubuntu 22.04+ or Debian 12+. Best hardware: used desktop PC with AMD Ryzen 7 or Intel i7, 32GB RAM, dedicated NVIDIA GPU or AMD Radeon 780M+, 1TB SSD. Budget options: refurbished Dell OptiPlex or HP EliteDesk with i7 ($150-250 on eBay), add a used NVIDIA GTX 1070/1080 for $80-120 for GPU acceleration. Total budget: $230-370 for a full Project Nomad rig. PATH 2 (macOS - for people who already own a Mac): Ollama + Open WebUI + AnythingLLM. Not as turnkey as Project Nomad but same core functionality. Mac Mini M1 16GB ($250-300 used) runs 7-8B models with full Metal GPU acceleration at only 10-15W idle (solar compatible). Software is all free and open source. Compare both paths: Project Nomad is the better prepper choice because it includes offline Wikipedia, maps, education content out of the box. The macOS route requires more manual setup but works great if you already own the hardware. Power consumption analysis for both paths. Why preppers need offline AI: internet-dependent knowledge is a single point of failure. Project Nomad comparison table vs PrepperDisk ($199-279), Doom Box ($699), R.E.A.D.I. ($499) - NOMAD is free and runs on any PC. Step-by-step guide for both paths." loading="lazy" style="width:100%;border-radius:8px;">
Historically, preparedness meant stockpiling physical books, printing out Federal Emergency Management Agency (FEMA) preparedness guidesdelines, or downloading static PDFs to a hard drive. While valuable, these methods lack interactivity. You cannot ask a PDF to cross-reference symptoms against the Centers for Disease Control and Prevention (CDC) field protocols, nor can you ask a static document to simplify a complex emergency water storage process based on the specific chemicals you have on hand. Today, prepper technology has evolved. By leveraging Large Language Models (LLMs) that run entirely locally on your own hardware, you can build an interactive, conversational survival knowledge base that requires zero internet connection.
The Critical Need for an Offline Knowledge Base
The fragility of our modern communications infrastructure is well-documented. According to the National Oceanic and Atmospheric Administration (NOAA), the United States is experiencing an increasing frequency of billion-dollar weather and climate disasters. Each of these events places immense strain on the power grid and telecommunications networks. The Red Cross consistently advises that a robust family emergency plan must account for extended periods of total disconnection from emergency services and digital resources.
When the grid goes down - one of the most common survival scenarios - your access to the collective knowledge of humanity is severed. An off grid ai system solves this problem by bringing the "cloud" into your living room. A local llm survival setup allows you to host an artificial intelligence on your own computer. This AI can read, synthesize, and explain information from your downloaded archives. Whether you need to reference United States Geological Survey (USGS) topographic data concepts, identify local edible flora, or execute a complex first-aid procedure, an offline AI acts as an interactive expert consultant that never loses its connection.
However, building this system doesn't require a military-grade budget or a supercomputer. With the rapid advancement of open-source software and the availability of cheap, refurbished enterprise computers, setting up budget ai hardware is entirely within reach. In this comprehensive guide, we will explore two distinct paths to building your ultimate offline system. Path 1 focuses on a dedicated, highly recommended Linux build using Project Nomad. Path 2 provides a streamlined approach for those who already own modern Apple silicon hardware.
PATH 1: Project Nomad on Linux (The Ultimate Prepper Choice)
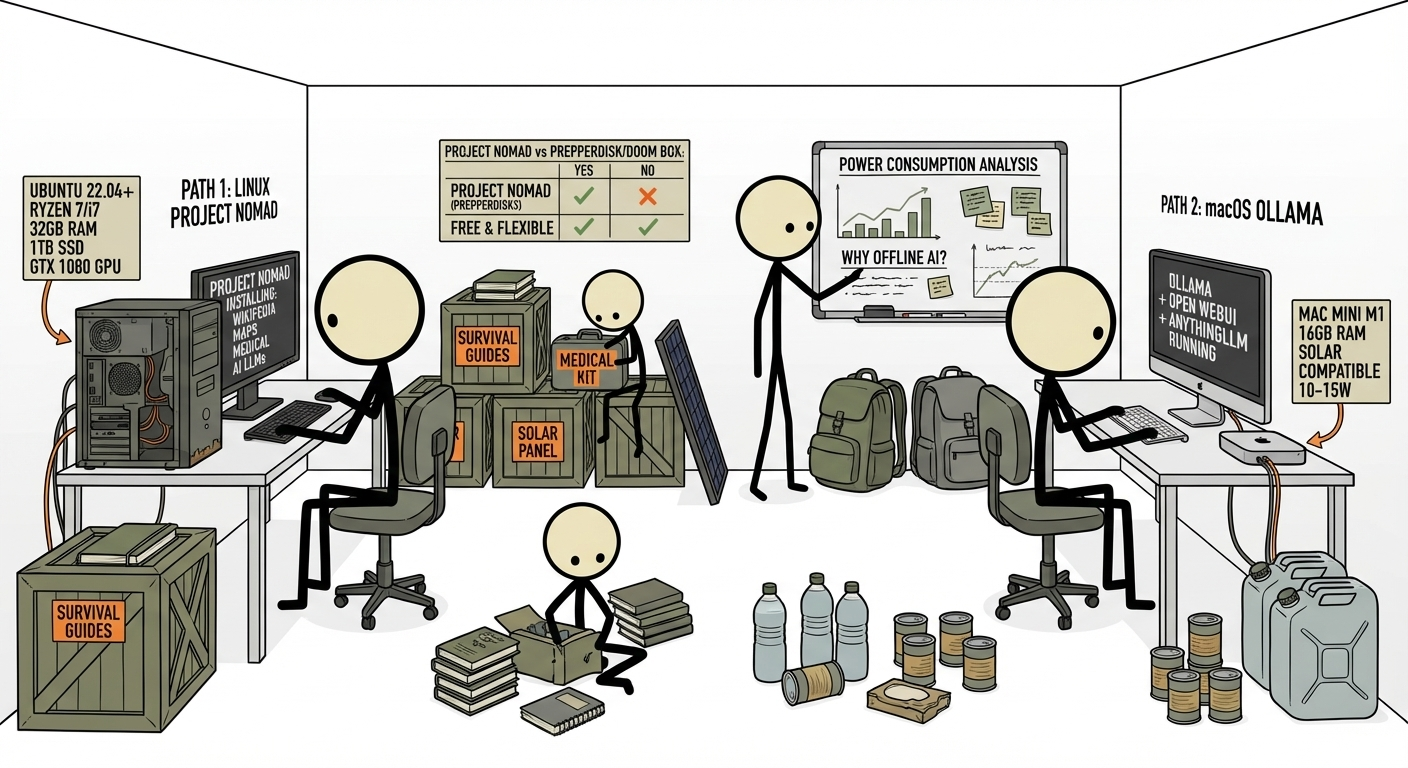
For the vast majority of preppers, building a dedicated, standalone machine is the best approach. You do not want your critical survival knowledge base tied to your daily-use laptop, which might be low on battery or damaged during an emergency. This is where Project Nomad shines. As a project nomad prepper, you are utilizing an all-in-one, open-source solution designed specifically to democratize access to human knowledge.
What is Project Nomad?
Project Nomad is a turnkey software deployment script that transforms a standard Linux PC into a localized, offline powerhouse. With essentially one installation command, it configures your machine to host a staggering array of resources. Out of the box, it provides a full offline version of Wikipedia, the entire Khan Academy curriculum for off-grid education, comprehensive medical references, survival guides, and fully interactive offline OpenStreetMap data. Crucially, it also configures GPU-accelerated local LLMs, giving you an intelligent interface to interact with all this data.
Budget AI Hardware Recommendations
To run Project Nomad effectively, you need a machine running Ubuntu 22.04+ or Debian 12+. AI models are memory-intensive, and generating text quickly requires a Graphics Processing Unit (GPU). Fortunately, the enterprise desktop market provides the perfect foundation for budget ai hardware.
- The Base System ($150 - $250): Look on eBay or local surplus auctions for refurbished enterprise desktops, specifically the Dell OptiPlex (Mini Tower/MT size, not the micro versions) or the HP EliteDesk. You want a machine with at least an Intel Core i7 (8th generation or newer) or an AMD Ryzen 7 processor. Ensure it has 32GB of RAM (or buy a 16GB model and upgrade it cheaply) and a 1TB SSD.
- The GPU Accelerator ($80 - $120): To achieve fast, fluid responses from your local llm survival system, you need a dedicated GPU. A used NVIDIA GTX 1070 or GTX 1080 with 8GB of VRAM is the perfect budget choice. Alternatively, if you are building a mini-PC from scratch, an AMD system with integrated Radeon 780M graphics (like the Ryzen 7 7840HS) offers excellent AI performance without a dedicated card.
Total Budget: For $230 to $370, you can assemble a rugged, dedicated Project Nomad rig that rivals commercial systems costing three times as much. This machine will sit quietly in your comms shack or basement, ready to be powered by a generator or solar station at a moment's notice.
PATH 2: macOS with Ollama (For Existing Mac Owners)
If you already own modern Apple hardware, you have a massive advantage. Apple's "M-series" chips (M1, M2, M3) feature a unified memory architecture. This means the CPU and the GPU share the same pool of RAM. While PC users have to buy expensive dedicated graphics cards to get 16GB or 24GB of VRAM for AI, a Mac Mini with 16GB or 24GB of system RAM can use almost all of it for AI processing. This makes the Mac an incredible off grid ai platform.
The Hardware
If you are buying specifically for this path, a used Mac Mini M1 with 16GB of RAM can be found for $250 to $300. This tiny, silent machine can comfortably run highly capable 7-Billion to 8-Billion parameter AI models (like Llama 3 or Mistral) with full Metal GPU acceleration. Its most significant advantage, however, is power consumption—which we will analyze in detail later.
The Software Stack
Unlike Project Nomad, the macOS route is not a single-click installation. It requires assembling a few open-source tools to create your offline knowledge base. The core of this system is Ollama.
Running ollama offline is incredibly straightforward. Ollama is a lightweight application that manages and runs local LLMs. By itself, it operates via the command line. To make it user-friendly, you pair it with Open WebUI, which gives you a beautiful, ChatGPT-like interface in your web browser. Finally, to allow the AI to read your specific FEMA PDFs, CDC manuals, and survival guides, you integrate AnythingLLM. AnythingLLM uses a process called Retrieval-Augmented Generation (RAG) to scan your private documents and feed the relevant text to Ollama, allowing the AI to answer questions based strictly on your trusted survival library.
Power Consumption Analysis: Staying Online Off the Grid
In a grid-down scenario, electricity is your most precious commodity - as our power outage survival guide explains. An offline ai prepper setup is useless if it drains your backup batteries in three hours. Understanding the power draw of your system is vital for pairing it with appropriate solar generators (like those from Jackery, EcoFlow, or Bluetti).
Path 1 Power Draw (Custom PC)
A Dell OptiPlex with an Intel i7 and an NVIDIA GTX 1070 is a traditional desktop computer. At idle (when turned on but not actively answering questions), this system will draw roughly 50 to 80 watts. When you ask the AI a complex question and the GPU spins up to generate text, the power draw will spike to between 200 and 250 watts for the duration of the generation (usually 10 to 30 seconds).
Solar Feasibility: To run this system for a few hours a day, you will need a mid-sized portable power station (at least 500Wh to 1000Wh capacity) and a 100W to 200W solar panel to replenish the energy.
Path 2 Power Draw (Mac Mini M1)
This is where Apple Silicon completely dominates prepper technology. A Mac Mini M1 draws an astonishingly low 10 to 15 watts at idle. Even under full load, when the AI is generating text at maximum speed, the system rarely exceeds 30 to 40 watts.
Solar Feasibility: The Mac Mini is the ultimate off grid ai device. You can run it off a small, budget-friendly 250Wh solar generator for days of intermittent use. If you pair it with a 100W solar panel, you can theoretically run the system indefinitely, even in partially cloudy conditions.
Comparing the Paths: Nomad vs. macOS vs. Commercial Options
When deciding between Path 1 and Path 2, the choice comes down to your priorities. Project Nomad is the better overall prepper choice because it is a holistic survival knowledge base. You aren't just getting an AI; you are getting offline maps, encyclopedias, and medical databases pre-configured. The macOS route requires you to manually download and organize your own PDFs and map data, but it rewards you with unmatched power efficiency.
How do these DIY budget ai hardware options stack up against commercial, pre-packaged prepper products? Let's look at the data.
| System | Cost | Hardware Base | AI Capability | Offline Maps/Wiki included? |
|---|---|---|---|---|
| Project Nomad (DIY) | $230 - $370 | Intel i7 / 32GB RAM / GTX 1070 | Excellent (Fast, GPU Accelerated) | Yes (Fully integrated) |
| macOS M1 (DIY) | $250 - $300 | Apple M1 / 16GB RAM | Excellent (Very fast, low power) | No (Requires manual RAG setup) |
| PrepperDisk | $199 - $279 | Just a USB Drive (No computer) | None (Static files only) | Yes (But static, no AI search) |
| R.E.A.D.I. Box | $499 | Low-power mini PC | Poor (CPU only, very slow text gen) | Yes |
| Doom Box | $699 | Raspberry Pi 4/5 based | Poor (Struggles with modern LLMs) | Yes |
The comparison is stark. Commercial options like the Doom Box or R.E.A.D.I. charge premium prices for low-end hardware (often Raspberry Pis) that simply cannot run modern local llm survival models at acceptable speeds. Generating a single paragraph of medical advice on a Raspberry Pi can take minutes; on a $100 used GTX 1070 or an M1 Mac, it takes seconds. By building it yourself, you retain total control over your prepper technology.
Step-by-Step Guide: Path 1 (Project Nomad on Linux)
Setting up your project nomad prepper system is designed to be as painless as possible, even if you are new to Linux.
Step 1: Prepare the Hardware and OS
Ensure your refurbished PC has the dedicated GPU installed and the 1TB SSD connected. Download the Ubuntu 22.04 LTS or Debian 12 ISO file on another computer, and use a free program like Rufus or BalenaEtcher to create a bootable USB drive. Insert the USB into your prepper PC, boot from it, and follow the on-screen prompts to install Linux. Choose the option to erase the disk and install a fresh copy.
Step 2: Update the System
Once you are logged into your new Linux desktop, open the Terminal app. You need to ensure your system is up to date. Type the following command and press Enter:
sudo apt update && sudo apt upgrade -y
Step 3: Install Project Nomad
Project Nomad utilizes a single deployment script to handle all the complex Docker containers, database setups, and AI model downloads. In your terminal, paste the official Nomad installation command (always verify the latest command on the official Project Nomad GitHub repository). It typically looks like this:
curl -sSL https://raw.githubusercontent.com/project-nomad/nomad/main/install.sh | bash
Step 4: Configuration and Download
The script will ask you a series of questions. It will ask which AI models you want to download (select a 7B or 8B model like Llama-3-8B-Instruct for best performance on budget hardware). It will also ask if you want to download the Wikipedia archives, OpenStreetMap data for your region, and the survival/medical databases. Select "yes" to all. Note: This process will download hundreds of gigabytes of data. Leave the machine connected to a fast internet connection overnight.
Step 5: Access Your Hub
Once finished, Project Nomad acts as a local server. You simply open the Firefox web browser on that computer and type localhost into the address bar. You will be greeted by the Nomad dashboard, giving you instant, offline access to maps, wikis, and your GPU-accelerated AI assistant.
Step-by-Step Guide: Path 2 (macOS with Ollama)
If you are utilizing an M1 Mac Mini for your off grid ai setup, follow these steps to build your custom software stack.
Step 1: Install Ollama
Navigate to the official Ollama website and download the macOS application. Drag it to your Applications folder and launch it. You will see a small llama icon in your top menu bar. Open your Mac's Terminal application and type:
ollama run llama3
This command tells Ollama to download the Llama 3 model (about 4.7GB) and start it. You can now chat with it directly in the terminal, confirming that ollama offline is working.
Step 2: Install Docker and Open WebUI
To get a clean, graphical interface, you need Open WebUI. First, download and install Docker Desktop for Mac. Once Docker is running, open your Terminal and paste the Open WebUI installation command:
docker run -d -p 3000:8080 --add-host=host.docker.internal:host-gateway -v open-webui:/app/backend/data --name open-webui --restart always ghcr.io/open-webui/open-webui:main
Open your Safari or Chrome browser and go to http://localhost:3000. Create an admin account, and you now have a localized ChatGPT interface connected to your Ollama models.
Step 3: Install AnythingLLM for Document Reading
To turn this into a true survival knowledge base, download the desktop version of AnythingLLM for Mac. Install it and launch the application. In the setup wizard, select "Ollama" as your LLM provider.
Now, create a "Workspace" called "Survival Protocols". Drag and drop your downloaded FEMA PDFs, Red Cross first aid manuals, and CDC disease guidelines into the workspace. AnythingLLM will process these documents. You can now ask questions like, "Based on my documents, how do I treat a severe burn?" The AI will read your specific offline files and generate an answer, citing the exact document it used.
Empowering Your Preparedness Strategy
True resilience is about eliminating dependencies. Combined with a solid family emergency plan, offline AI completes your preparedness toolkit. By taking the time to build an offline ai prepper system, you are taking absolute ownership of your access to information. Whether you choose the all-encompassing, rugged utility of Project Nomad on a budget Linux PC, or the ultra-efficient, solar-friendly macOS route, you are securing a massive tactical advantage for your family. You are no longer reliant on fragile cell towers or vulnerable internet service providers to access critical medical, mechanical, and survival knowledge. Gather your hardware, download your models, and build your ultimate offline knowledge base today. Knowledge is power, but only if you can access it when the lights go out.
Learn grid-down tech strategies alongside our emergency preparedness guide. Review overall preparedness through our bug-out bag essentials. Build offline communication kits with our go-bag builder. Calculate tech supplies with our supply calculator. Master offline technology through our preparedness courses.
Frequently Asked Questions
Can you run AI models without internet?
Yes. Tools like Ollama and Project Nomad let you download and run large language models entirely on local hardware. Once model files are stored on your machine, no internet connection is needed. Project Nomad goes further by bundling offline Wikipedia, medical references, maps, and educational content alongside the AI.
What is the cheapest hardware for running local AI models?
For Linux with Project Nomad: a refurbished Dell OptiPlex or HP EliteDesk with an Intel i7 and 32GB RAM costs $150-250 on eBay. Add a used NVIDIA GTX 1070 for $80-120 for GPU acceleration. Total: around $230-370. For macOS: a used Mac Mini M1 with 16GB unified memory runs $250-300 and handles 7-8B models natively.
What is Project Nomad and why is it ideal for preppers?
Project Nomad is a free, open-source system that installs with a single command on Ubuntu or Debian Linux. It bundles GPU-accelerated local LLMs, the full offline Wikipedia, Khan Academy, medical references, survival guides, and OpenStreetMap into one package. Unlike alternatives like PrepperDisk ($199+) or Doom Box ($699), it runs on any PC you choose and costs nothing.
How much power does an offline AI system use?
A typical desktop running Project Nomad draws 65-120 watts under AI inference load. A Mac Mini M1 draws only 10-15 watts idle and 30-40 watts under load. Both are practical for solar panel and battery setups. The Mac Mini is especially efficient for off-grid scenarios where every watt counts.
Can I use a Mac for offline AI instead of Linux?
Yes, but with trade-offs. macOS supports Ollama, Open WebUI, and AnythingLLM for local AI and knowledge base functionality. However, Project Nomad - the most complete prepper-focused offline system - requires Linux. If you already own a Mac, the macOS route works well. For a dedicated prepper build from scratch, Linux with Project Nomad gives you more out of the box.